This gloriously flaky gluten-free pie crust recipe rivals a wheat crust! It's super flavorful thanks to whole food ingredients: sweet rice, oat, and millet flours plus flax or chia seed (no xanthan gum!). A couple of classical pastry techniques make it easy to work with and give it extra layers.
I'll show you how to use these ingredients and techniques to get the flakiest GF pie crust, plus how to shape and blind bake it for all your pie needs. Use it in sweet and savory pies, tarts, galettes, quiches and turnovers.
The recipe is adapted from my award-winning cookbook Alternative Baker: Reinventing Dessert with Gluten-Free Grains and Flours. You can learn more about baking with gluten-free flours in my gluten-free flours guide!
Looking for a flaky gluten-free pie crust that tastes like it was made with wheat flour? I've spent years developing a recipe that tastes and feels like a whole wheat pie crust – buttery, flaky, and full of flavor.
Here's why this recipe is (IMHO) the best gluten-free pie crust out there:
- It's super flaky and easy to work with. It can be rolled out, fluted, weaved, and crimped with ease.
- It's made from whole-grain gluten-free flours that add nutritional value and loads of flavor. As a bonus, you don't need to source a particular flour blend to make it!
- It's free of xanthan gum, which some folks are intolerant of (plus it just sounds icky!)
- You'll feel like a professional pastry chef while you make it! I'll show you a couple of classic pastry techniques that create layers upon layers of flaky goodness.
- It can easily be made dairy-free and vegan by using plant butter.
- You can use it to make pies, savory tarts, galettes, and quiche.
A Decade of Great Gluten-Free Pie
I first developed this gluten-free pie crust recipe in 2013 and I loved it so much, it inspired me to write an entire cookbook about baking with alternative flours and seasonal produce! I was eating a slice of a crumb-topped apple pie ala mode made with this crust, and I literally forgot that it was gluten free. I knew I needed to share it with the world!
This is *not* the simplest gf pie crust recipe out there. More conventional recipes rely on storebought gluten-free all-purpose flour blends that are loaded with starches and gums and don't have much nutritional value. They may be easy to make, but they tend to bake up pale, bland, and pasty.
My recipe starts with whole-grain gluten-free flours, enough starch to make the dough easy to work with, and flax or chia seed instead of any gums. It's one of the more advanced recipes in my book and on my site due to the number of flours and starches it uses (5) and the techniques it requires (fraisage and turns). But I've been making it over and over for the past ~10 years with no changes. It's very much worth the effort!
But don't take my word for it. Here are a few things readers have said over the years in the comments section below:
Seriously the best gf pie crust I’ve found. It’s the only pie crust recipe I use anymore!
I just made this crust last night and it was the best gf crust I’ve made yet. The texture was fantastic and the dough was easy to work with.
The crust was great! I even got a "this takes just like regular dough!" So flaky and crisp. Can't wait to try it again!
Singularly the best pie crust I have ever made.
Absolutely delicious! I used this recipe for two two-crust chicken pot pies, and the group I served them for loved them! One person commented that if this was how gluten-free tasted, then maybe they should go gluten free!
This pie crust is amazingly good. Buttery, nutty flavor; nearly as easy to handle as wheat dough; and a lovely fine flakey texture. I also appreciate the whole-grain ingredients, and the use of chia instead of gum.
You nailed this recipe!! It was perfectly buttery, flaky magic! I can’t get over how amazing it is! This will forever be my go to gf pastry dough!
I've recently added a few ingredient options to make this pie crust recipe more accessible (such as using pre-ground flax seed instead of having to grind your own chia seed). I've updated the post with beautiful process photos that Sarah helped me shoot for my book.
And I've shared some of my favorite pie, tart, galette, and quiche recipes that you can make with this crust. You can find all my favorite gluten-free pie recipes here!
GF Pie Crust Video
My friends Nadia and Rob made a dreamy video of this pie crust (the teff flour version used for a plum frangipane galette from my book). You can see how the dough comes together between 7 minutes and 12 minutes in the video!
Ingredients & Substitution Suggestions
Flours
I've tested this recipe with many different combinations of gluten-free flours and starches and this combination makes the flakiest, easy to work crust. I've added substitution suggestions in case of dietary restrictions or trouble sourcing ingredients. Substitute by weight for best results!
I use Bob's Red Mill flours but any brand should work. You can find these at most well-stocked grocers.
- Sweet rice flour adds stickiness and a neutral flavor.
- Sub any GF AP blend (Bob's Red Mill 1 to 1 is recommended as it uses sweet rice flour as its base).
- Oat flour adds tenderness and a creamy / nutty flavor.
- Sub sorghum flour.
- Millet flour adds a buttery flavor and keeps the crust delicate.
- Sub sorghum flour, or for a stronger flavor use buckwheat or teff flour.
- Cornstarch makes the crust shatteringly crisp.
- Sub more tapioca flour (though cornstarch works best!)
- Tapioca flour makes the dough extensible (aka stretchy) so it's easy to work with.
- Sub arrowroot flour.
Other Ingredients
- Butter makes the crust rich and tender. For best results, use a high-quality European-style butter with a high fat content such as Kerrygold, Vermont Creamery, or Straus.
- For a dairy-free & vegan pie crust, use a good plant-based butter such as Miyoko's cultured unsalted butter. Or get the recipe for a version made with coconut oil in my book!
- Ground flax seed or chia seed add stickiness that make the dough smooth and pliable. For the most attractive crust, use golden flax or white chia seed. These take the place of the usual xanthan gum that's in most recipes.
- Sub 1/2 teaspoon xanthan gum.
- Salt and a little sugar sharpen the flavors and promote browning. No need to omit the sugar if using this in a savory recipe; it just enhances the flavor and doesn't add much sweetness.
- Sub maple sugar or coconut sugar.
- Vinegar or lemon juice add acidity that keep the dough tender and prevent it from shrinking as it bakes.
- Yogurt or buttermilk can also be used to add acidity – these make extra lovely dough since they add a little protein as well!
- Ice water brings the dough together.
- Sub chilled water.
What Makes this Pie Crust so Flaky?
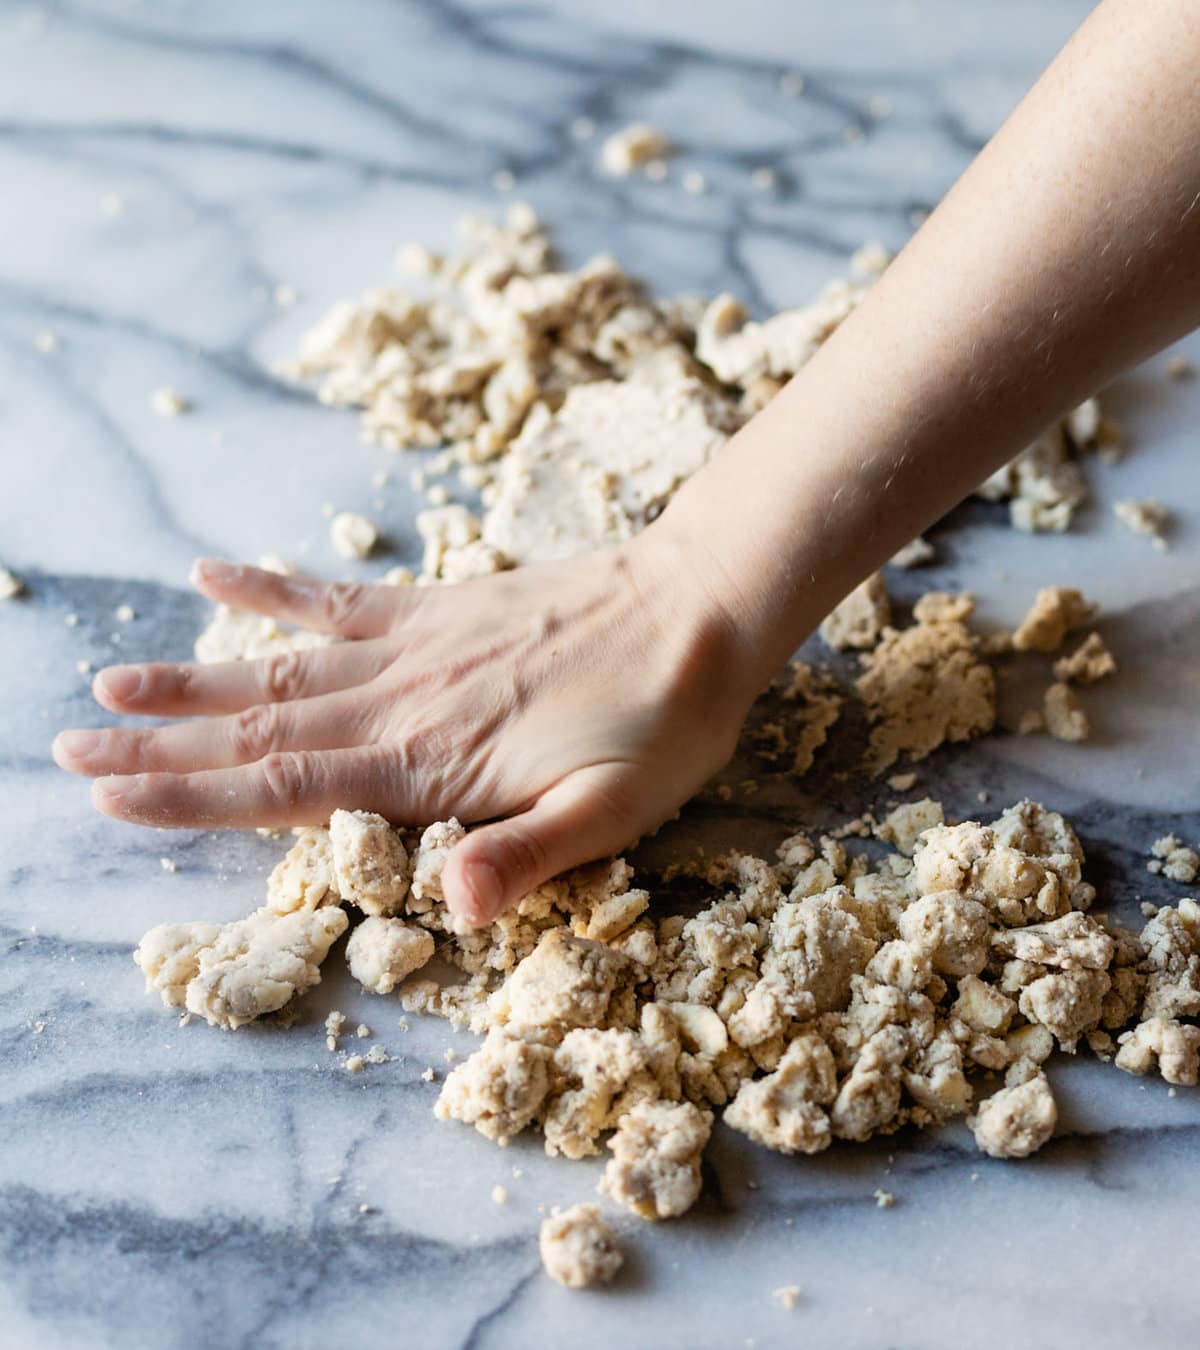
Unlike most gluten-free pie crust recipes out there, my version uses two techniques to get big, tender flakes similar to a rough puff pastry.
- Fraisage: scraping portions of dough along the counter
- Turns: rolling the dough out and folding it up over itself
When we leave big chunks of cold butter in the dough, these methods form the butter into long, wide sheets encased within multiple layers of dough.
When the cold dough hits the heat of the oven, the butter sheets let off steam which raise the layer of dough above it.
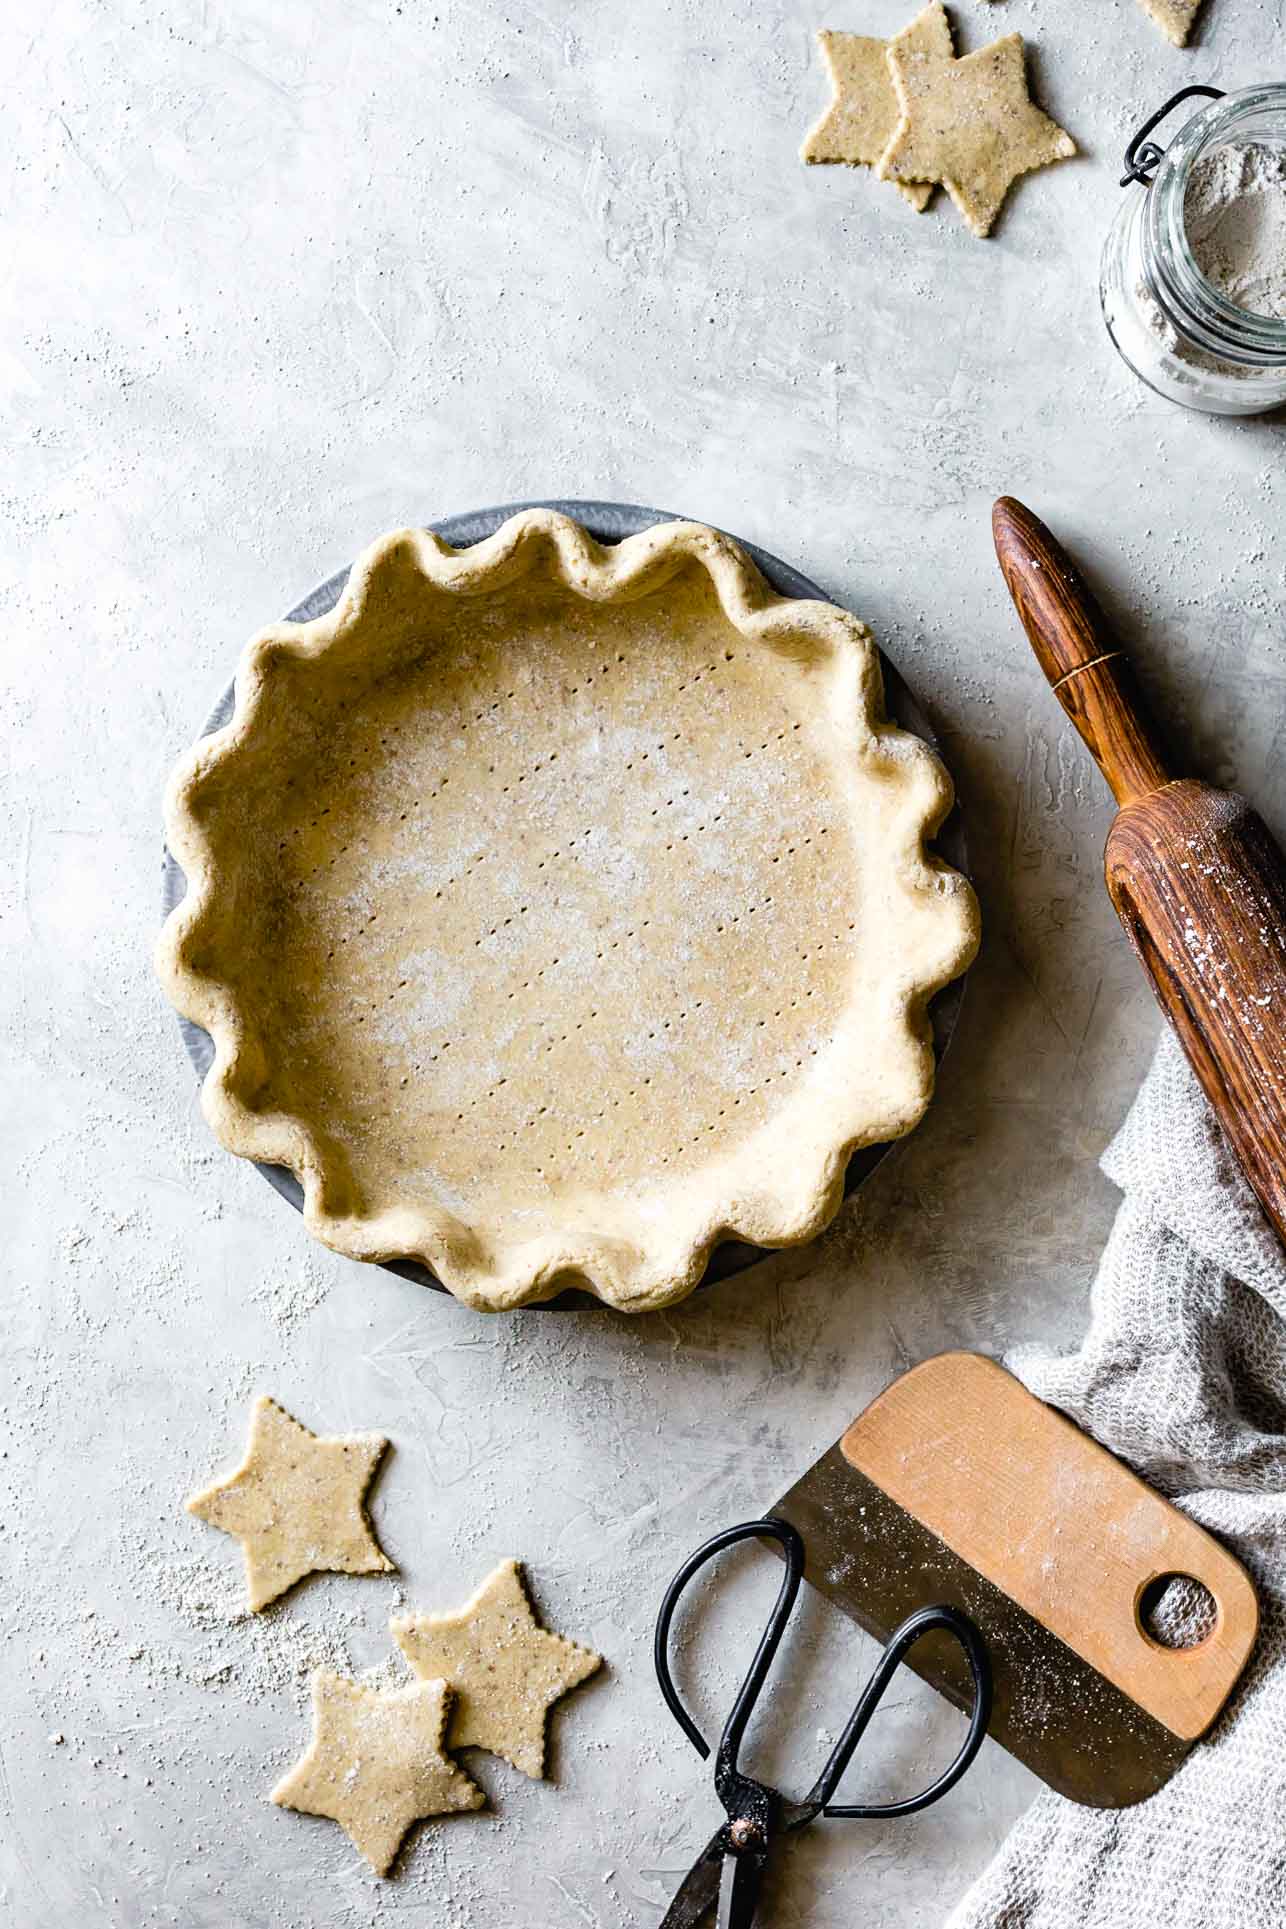
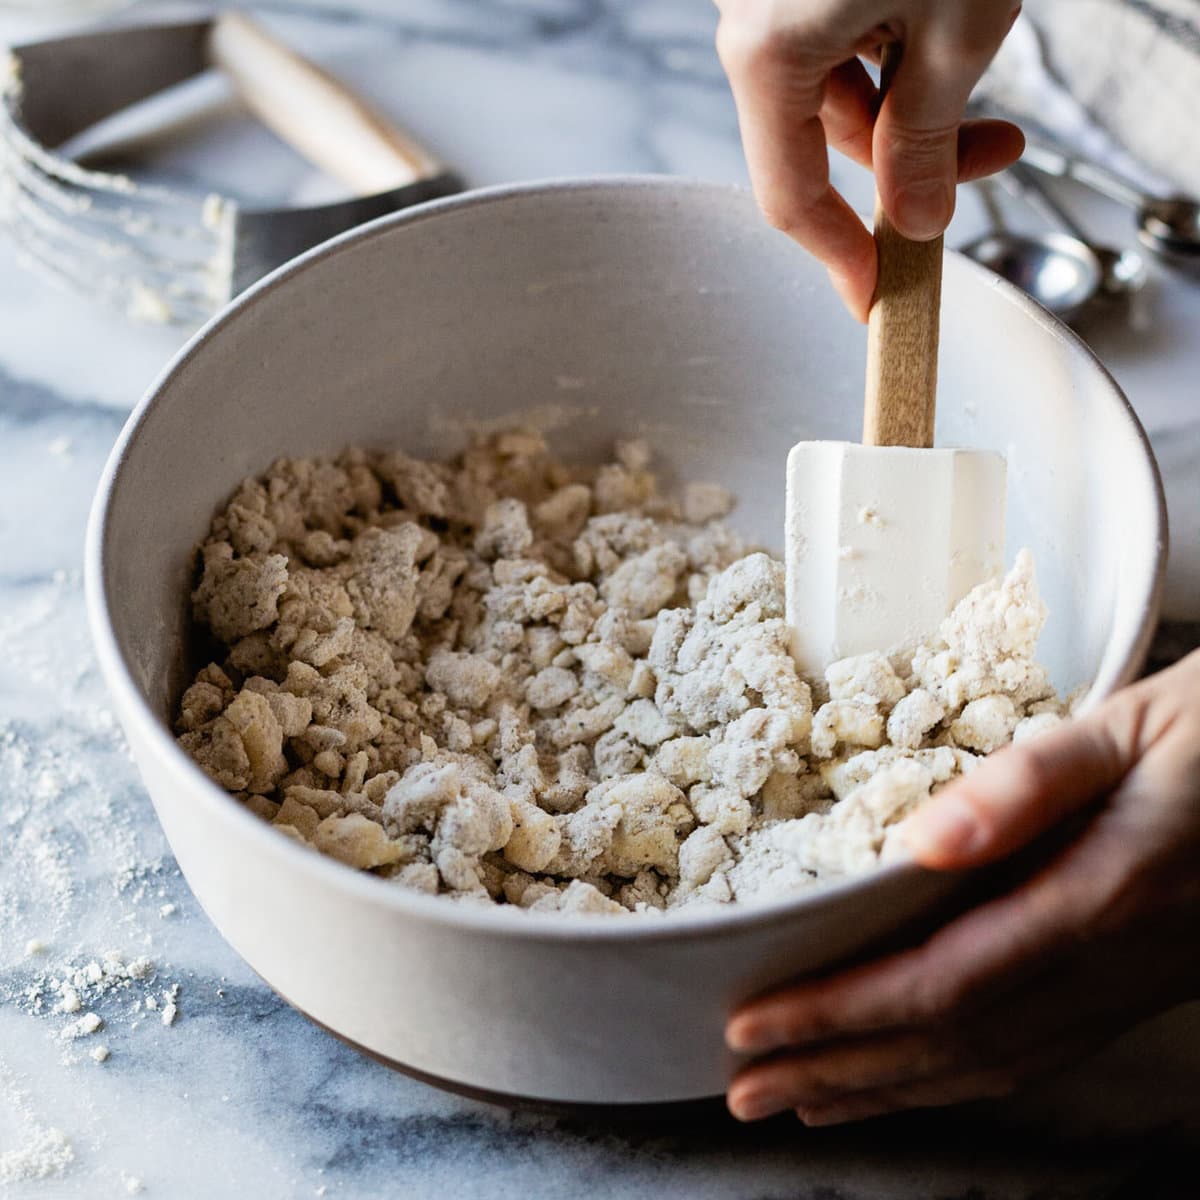
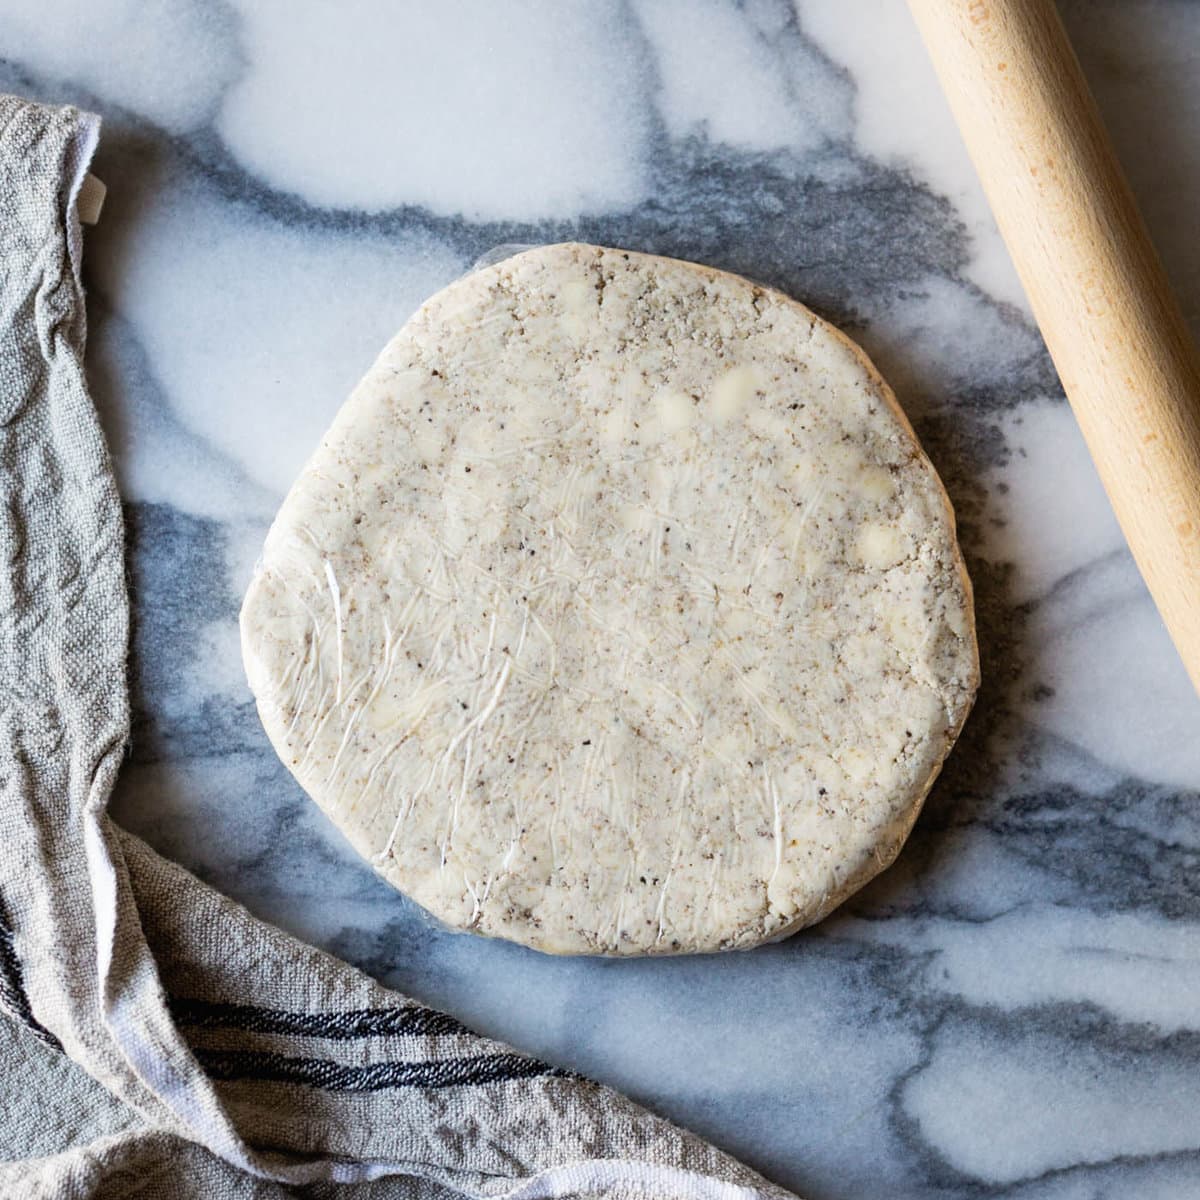
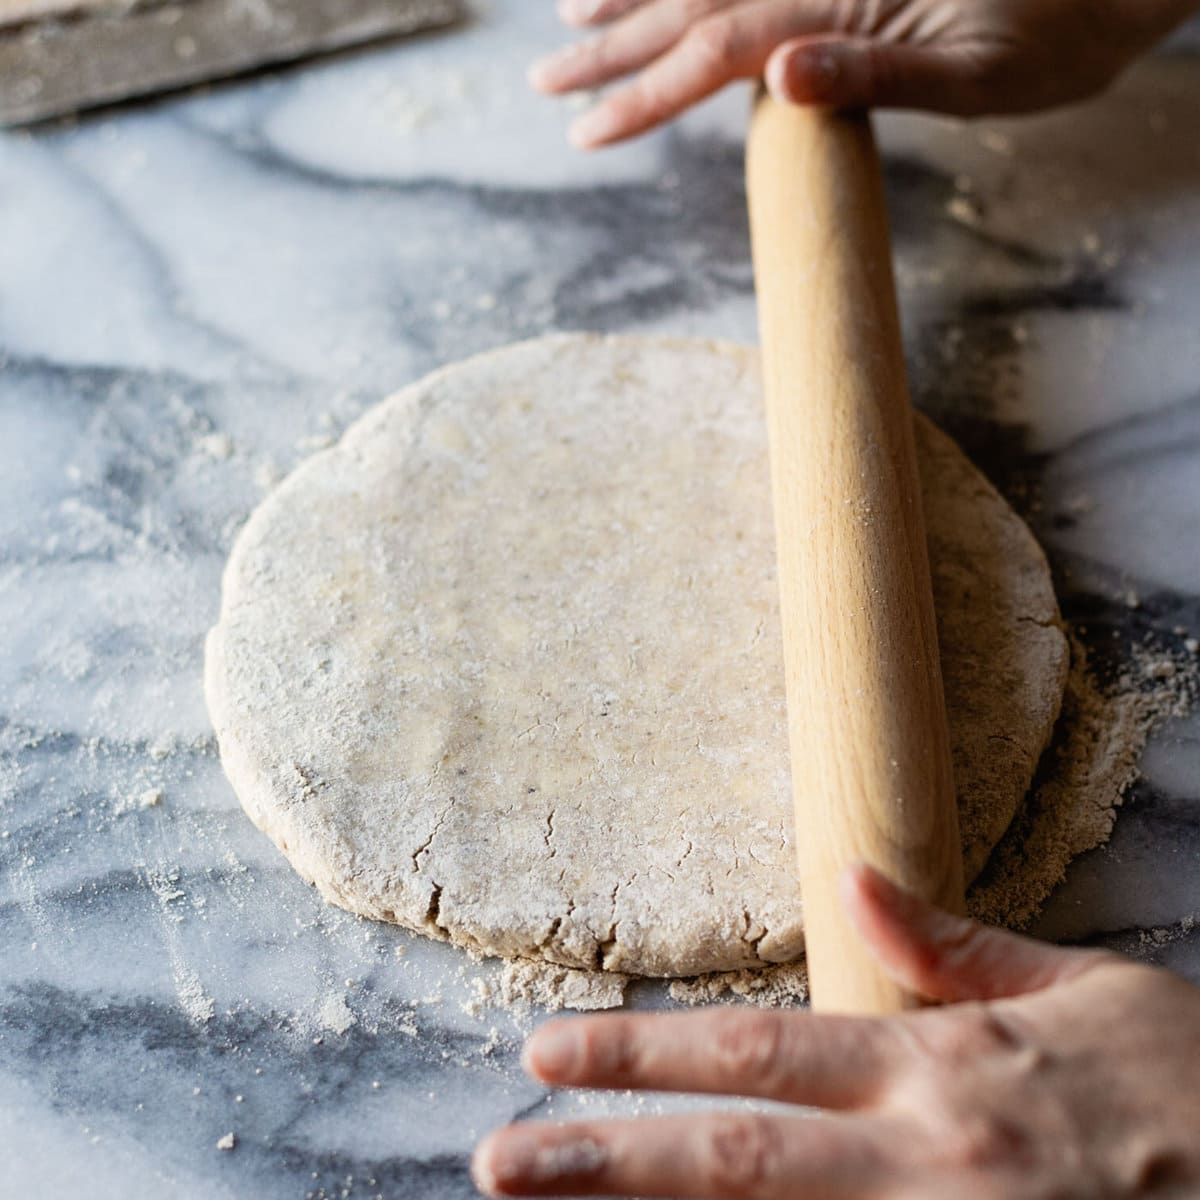
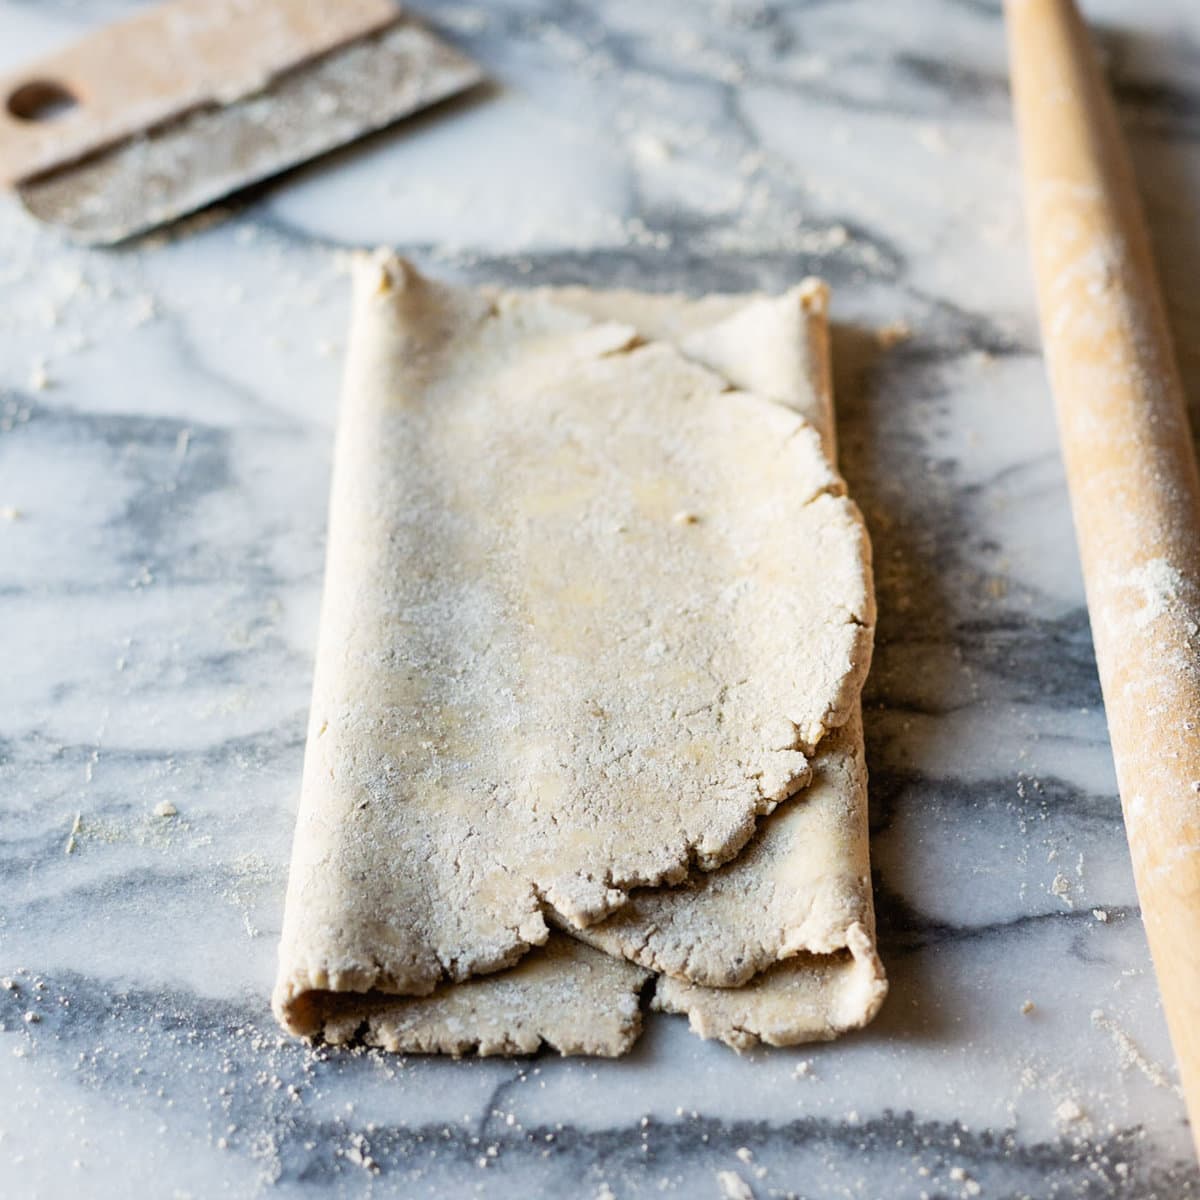
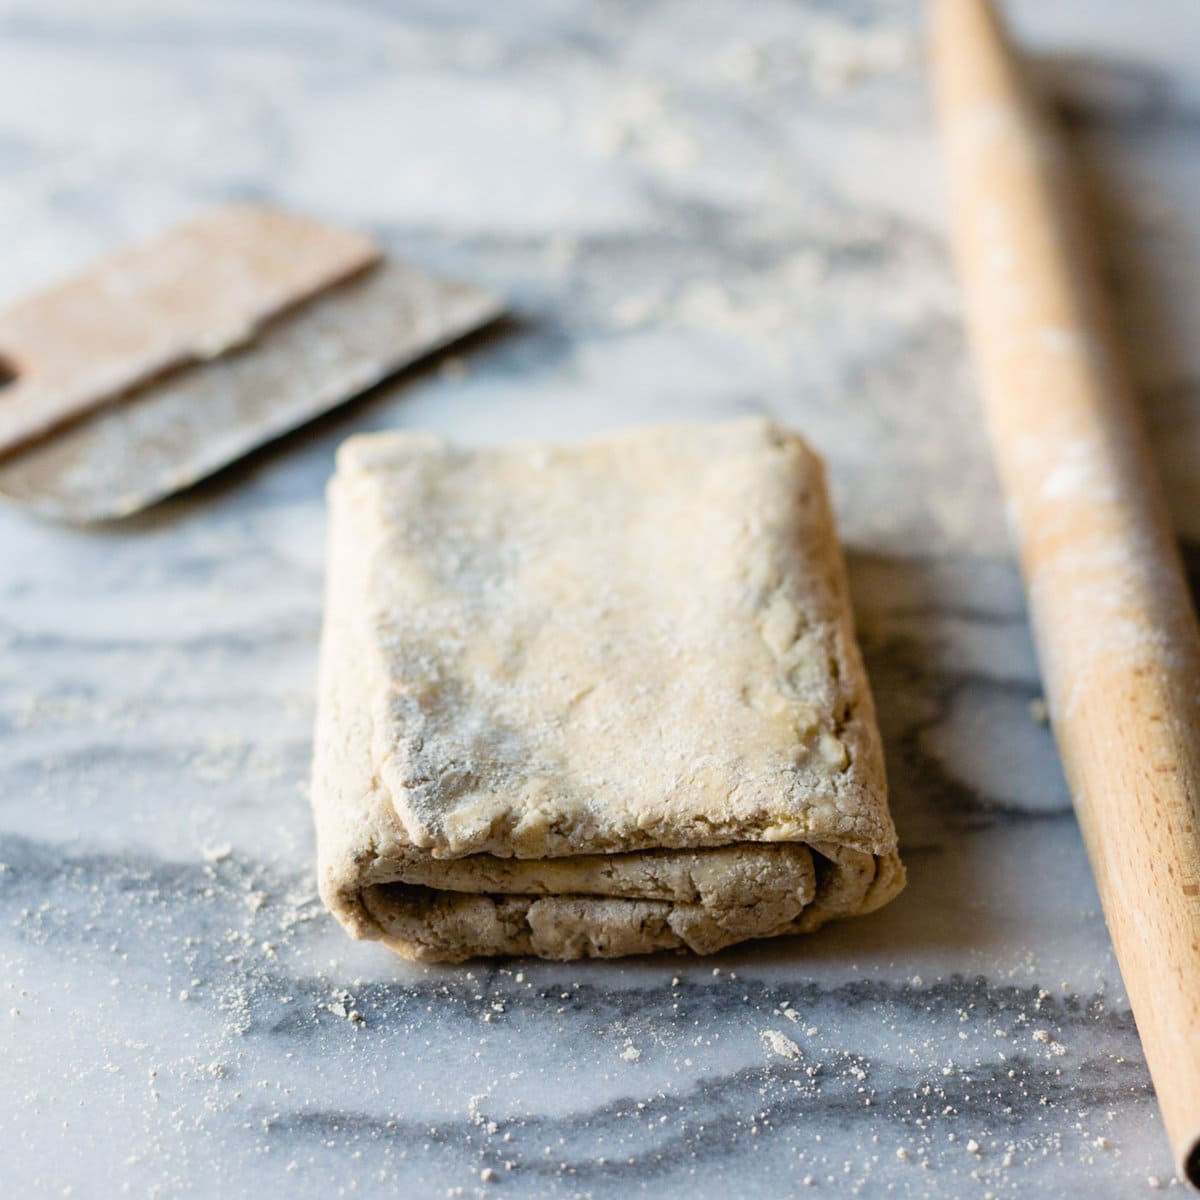
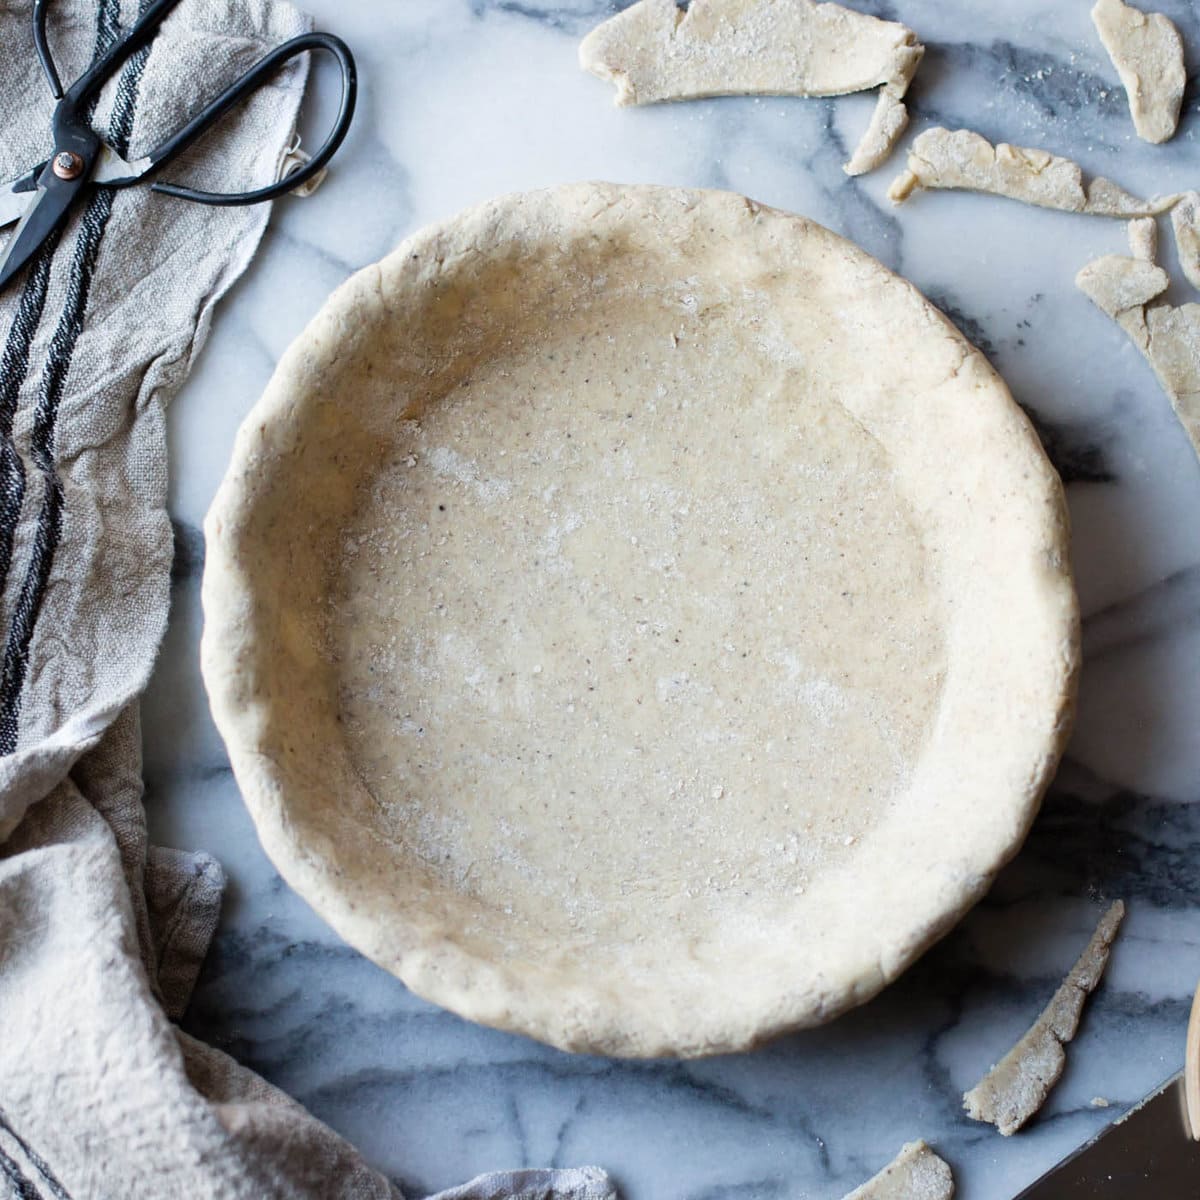
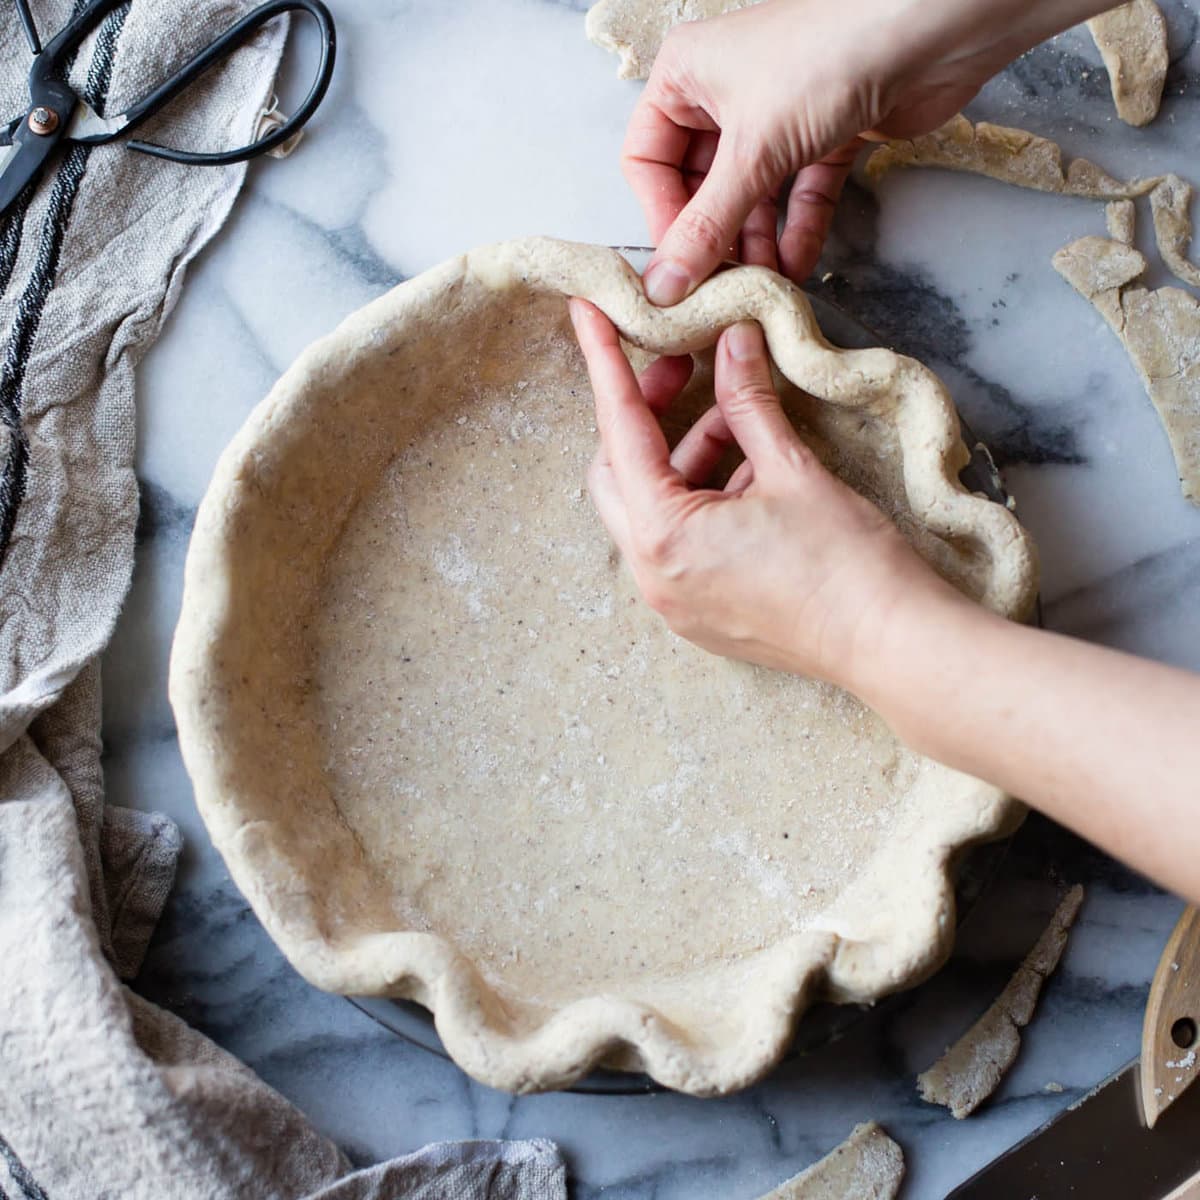
The process is downright magical and will make you feel like a badass pro baker when you pull your masterpiece from the oven. The photos below show these methods in action!
How to Make a Gloriously Flaky Gluten-Free Pie Crust
- This recipe makes enough dough for a single crust 9-inch pie or a 10-inch tart or galette. Double the recipe if you're making a double-crust pie such as this apple pie with a cut-out crust or a lattice pie.
- This recipe takes several hours to complete, but much of the time is inactive chilling time (for both you and the dough!)
- If you can, make the dough a day ahead. It gets smoother and more workable as the flours absorb moisture in the fridge. It can also be popped in a freezer-safe bag and frozen for up to a year.
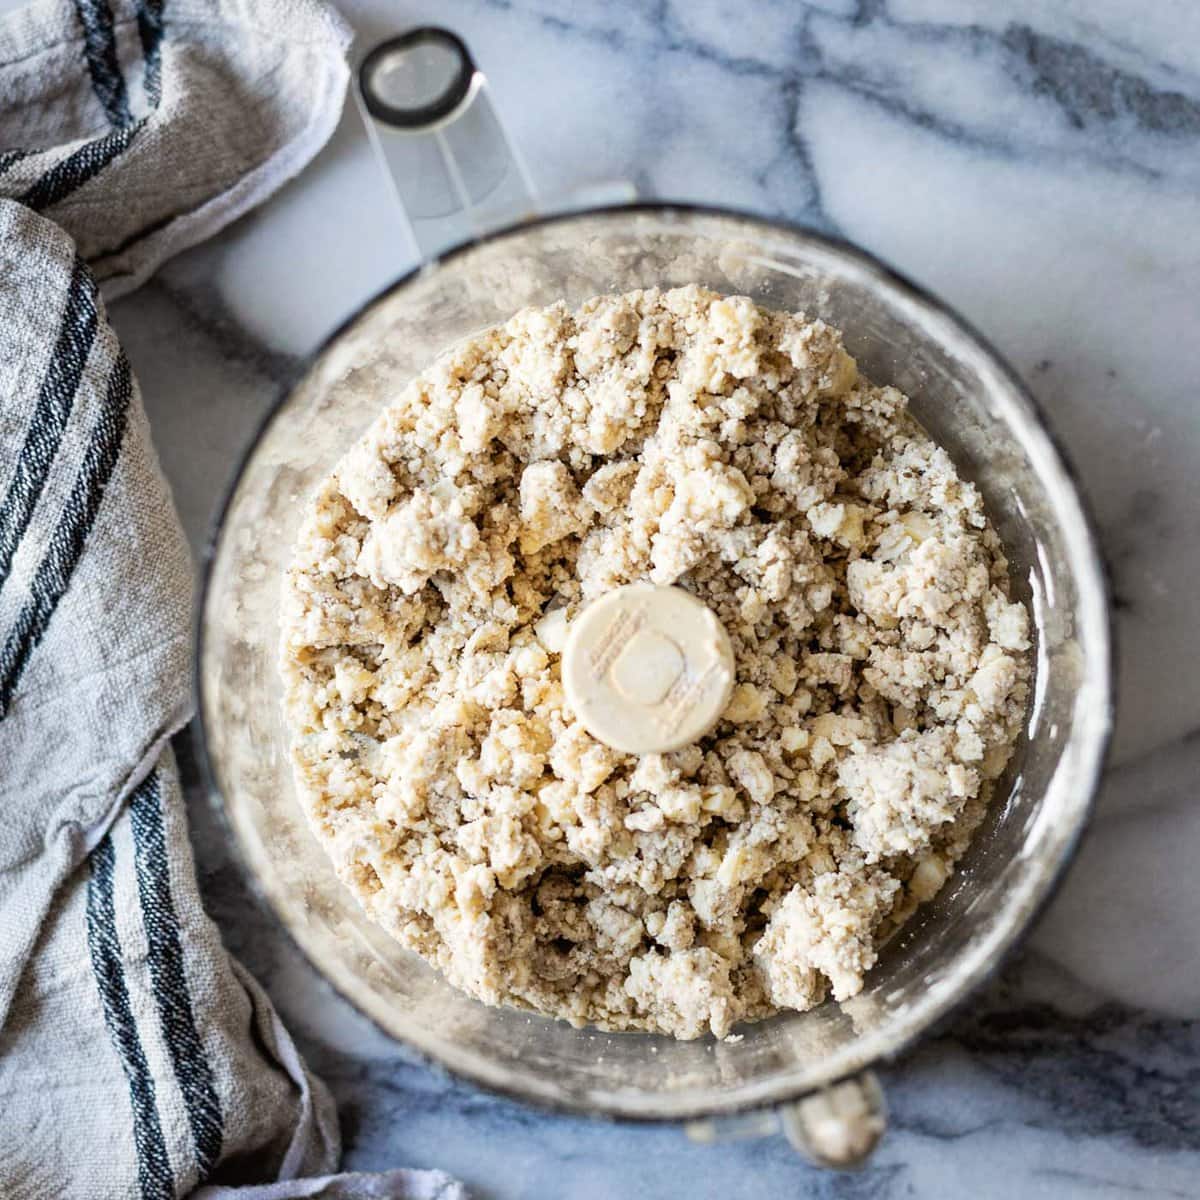
- I've shared two mixing methods for the dough: by hand and in a food processor. I usually use the food processor method, which makes the dough more smooth and pliable. But by hand, you have more control over the dough, which is best when you're just starting out, and it tends to be flakier since the butter can stay chunkier.
Method: By Hand
Fraisage
Method: Food Processor
Step 2: Open the feed tube and pour in the ice water mixture in a slow and steady stream as you pulse the mixer. Squeeze the dough; it should hold together easily without feeling overly wet or sticky, and there should be large pea-sized butter pieces throughout.
Method: Turn the Dough
- Turning the dough (i.e. rolling it out and folding it over itself) is the method used to make croissants, puff pastry, and danish pastry.
- Here it builds extra flaky layers and it also makes the dough more smooth, pliable, and easy to work.
Shape the GF Pie Crust
Blind-Baking
Blind-baking a pie crust means baking it for a time before you've added any filling. This method works best for custard-based pies where the filling takes less time to bake than the crust, such as quiche or pumpkin pie.
Step 1: Place a piece of parchment paper in the chilled crust and fill to the top with pie weights or dried beans. Place the crust on a rimmed baking sheet (to make it easy to maneuver and catch any buttery drips) and bake in the lower third of the oven at 400ºF.
Step 2: Bake the crust for 15-30 minutes (shorter for a metal pan, longer for a glass pan), until the crust will hold its shape when you lift off the parchment. Carefully remove the weights and parchment and bake until the bottom is dry and lightly golden, about 8-12 minutes longer (for a parbaked crust) or until deeply golden, 15-20 minutes (for a fully baked crust).
Step 3: If there are any holes or tears in the dough, use the saved scraps of dough to patch them before adding the filling, baking for a few more minutes post-patching.
TBG Tip: To keep the crust extra-crisp, brush the hot crust with a little bit of beaten egg white, then return to the oven for a minute or two. This creates a barrier between crust and filling, keeping the crust crisp for a couple of days after baking.
Congratulations, you're now ready to fill and bake your gluten-free pie crust!
Allergy-Friendly Variations
Gluten-Free Dairy-Free Pie Crust / Gluten-Free Vegan Pie Crust
Use vegan butter in place of the butter, and decrease the salt if the butter is salty. I like Miyoko's cultured vegan butter the best. Or get the recipe for a version made with coconut oil in my book!
Grain-Free / Paleo Pie Crust
Get the recipe here for a paleo crust made with almond and cassava flours!
How to use your perfect gluten-free pie crust
Some of my favorite pie recipes wrapped up in this buttery gf pie crust goodness!
Sweet
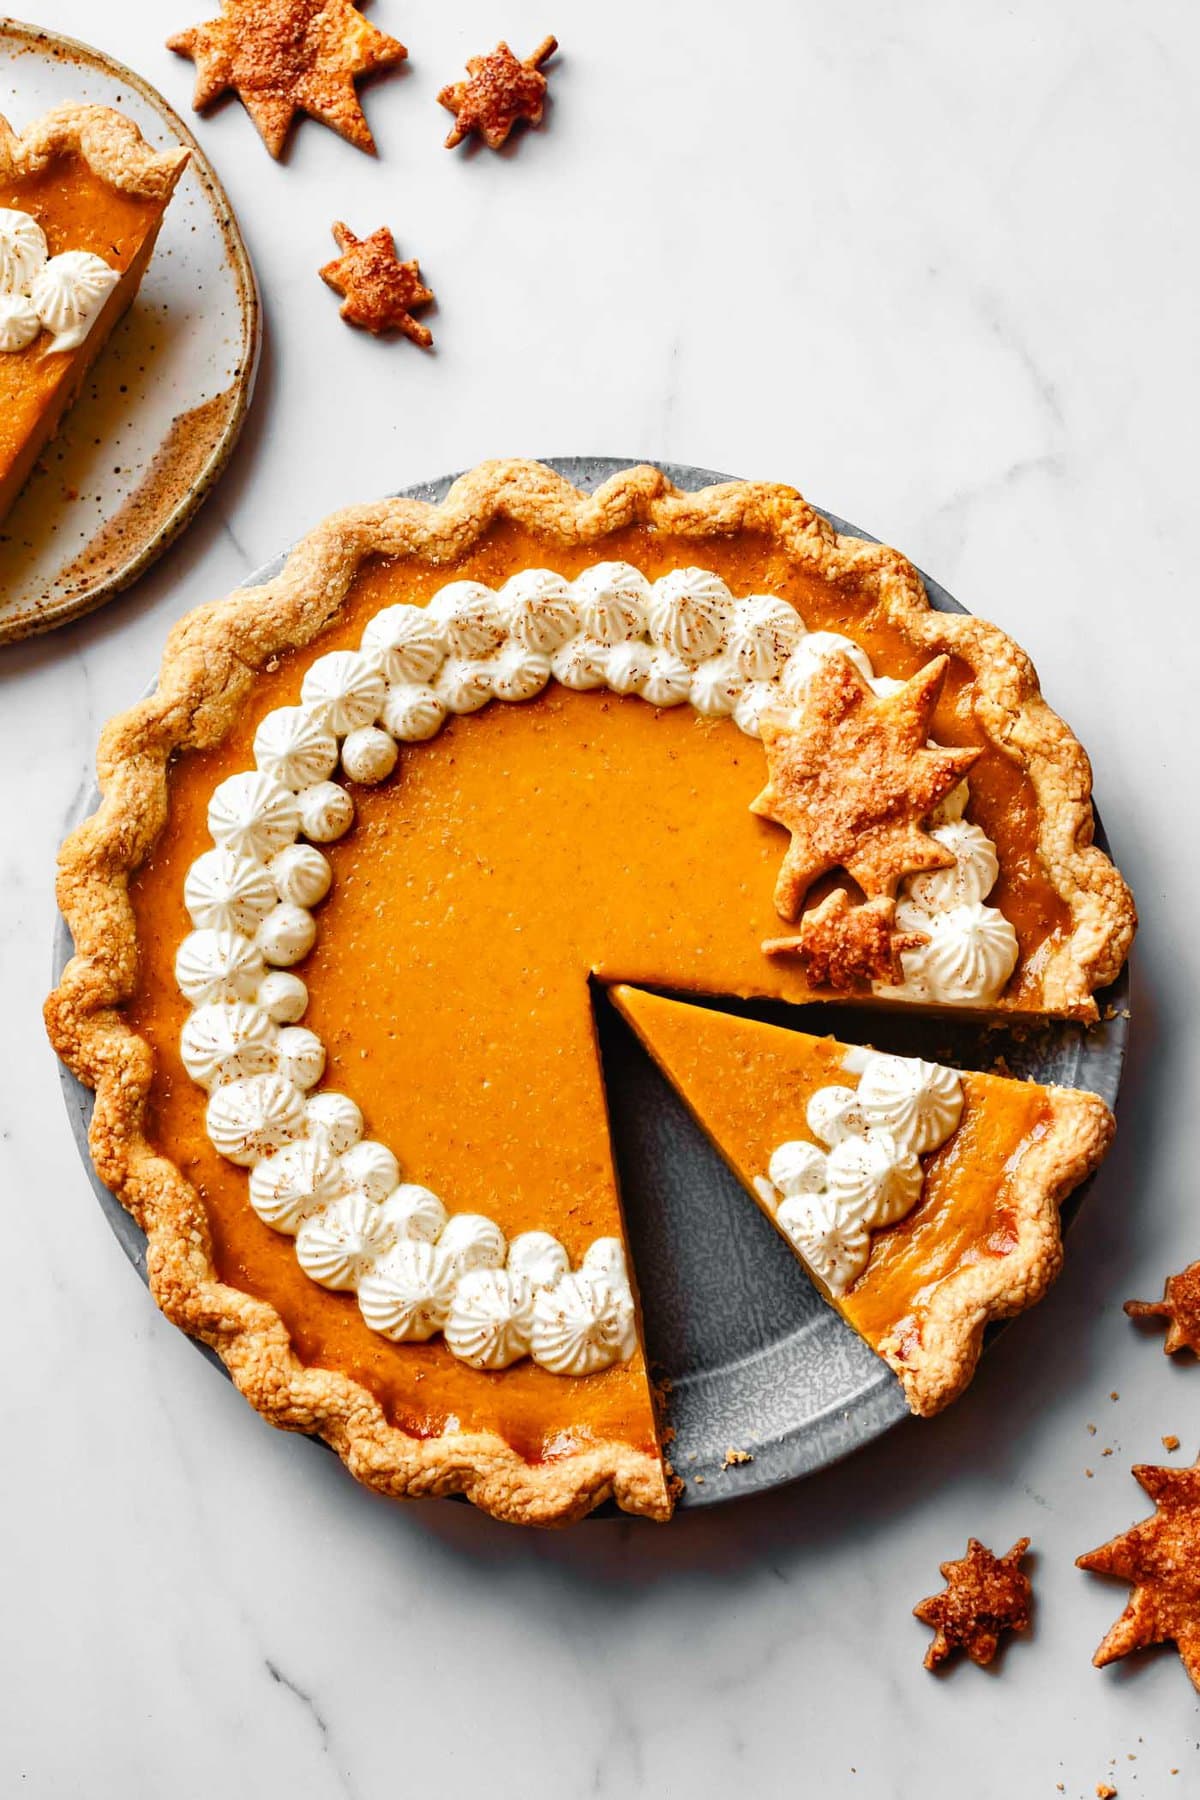
- Gluten-Free Pumpkin Pie – ultra-creamy pumpkin custard filling made with 10 ingredients
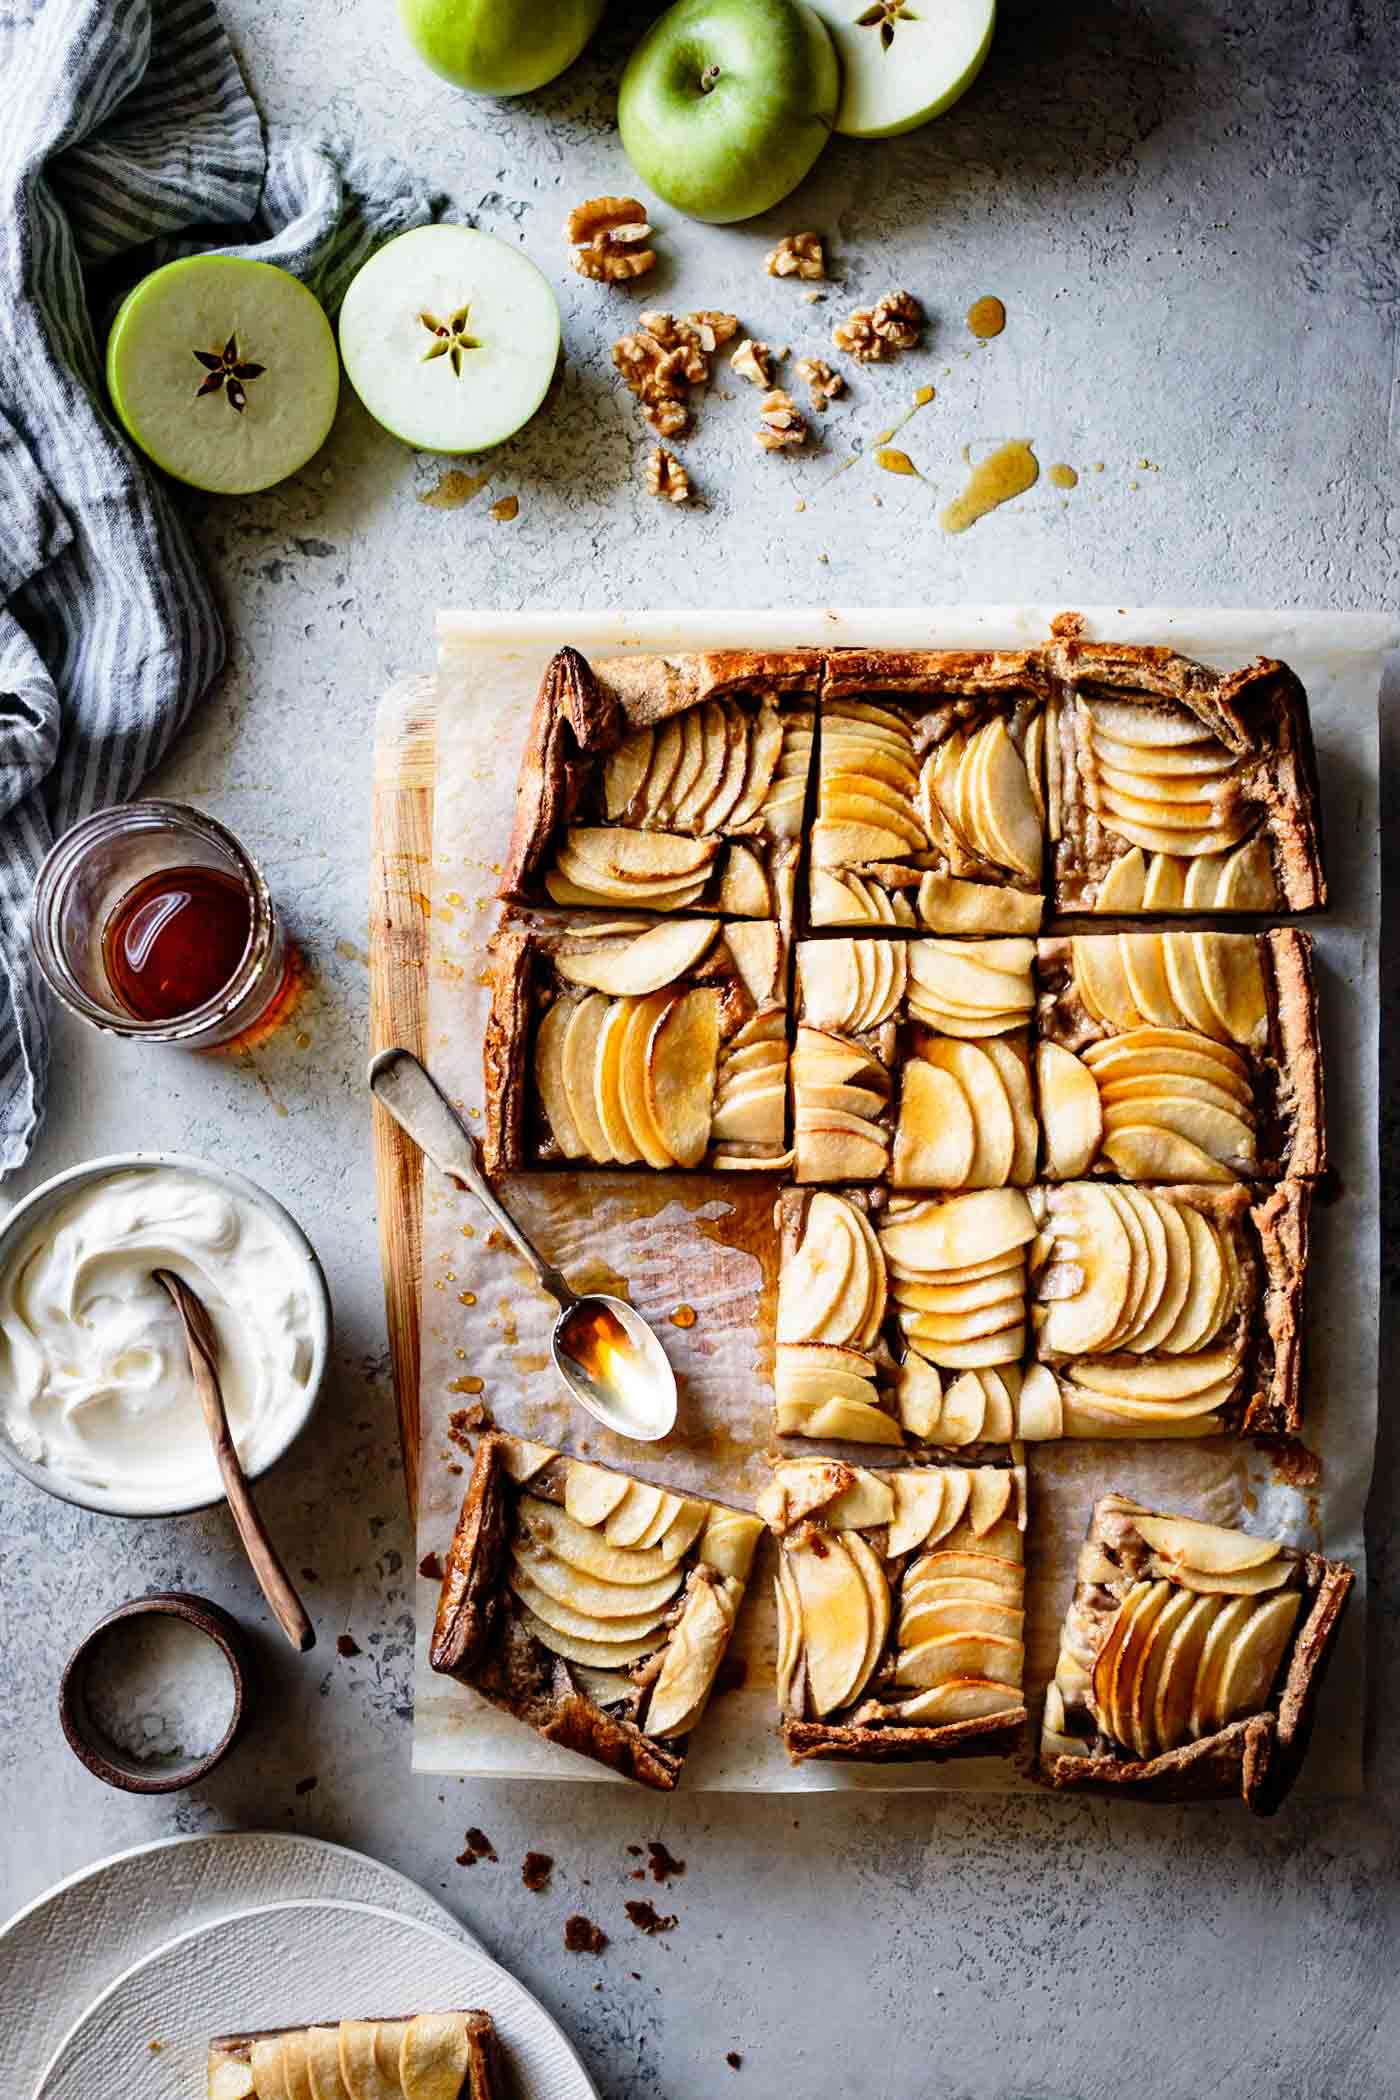
- Apple Galette with Maple Walnut Frangipane – flaky buckwheat crust folded around nutty frangipane and topped with thinly sliced apples. Rustic & fancy!
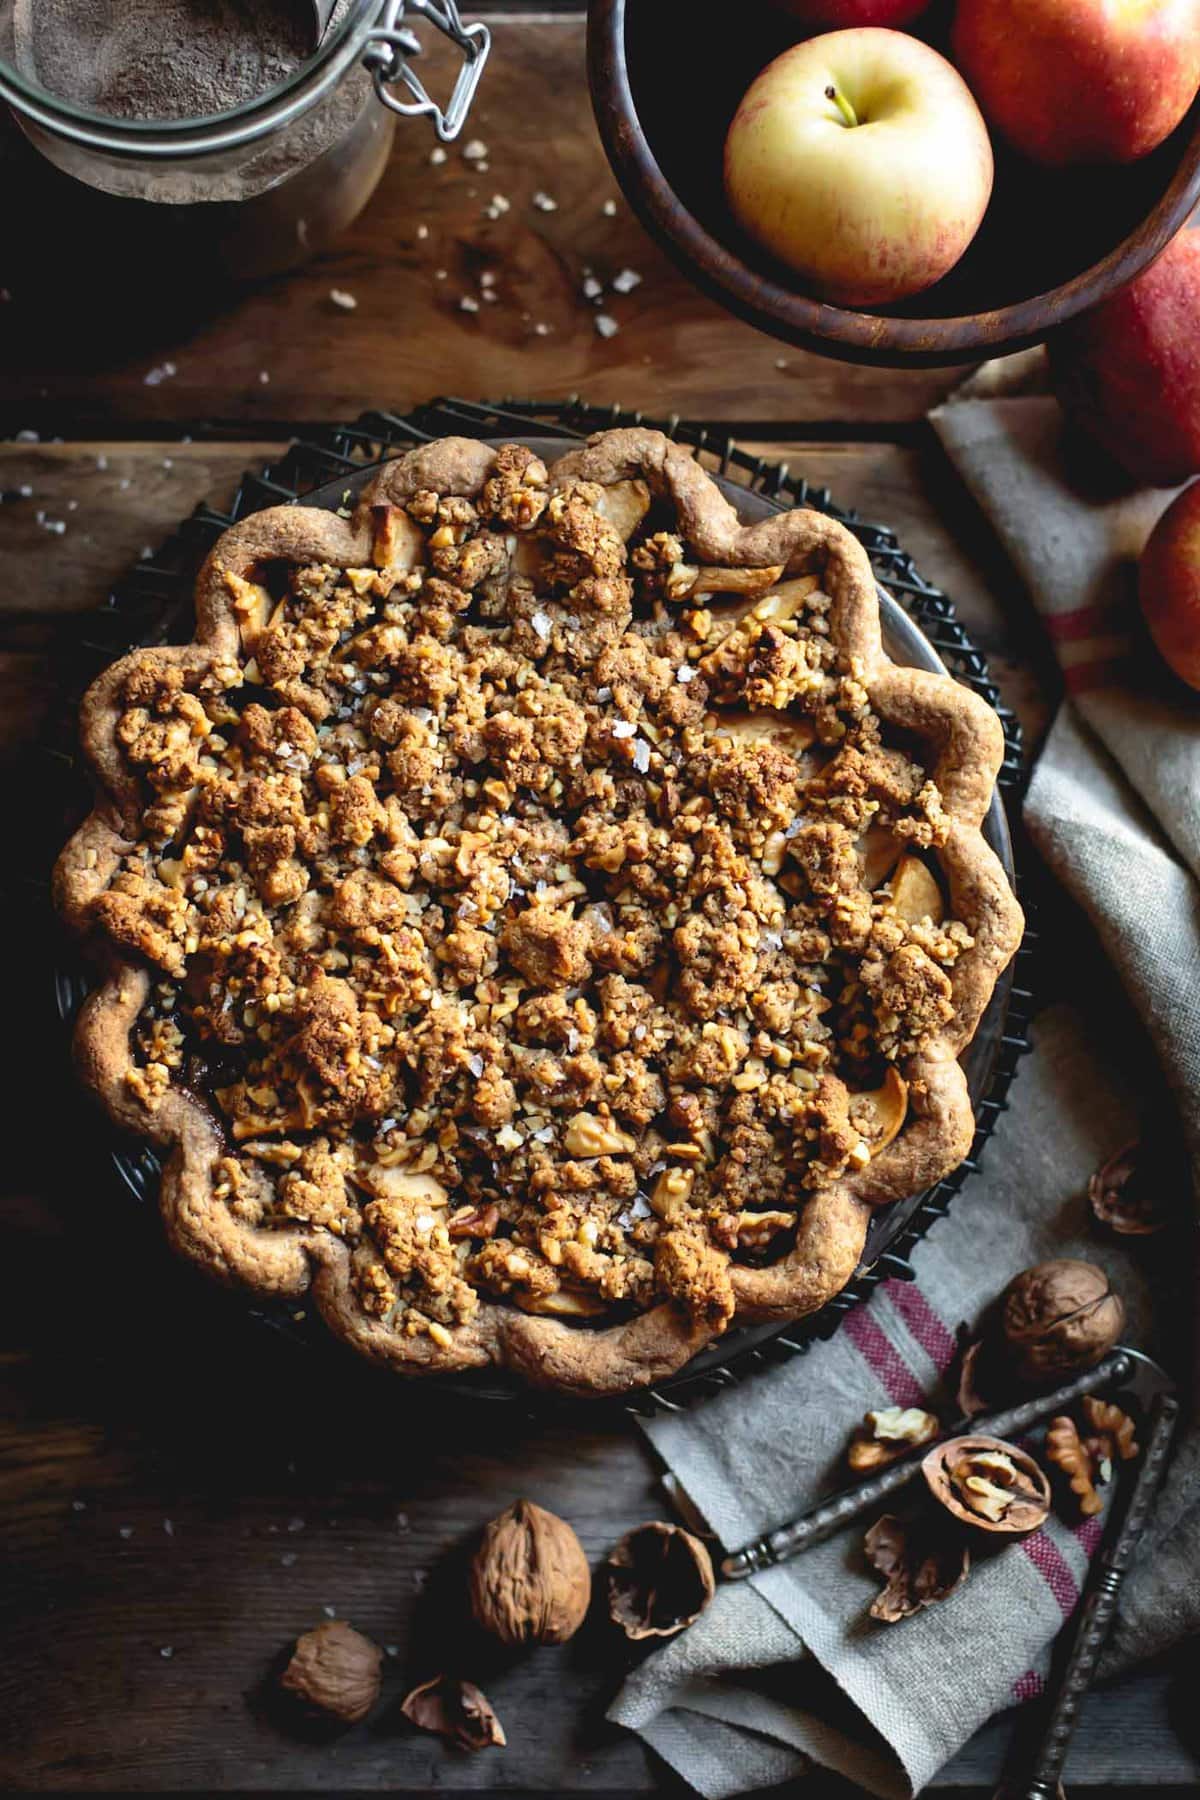
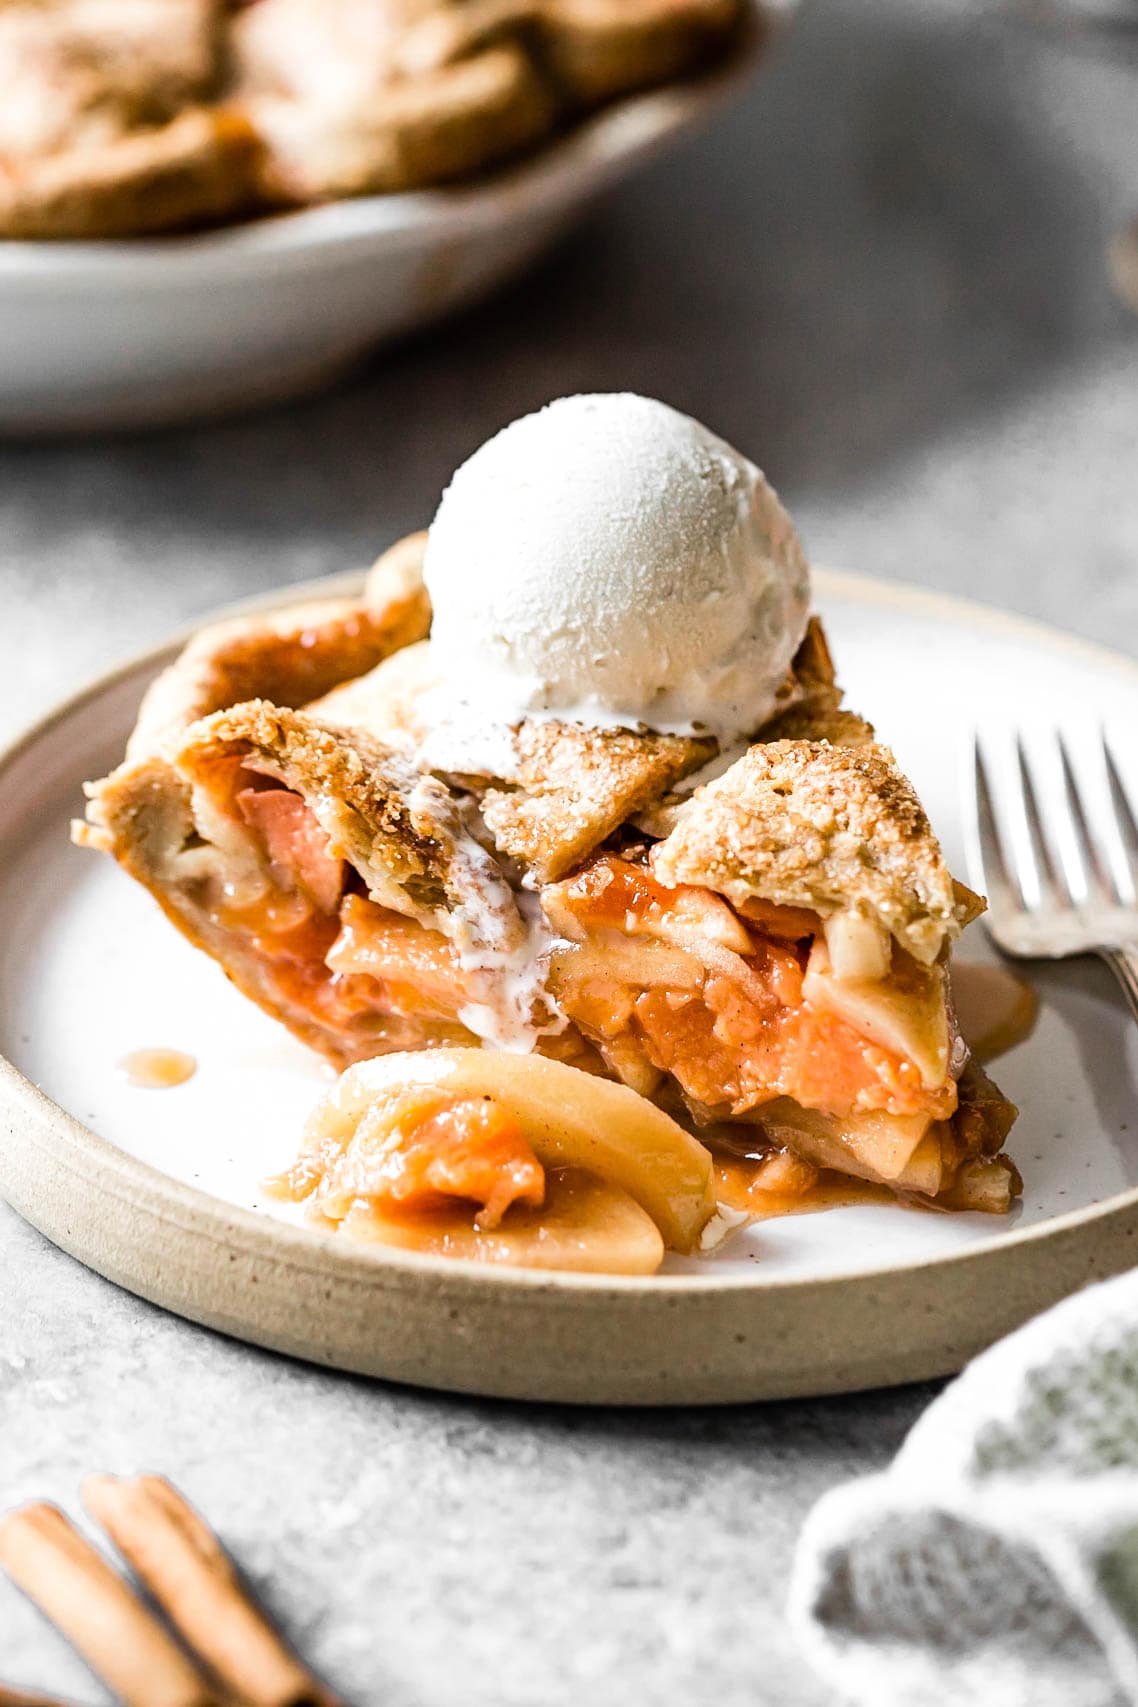
- Maple-Sweetened Apple Pie – perfectly juicy apples sweetened with maple and kissed with spices in a pretty cut-out crust.
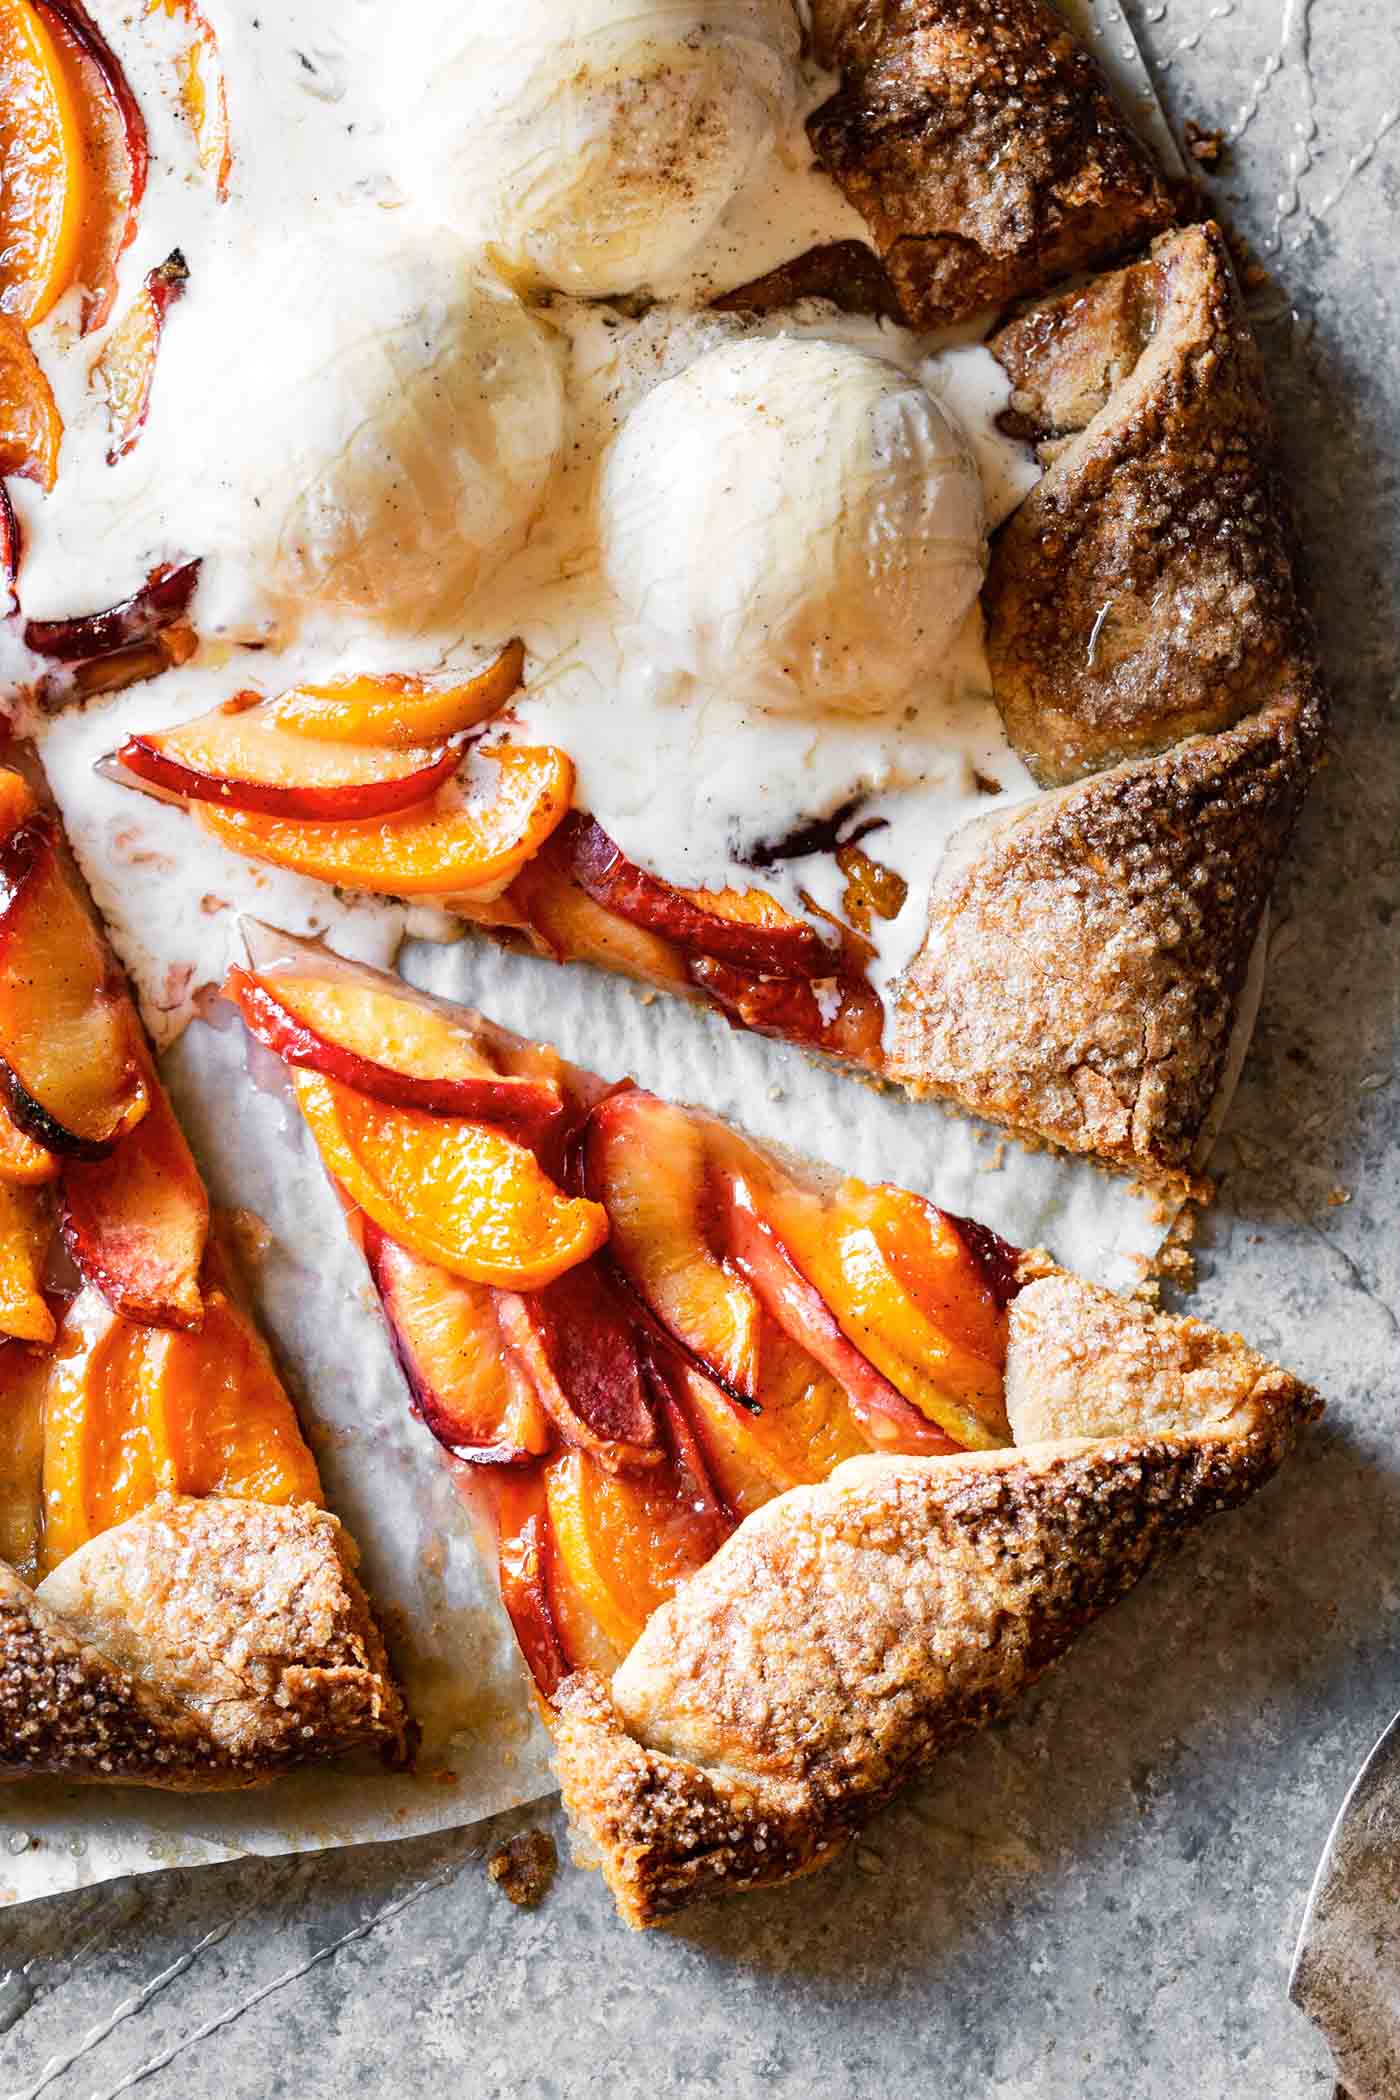
- Stone Fruit Galette – flaky pastry wraps slices of summer stone fruit flavored with honey and cardamom.
- Gluten-Free Cherry Pie – make this with fresh or frozen cherries! A slug of whiskey and pinch of spice make the flavors pop.
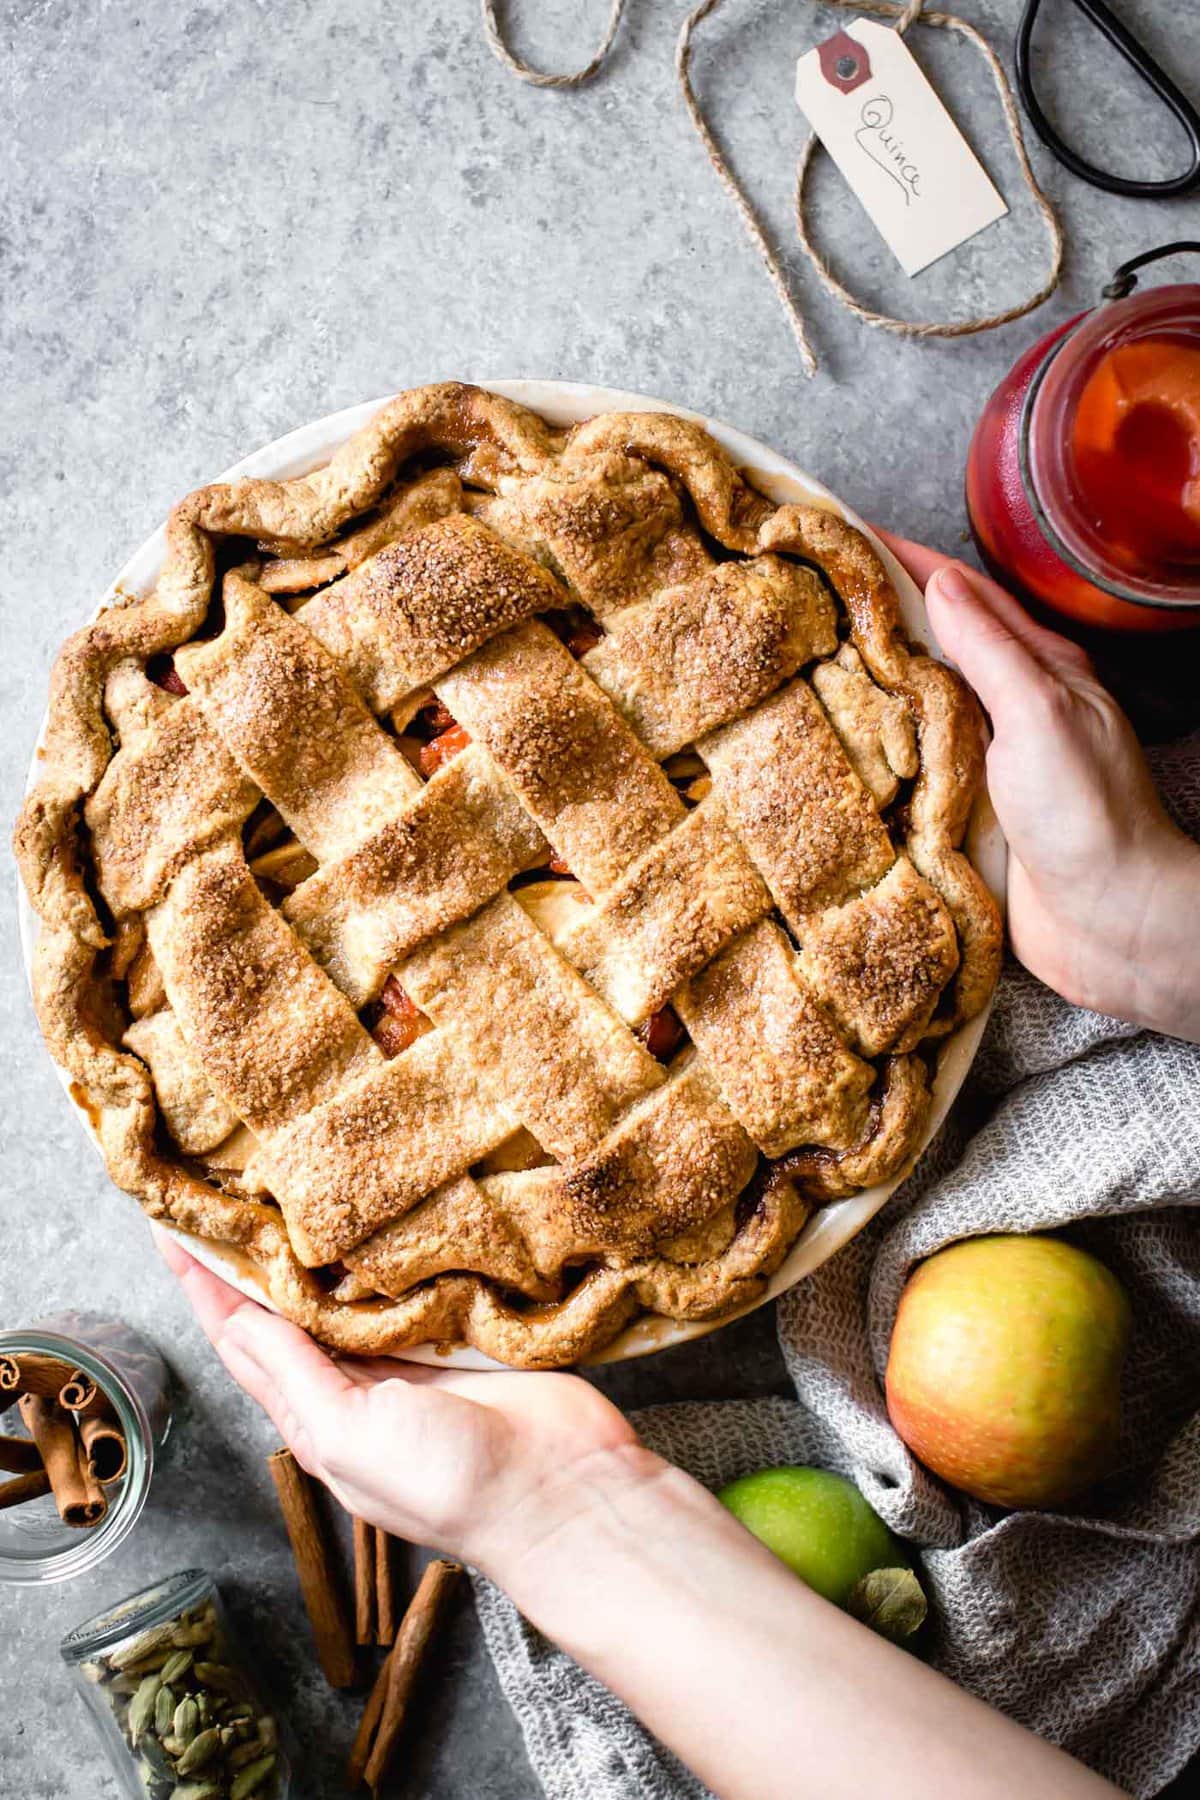
- Apple Quince Pie – double your pome pleasure with spiced poached quince and tangy apples, all commingling under a lattice crust.
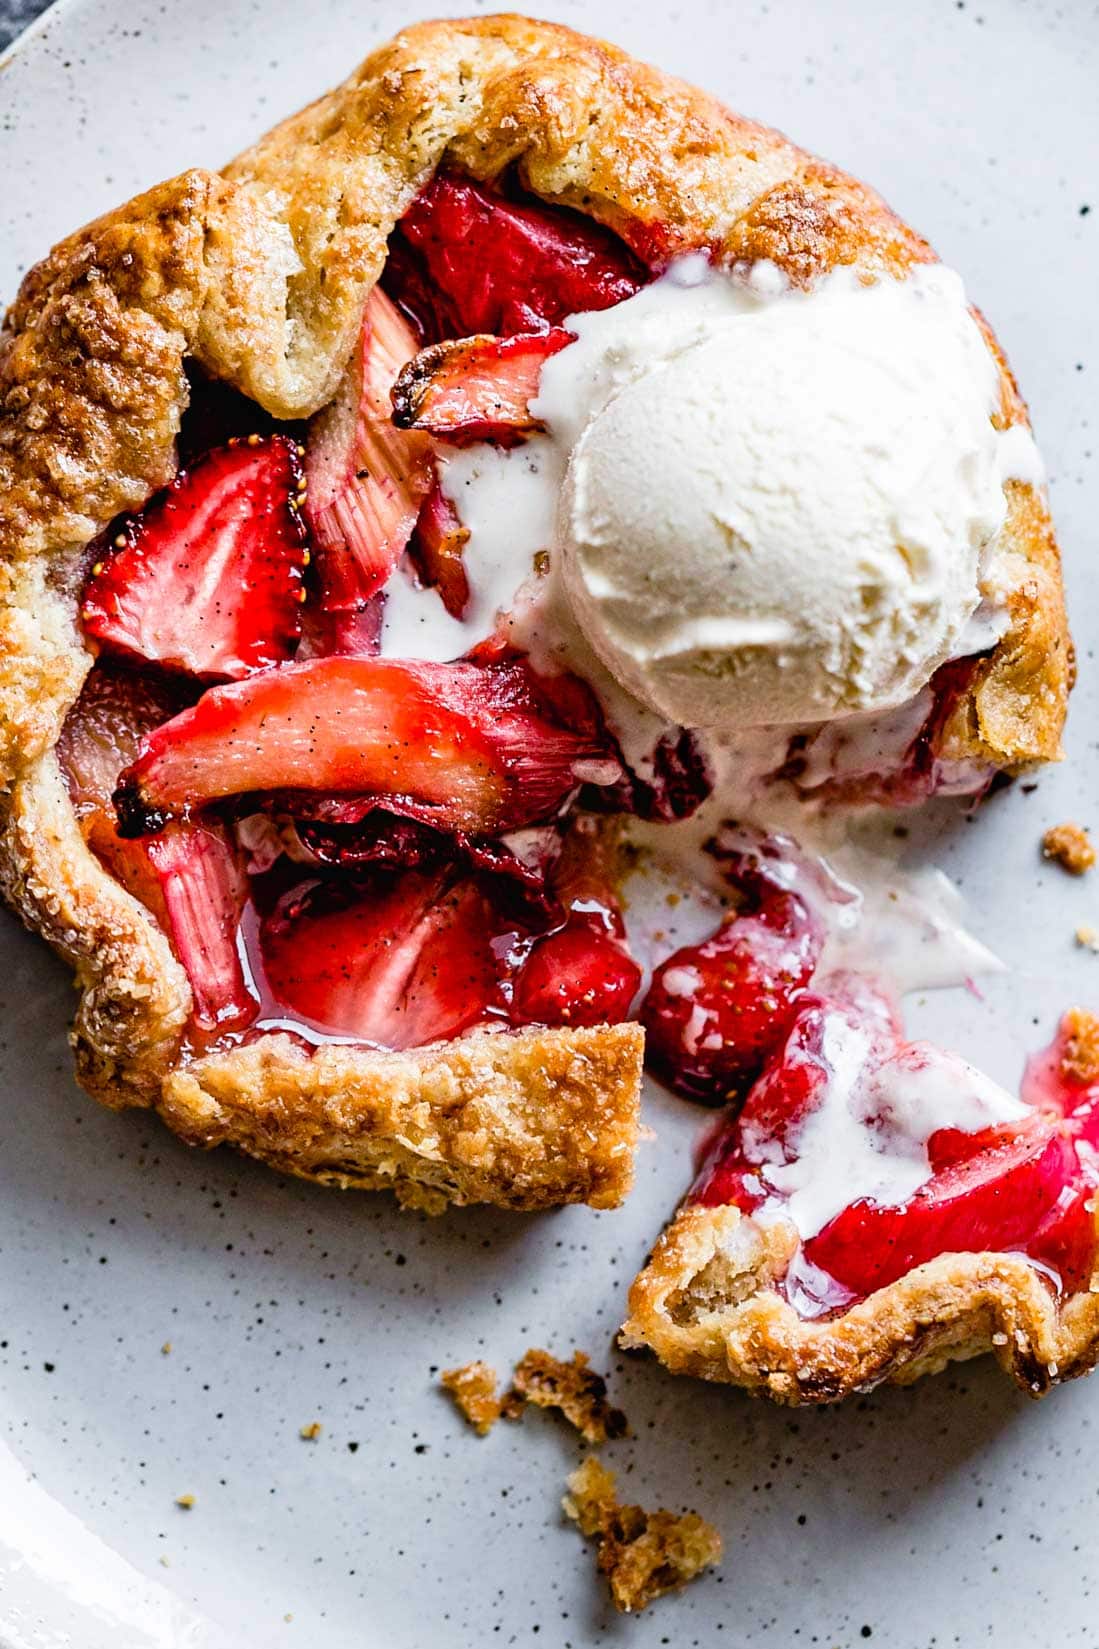
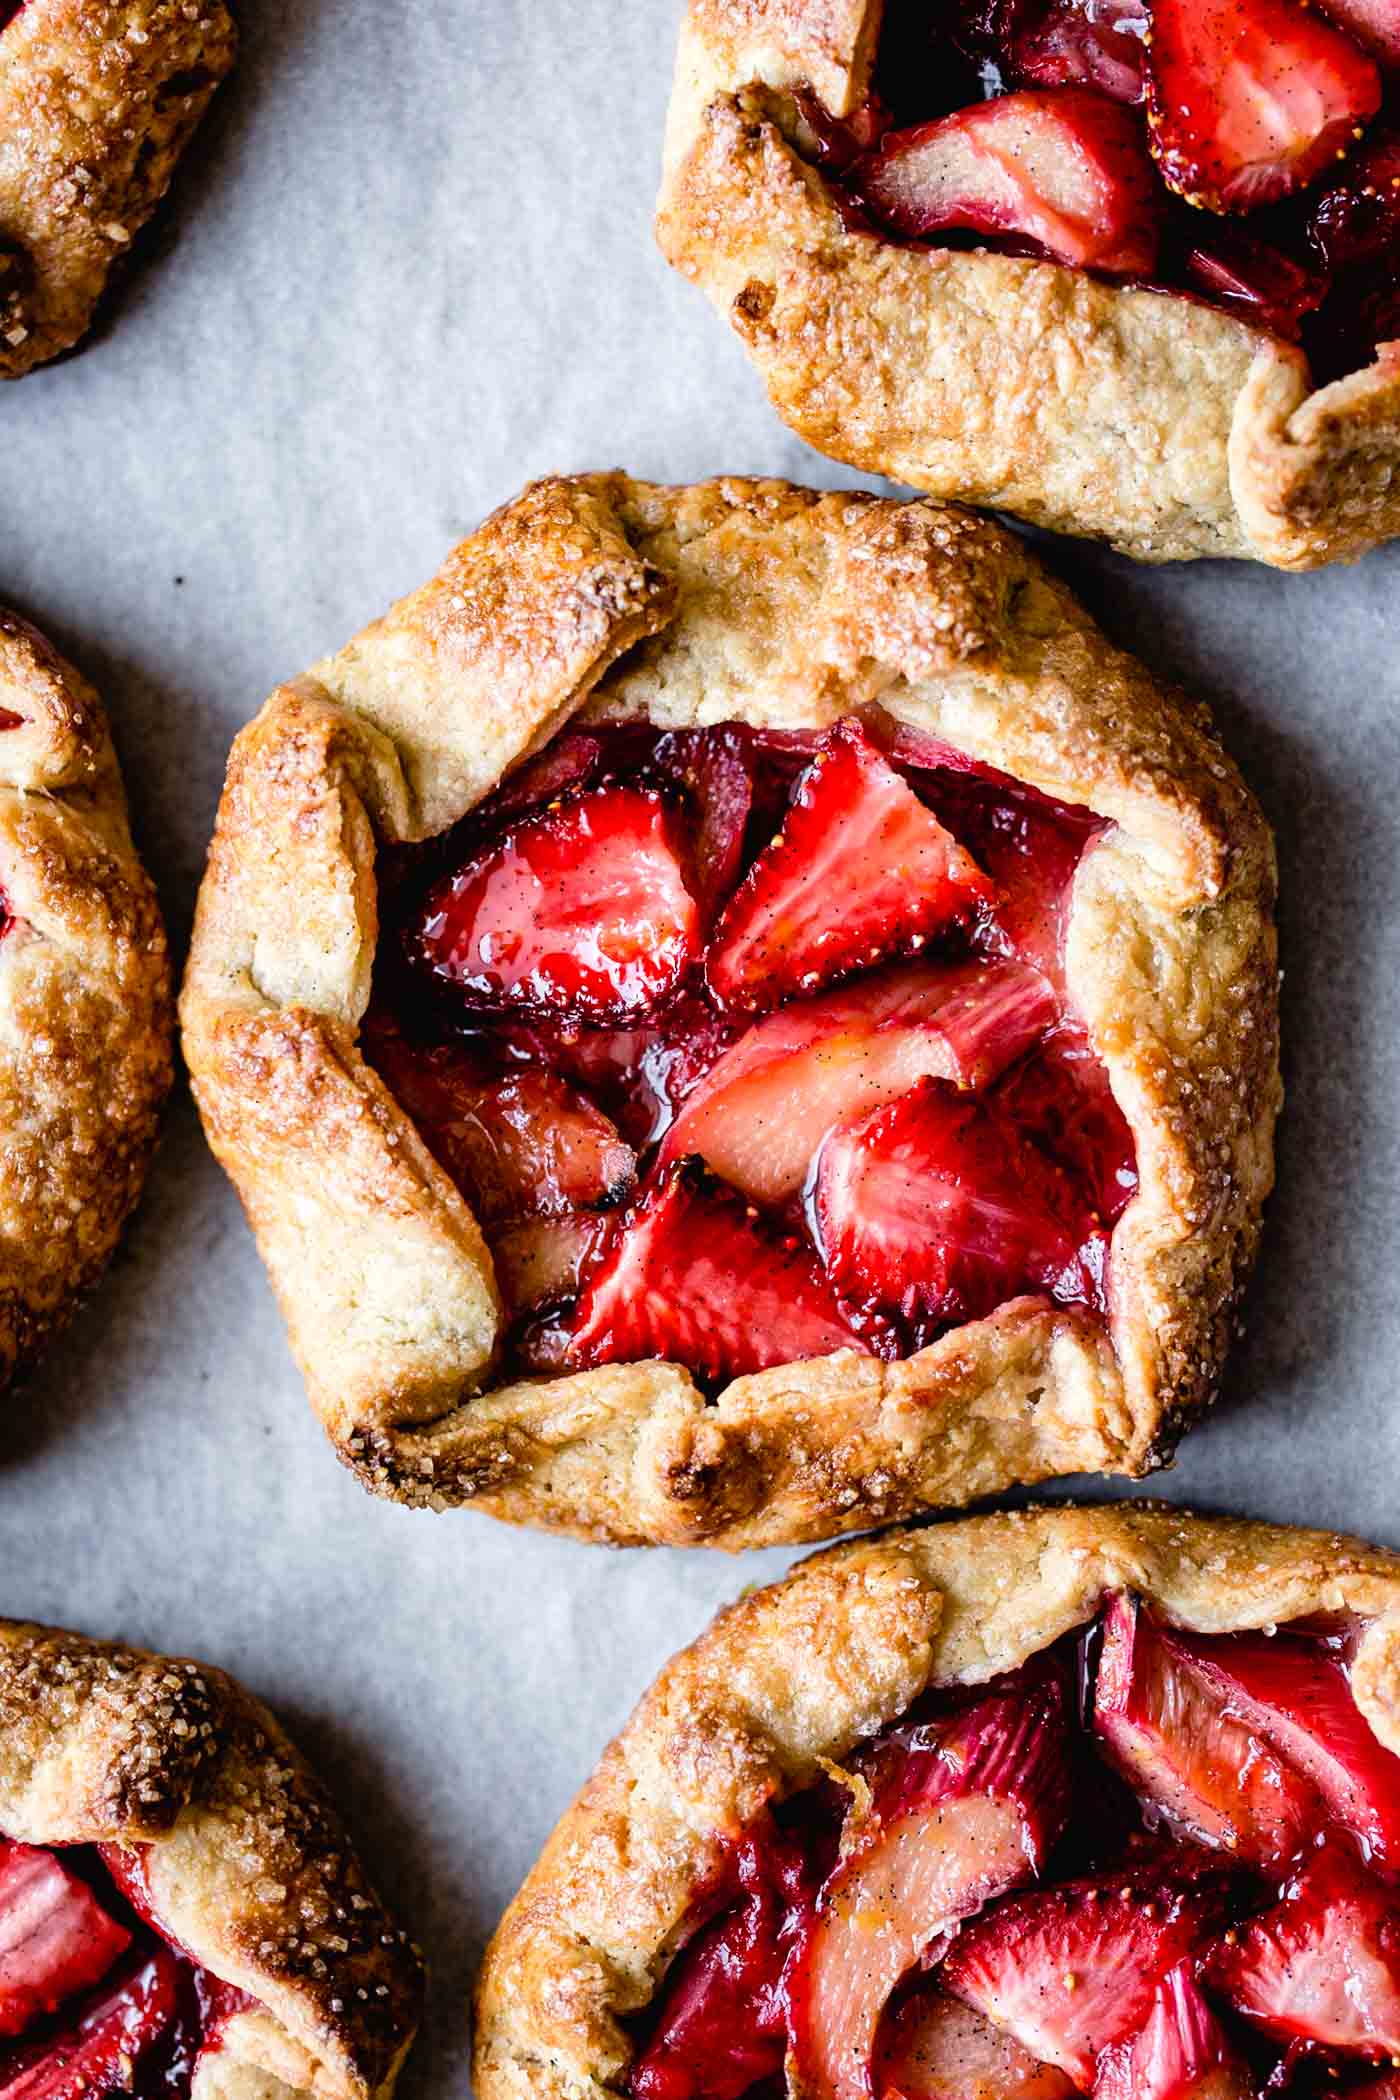
- Strawberry Rhubarb Galettes – jammy berries meet tart rhubarb laced with vanilla and rose.
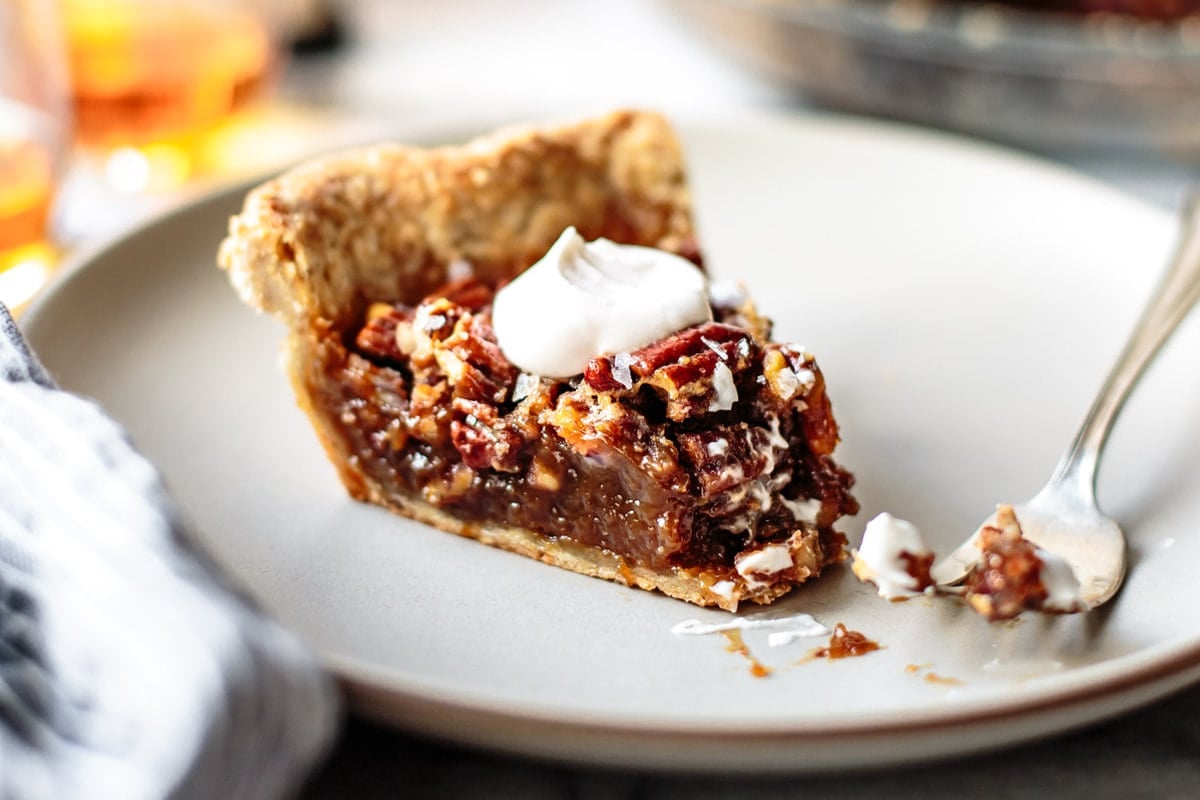
- Gluten-Free Pecan Pie – not-too-sweet, free of corn syrup, and a little bit boozy.
- GF Apple Tarte Tatin – buttery, caramelized apples baked under a lid of flaky gluten-free pastry.
- Pecan-Topped Sweet Potato Pie – One of my all-time favorites! Nutmeg-scented sweet potato custard beneath a top layer of crispy pecan streusel. So good!
Savory:
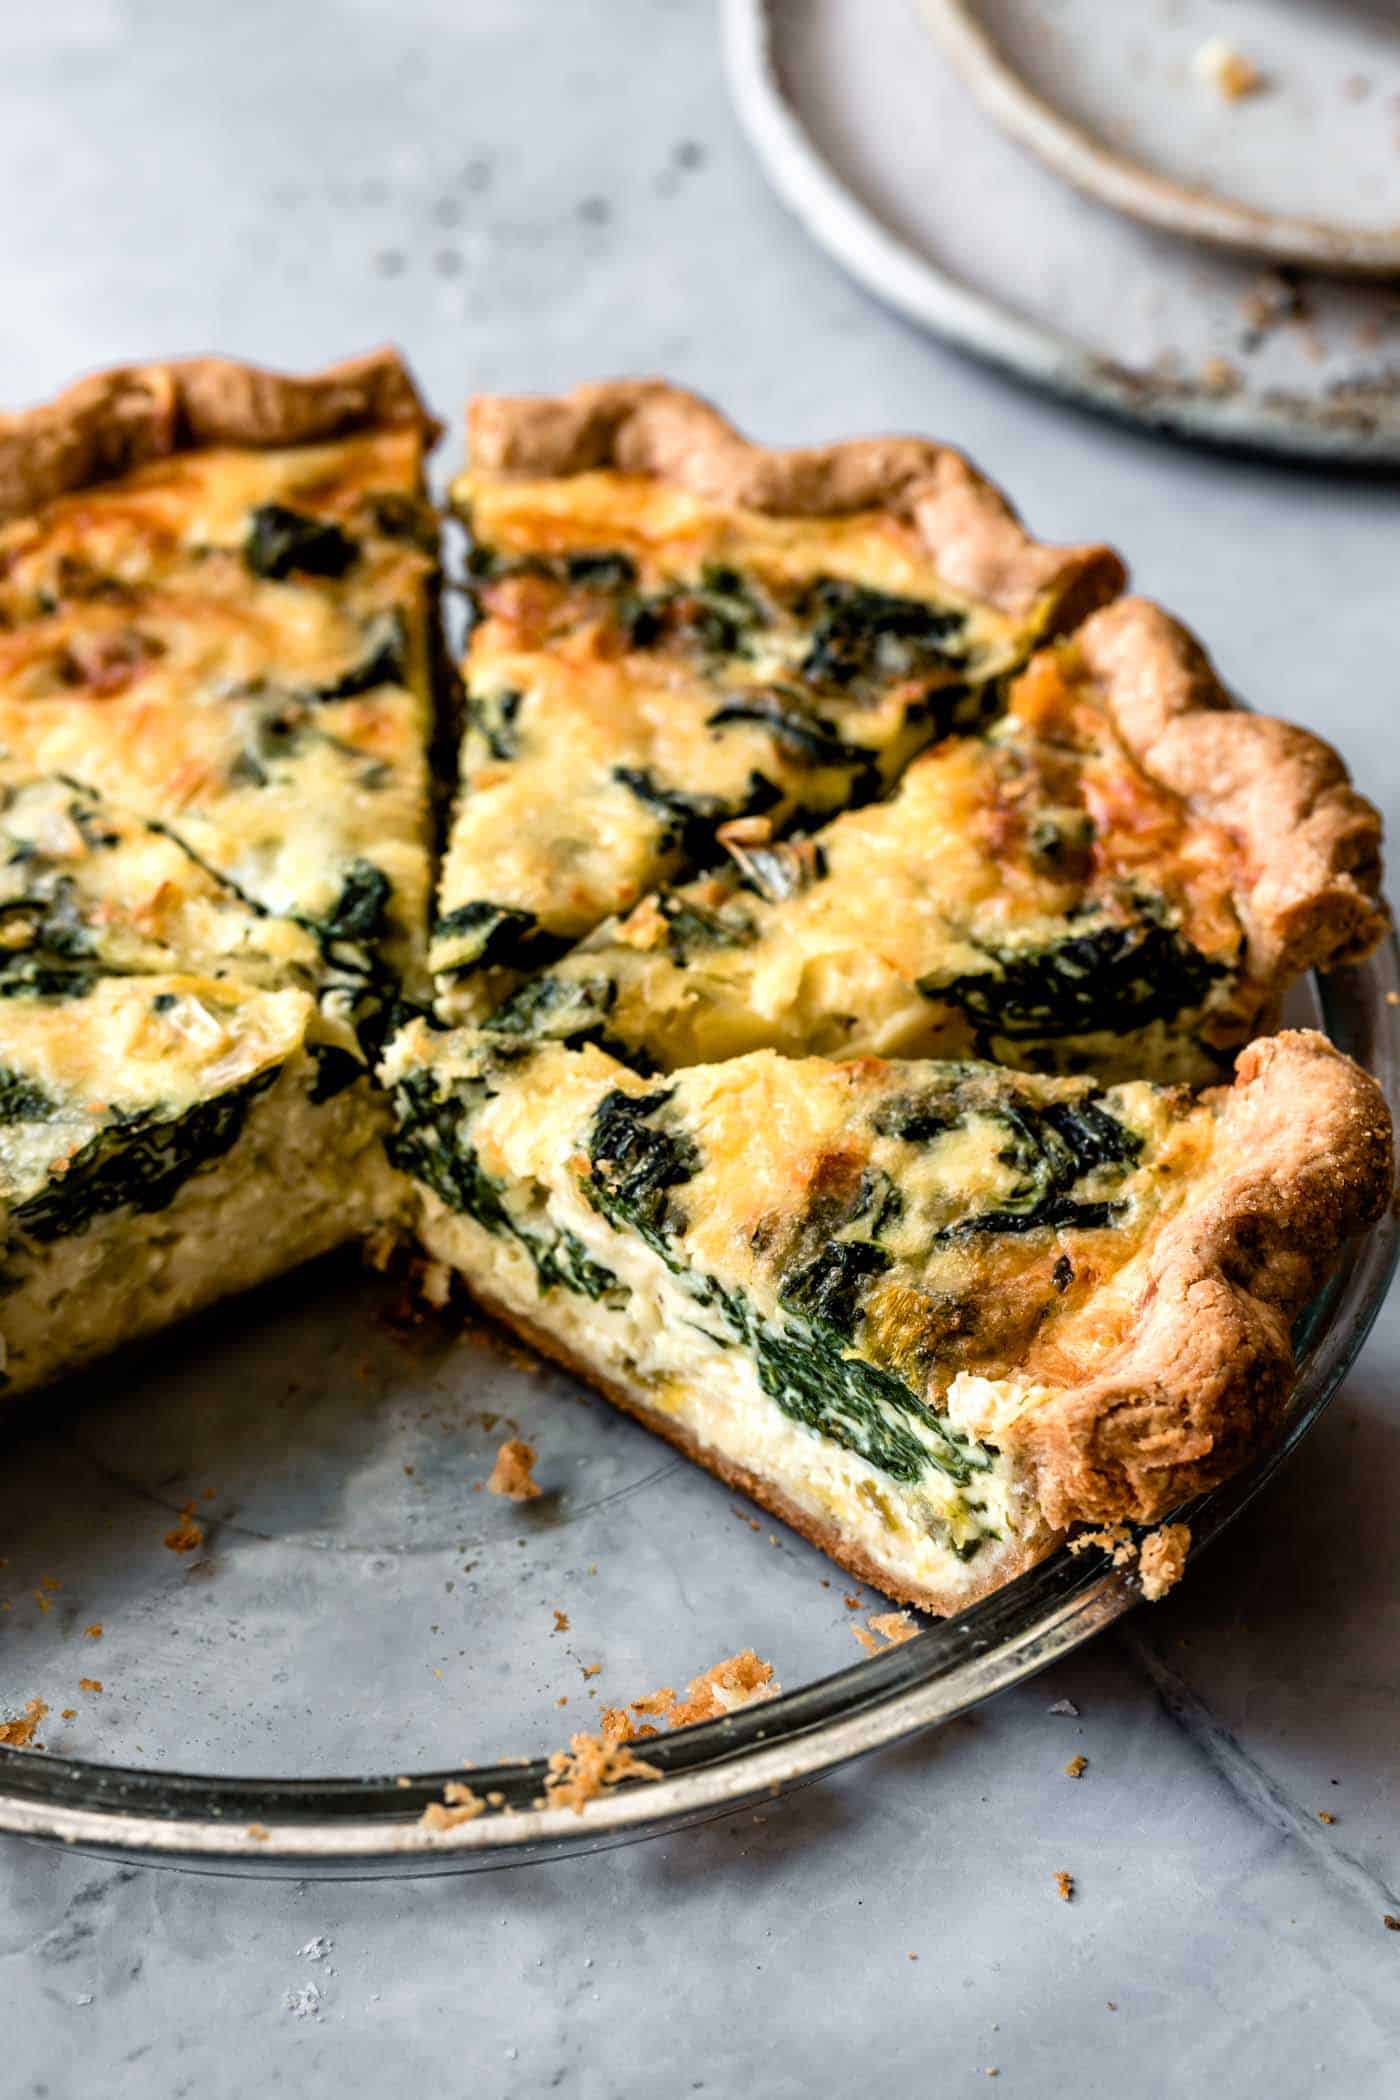
- Gluten-Free Spinach Quiche – crispy crust meets savory custard studded with spinach, leeks, and gruyère cheese.
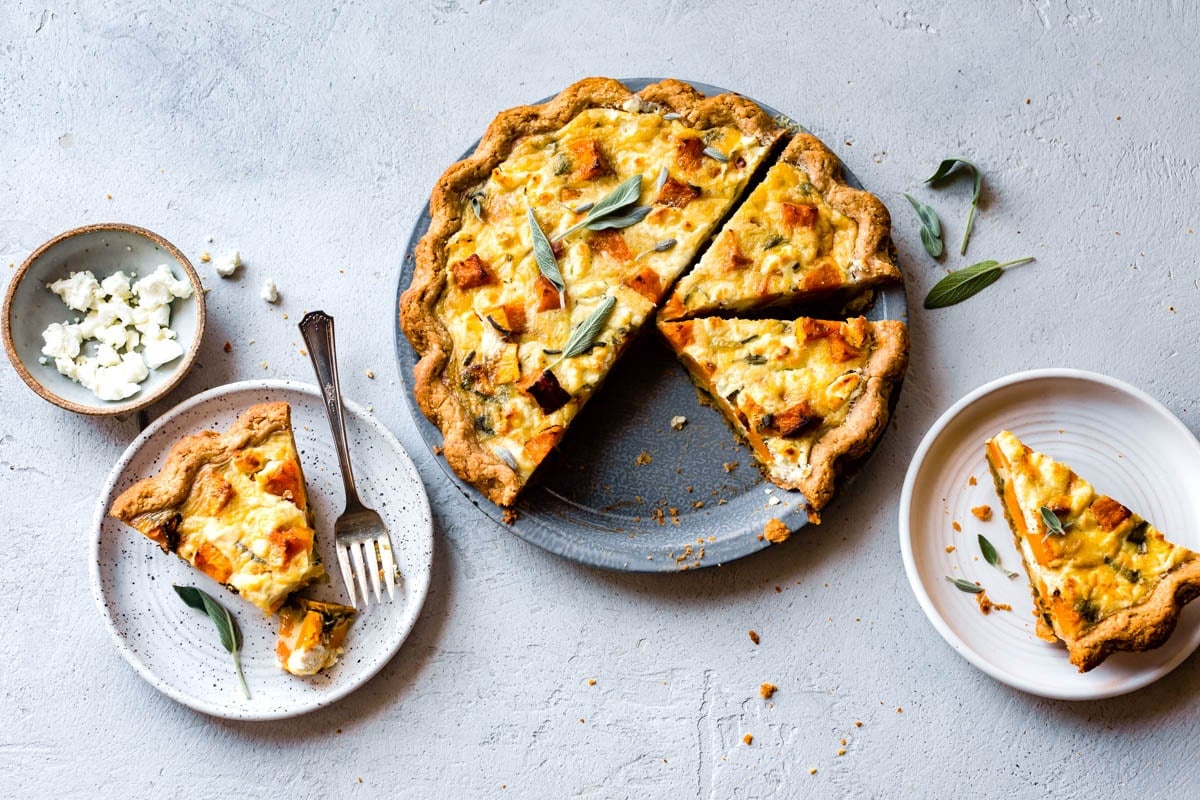
- Roasted Butternut Squash Quiche – brimming with the fall flavors of roasted winter squash, slivered sage, creamy goat cheese, and sweet leeks.
- Heirloom Tomato Galette – flaky gf pastry wraps cheesy filling and sliced heirloom tomatoes.
- Sweet Potato Kale Galette – a showstopping vegetarian main dish with cheesy kale filling and a pretty mosaic of roasted sweet potato slices.
- Ricotta Beet Tart with Beet Greens Pesto – make use of sweet beets from root to leaf with this stunning savory rustic tart.
- Eggplant Parmesan Hand Pies – pretty much my dream meal! Roasted eggplant, tomatoes, mozz, parm, and basil wrapped in pretty gf pie crust parcels.
- Bacon, Leek, and Fennel Quiche – a hearty dish for cool months, this savory quiche makes a killer brunch.
- Pear, Blue Cheese, and Hazelnut Tart – an exquisite combination of savory / sweet / earthy flavor delights.
The Flakiest Gluten-Free Pastry Recipe
However you enjoy this gluten-free pie dough recipe – savory or sweet, in a pie, tart, quiche, or galette – I hope you love its flaky, buttery goodness. As always, feel free to leave any questions or comments in the notes below.
Happy baking, friends!
*Bojon appétit! For more Bojon Gourmet in your life, follow along on Instagram, Facebook, or Pinterest, purchase my gluten-free cookbook Alternative Baker, or subscribe to receive new posts via email. And if you make this gluten-free pie crust recipe, I’d love to know. Leave a comment and rating below, and tag your Instagram snaps @The_Bojon_Gourmet and #bojongourmet.*
Tender & Flaky Gluten-Free Pie Crust
Print Recipe Pin RecipeIngredients
- 6-8 tablespoons ice water (from 1 cup ice cubes filled with cool water)
- ½ cup (78 g) sweet white rice flour (preferably Mochiko brand)*
- ¼ cup + 2 tablespoons (35 g) GF oat flour (preferably Bob's Red Mill)*
- ¼ cup (35 g) millet flour (preferably Bob's Red Mill)*
- ¼ cup (30 g) cornstarch*
- 2 tablespoons (15 g) tapioca starch/flour*
- 2 ½ tablespoons (15 g) finely ground golden flax seed or white chia seed (I grind mine in a coffee grinder)
- 1 tablespoon (15 g) sugar (granulated, maple, or coconut)
- ½ teaspoon fine sea salt
- 8 tablespoons (115 g) cold, unsalted butter (preferably European-style such as Straus, Kerrygold, or Vermont Creamery), sliced ¼-inch thick
- 1 teaspoon apple cider vinegar or lemon juice**
Instructions
Make the dough (by hand):
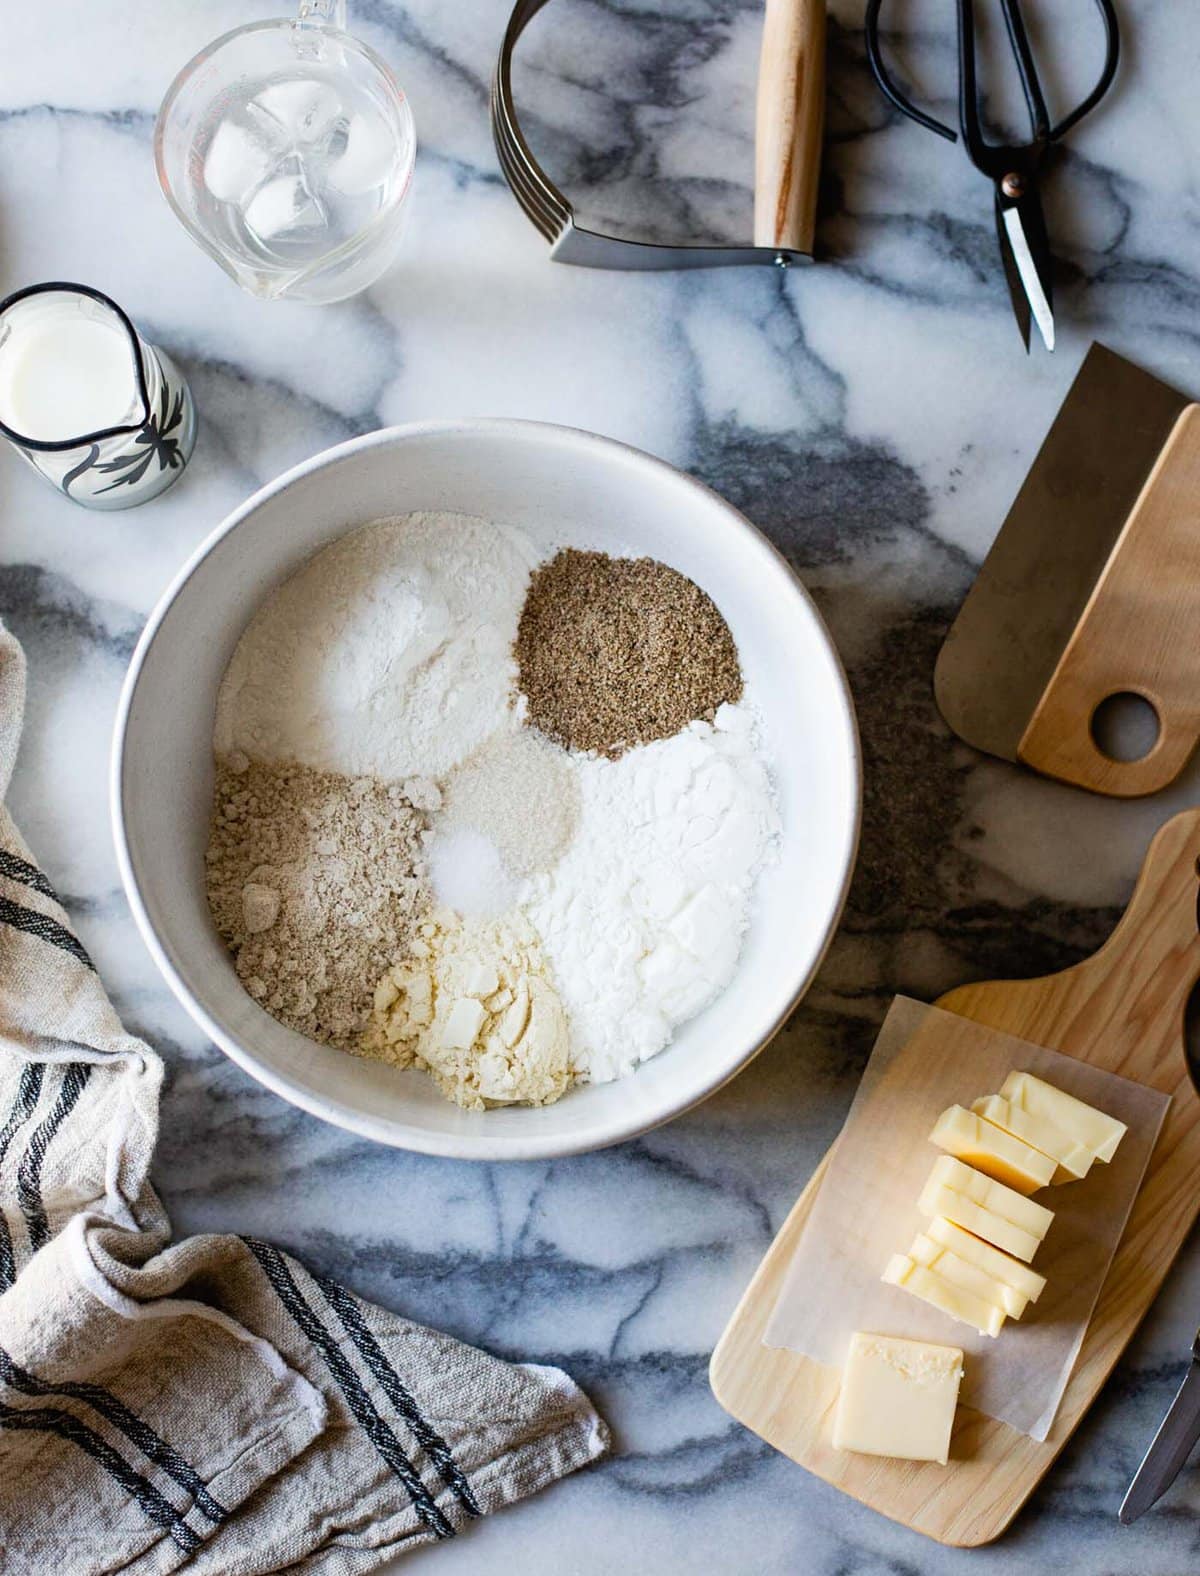
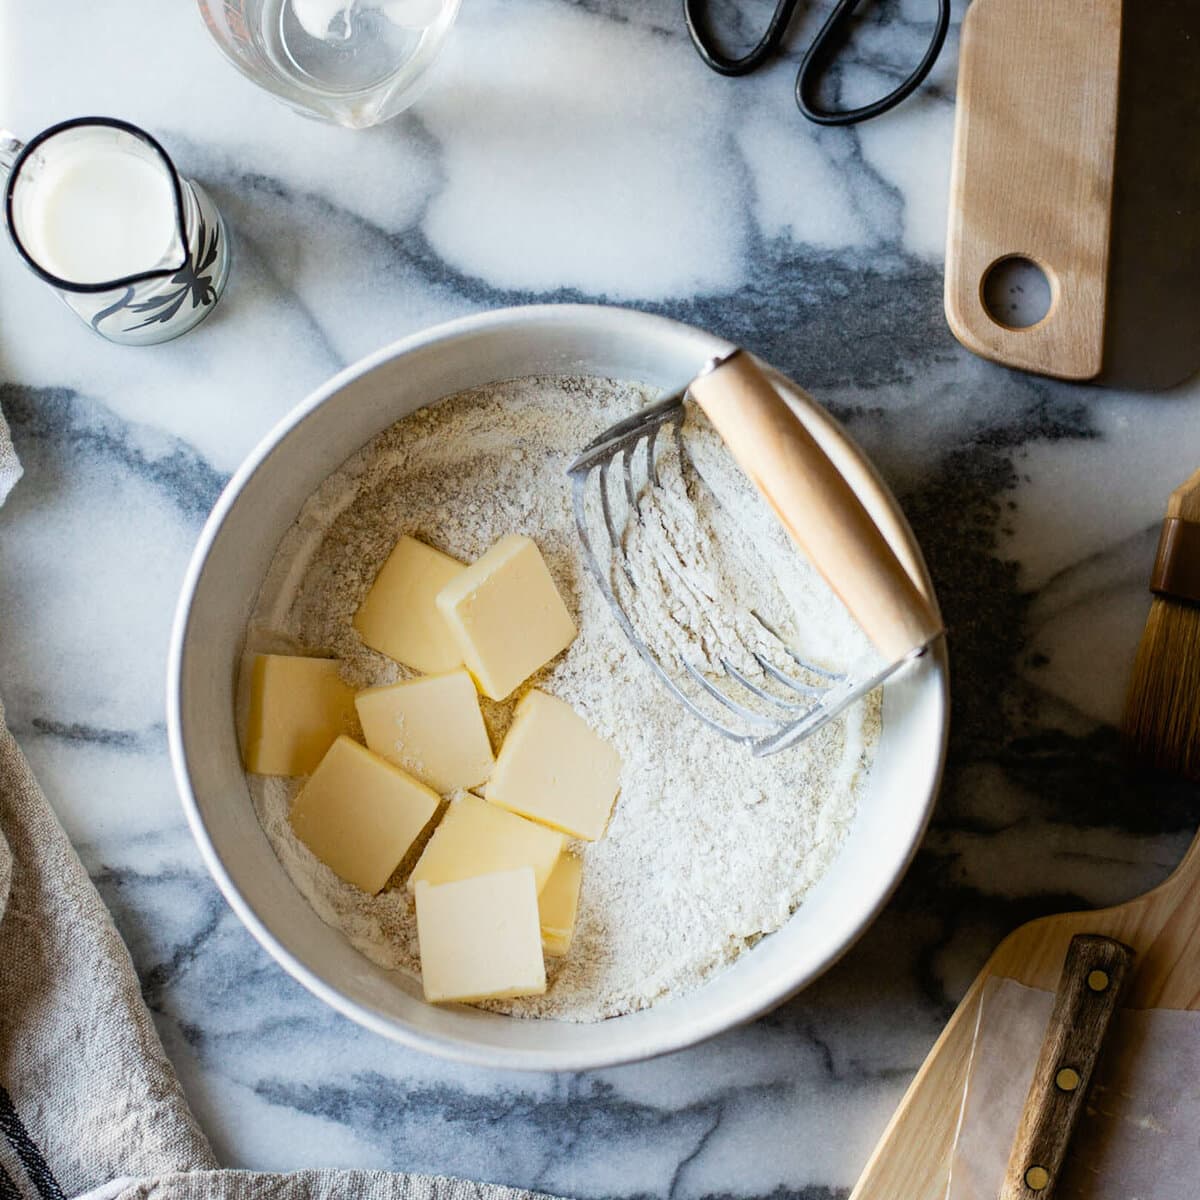
- In a large bowl, combine the sweet rice, oat, and millet flours with the cornstarch, tapioca flour, ground flax or chia seed, sugar, and salt.
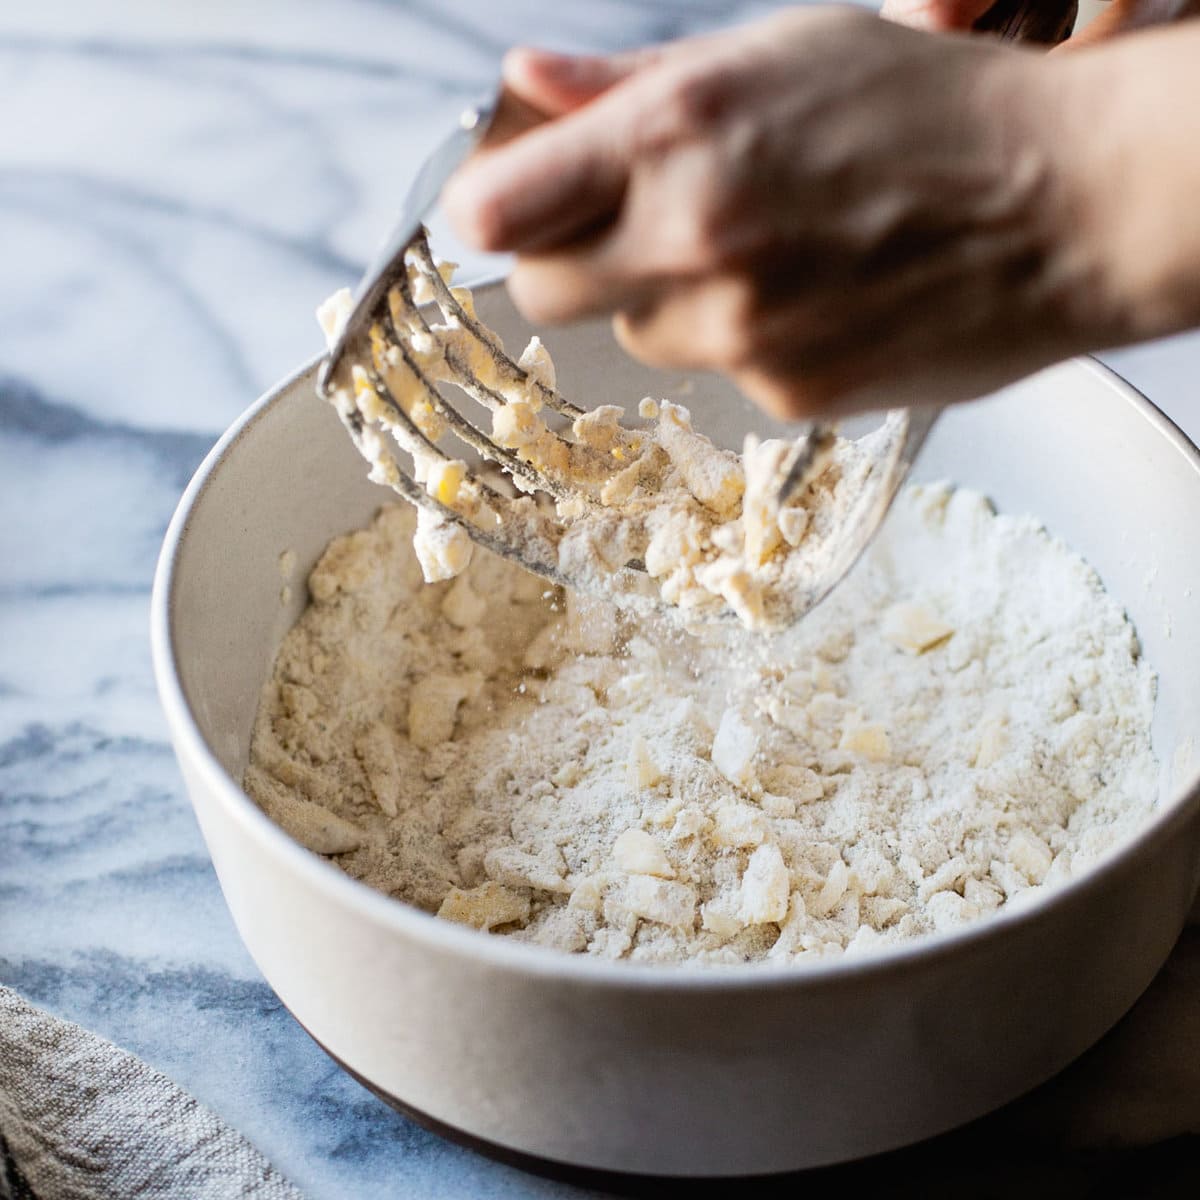
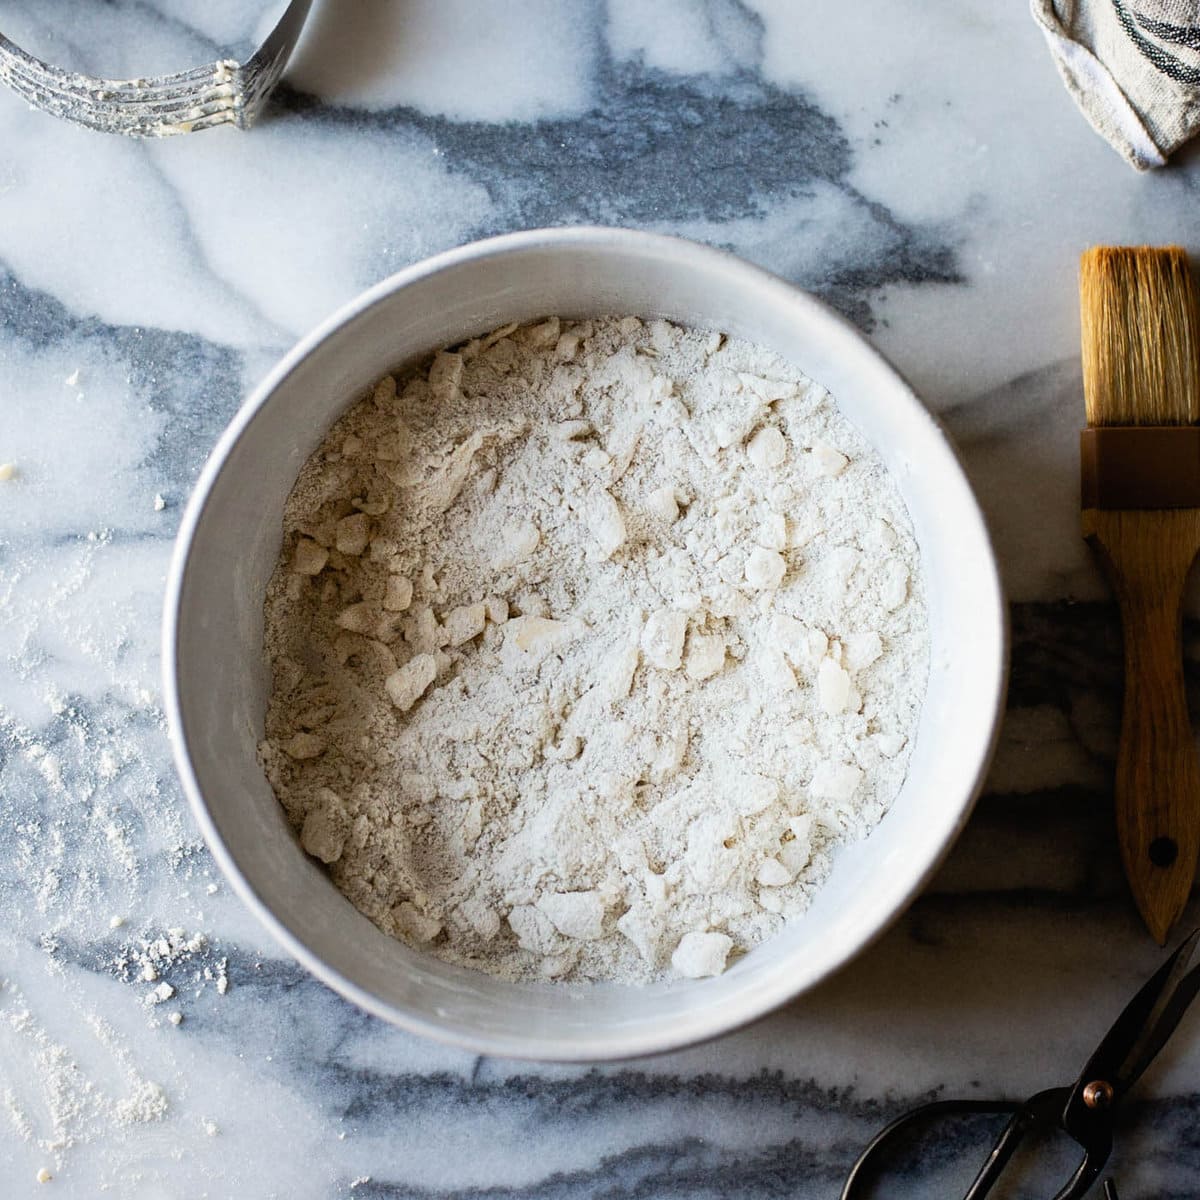
- Scatter the butter pieces over the top, and work in the butter with a pastry blender or your fingers until the mixture resembles gravel, with lots of butter chunks the size of almonds or large peas.
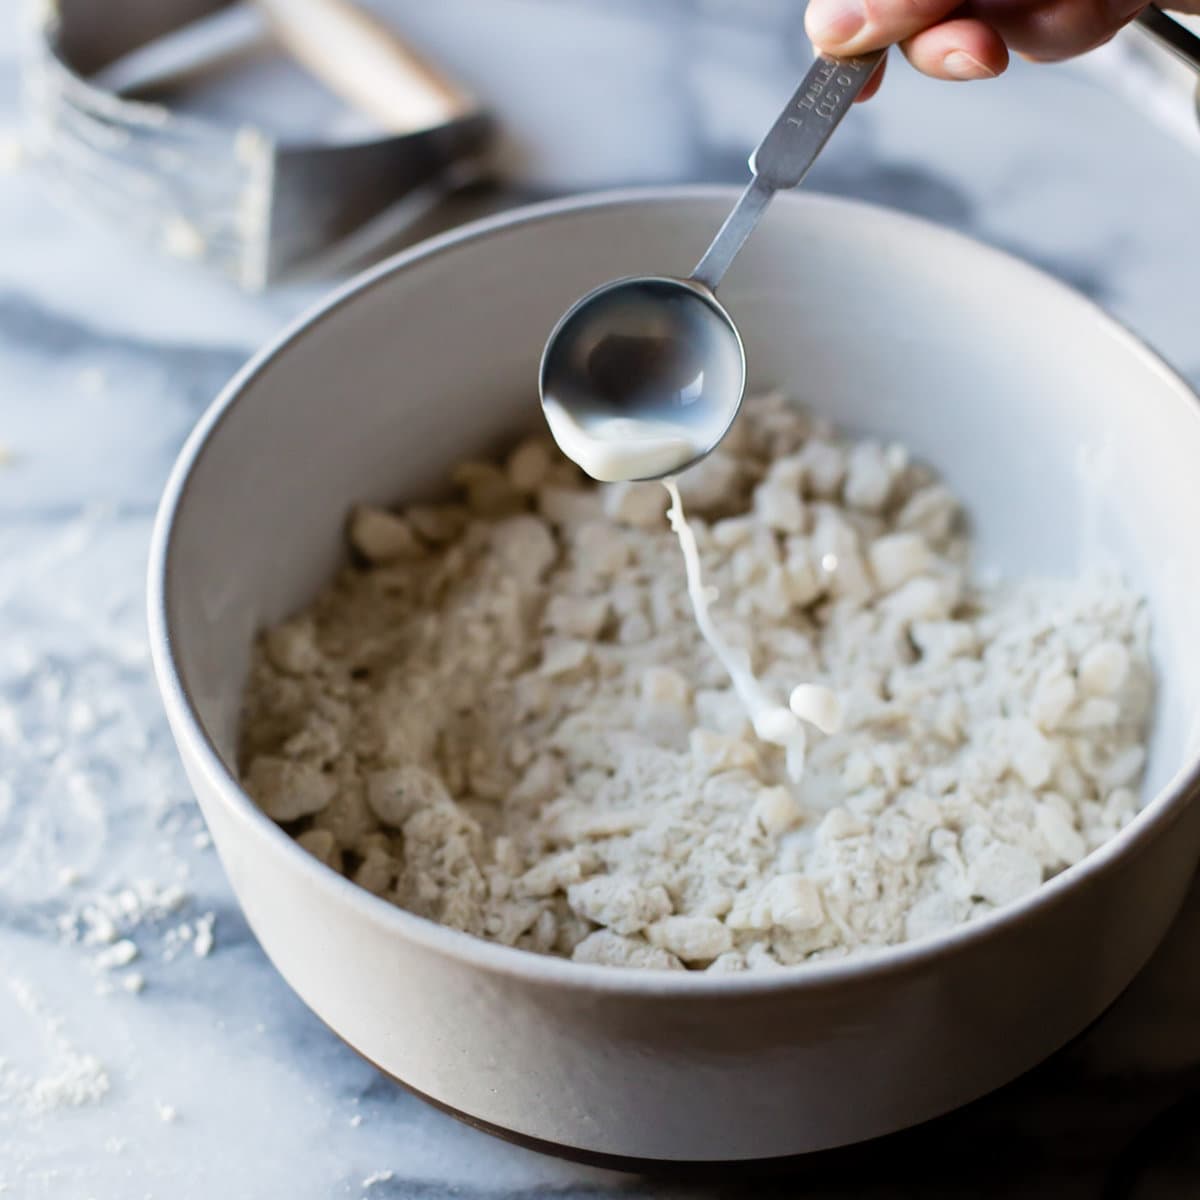
- Stir together 6 tablespoons of the ice water, drained, with the apple cider vinegar or lemon juice. Sprinkle the water into the flour mixture 1 tablespoon at a time, tossing the dough with a flexible silicone spatula to moisten it evenly.
- Give the dough a sueeze: it should hold together easily without feeling overly wet or sticky. Toss in more ice water by the teaspoon until this texture is achieved, adding it directly to the dry floury bits that like to hang out on the bottom of the bowl. You may need up to 8 tablespoons of ice water, total (I always need the full amount but you may need more or less depending on how cold your butter is!). Note that this dough should feel more moist than a wheat flour dough. These GF flours perform better with more hydration and we don't have to worry about making it too moist because there are no glutens to turn tough.
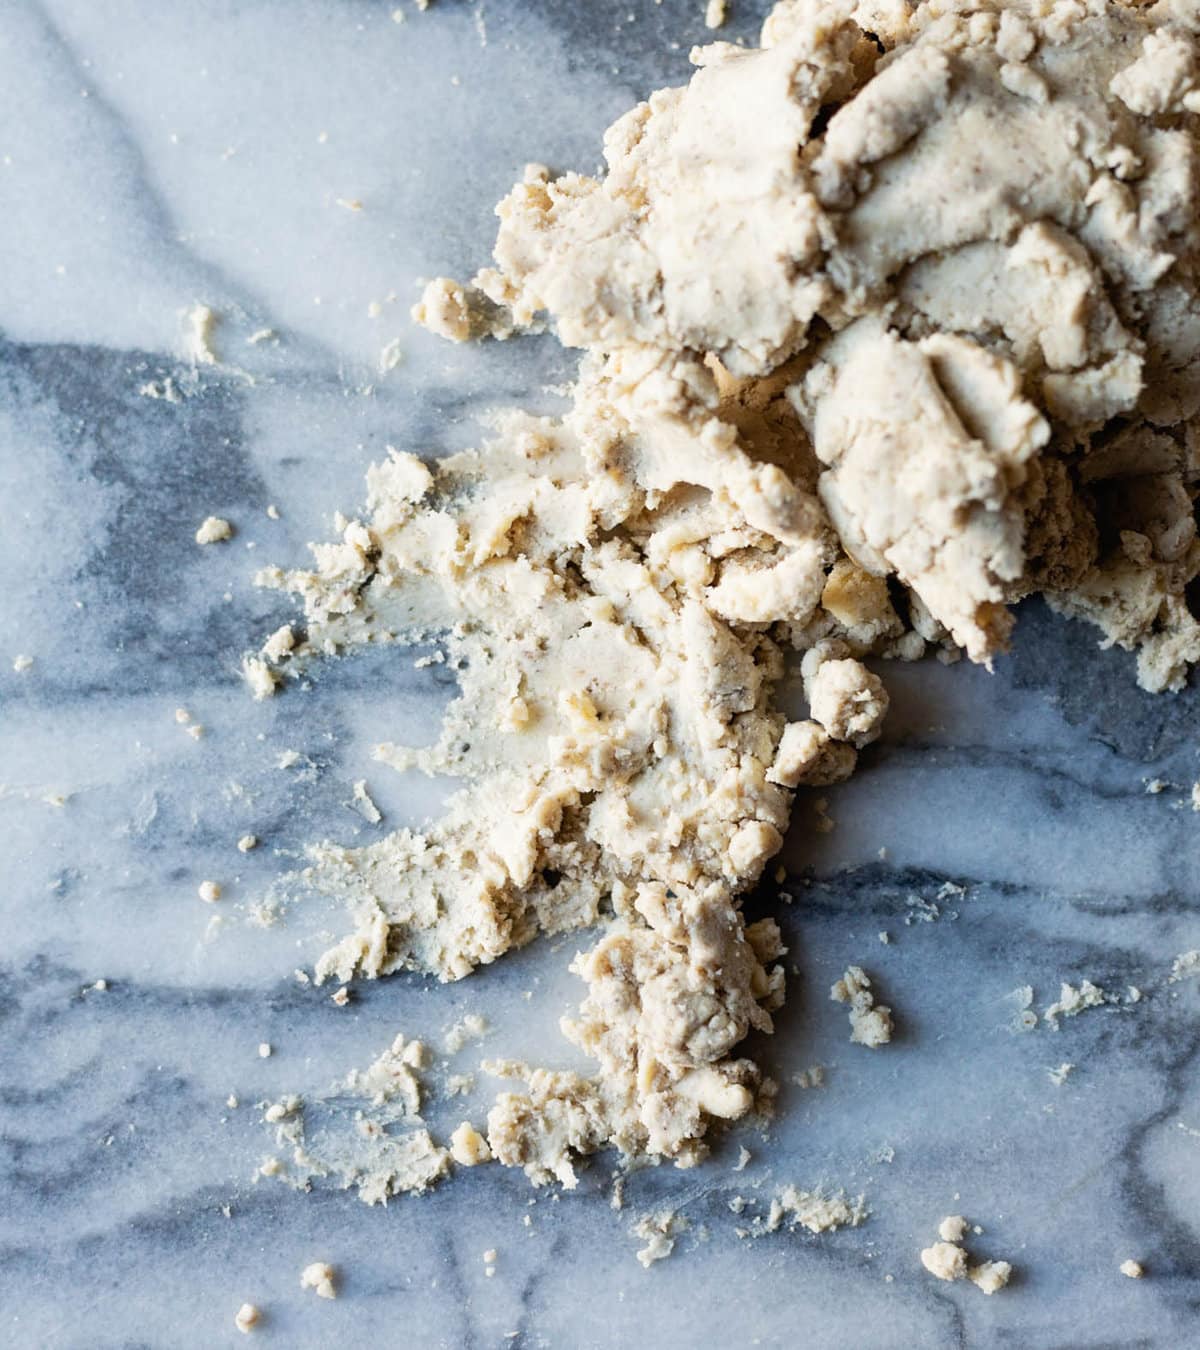
- Fraisage the dough: dump the crumbly dough out onto a clean counter or work surface. Working quickly in order to keep the butter cold, use the heel of your hand to scrape portions of dough across the counter.
- Use a metal bench scraper to scrape up the dough and gather it into a ball. Flatten it into a disk and wrap the dough in plastic wrap, a plastic bag, or beeswax wrap. Chill until firm, 30-60 minutes or up to 24 hours.
Make the dough (in a food processor):
- If using a food processor, combine the flours and starches, sugar, salt, and ground chia / flax seed in the bowl of a food processor. Scatter the butter pieces over the flours but don't pulse just yet! Stir together 6 tablespoons of the ice water, drained, with the vinegar or lemon juice.
- Open the feed tube and pour in the ice water in a slow and steady stream as you pulse the mixer. Squeeze the dough; it should hold together easily without feeling overly wet or sticky, and there should be large pea-sized butter pieces throughout. Gently pulse in more ice water by the teaspoon until this texture is achieved. Note that the dough should feel more moist than a wheat flour dough.
- Gather the dough into a ball, flatten it into a disk, wrap in plastic wrap, a plastic bag, or beeswax wrap and chill until firm, 30-60 minutes or up to 24 hours. It's not necessary to fraisage the dough if using this method since the butter gets broken down into smaller pieces.
Turn the Dough:
- Whichever method you've used (by hand or in a food processor), remove the dough from the fridge, unwrap, and place it on clean work surface dusted lightly with oat flour. If the dough is very cold, it may need to soften for 5-10 minutes to make it easier to roll. (Note that if you don't have a metal bench scraper to move the dough around, it's best to roll out the dough on a sheet of parchment paper.)
- Using a rolling pin, begin to press and roll the dough out into a large ¼-inch thick oval. The dough will crack and tear at first and that's ok, just smush it back together. Periodically dust the dough with oat flour, sweeping excess flour away with a dry pastry brush. Use the bench scraper to flip the dough over occasionally, dusting the dough with flour to keep it from sticking.
- As you work, if the butter starts to soften or stick to the surface, pop it back in the fridge to firm up for 5-10 minutes.
- Once the dough is rolled out to ¼-inch thickness, fold it in thirds like folding a letter. Then fold it in thirds the other way. Flatten the folded dough slightly, re-wrap, and chill until firm, 30-60 minutes or up to 24 hours.
- Repeat the turning process one more time. The dough will become more and more cohesive and pliable as you work with it, which will make it easier to shape and help it bake up tender and flaky.
- Wrap the dough and chill it again until firm, 30-60 minutes and up to 2 days. Or freeze the dough for up to 1 year until ready to use.
Shape the crust:
- Remove the dough from the fridge, unwrap, and place on a lightly floured surface. Roll out the dough into a 12-inch circle, dusting the dough lightly with oat flour flour as needed, rotating and flipping it to prevent it from sticking.
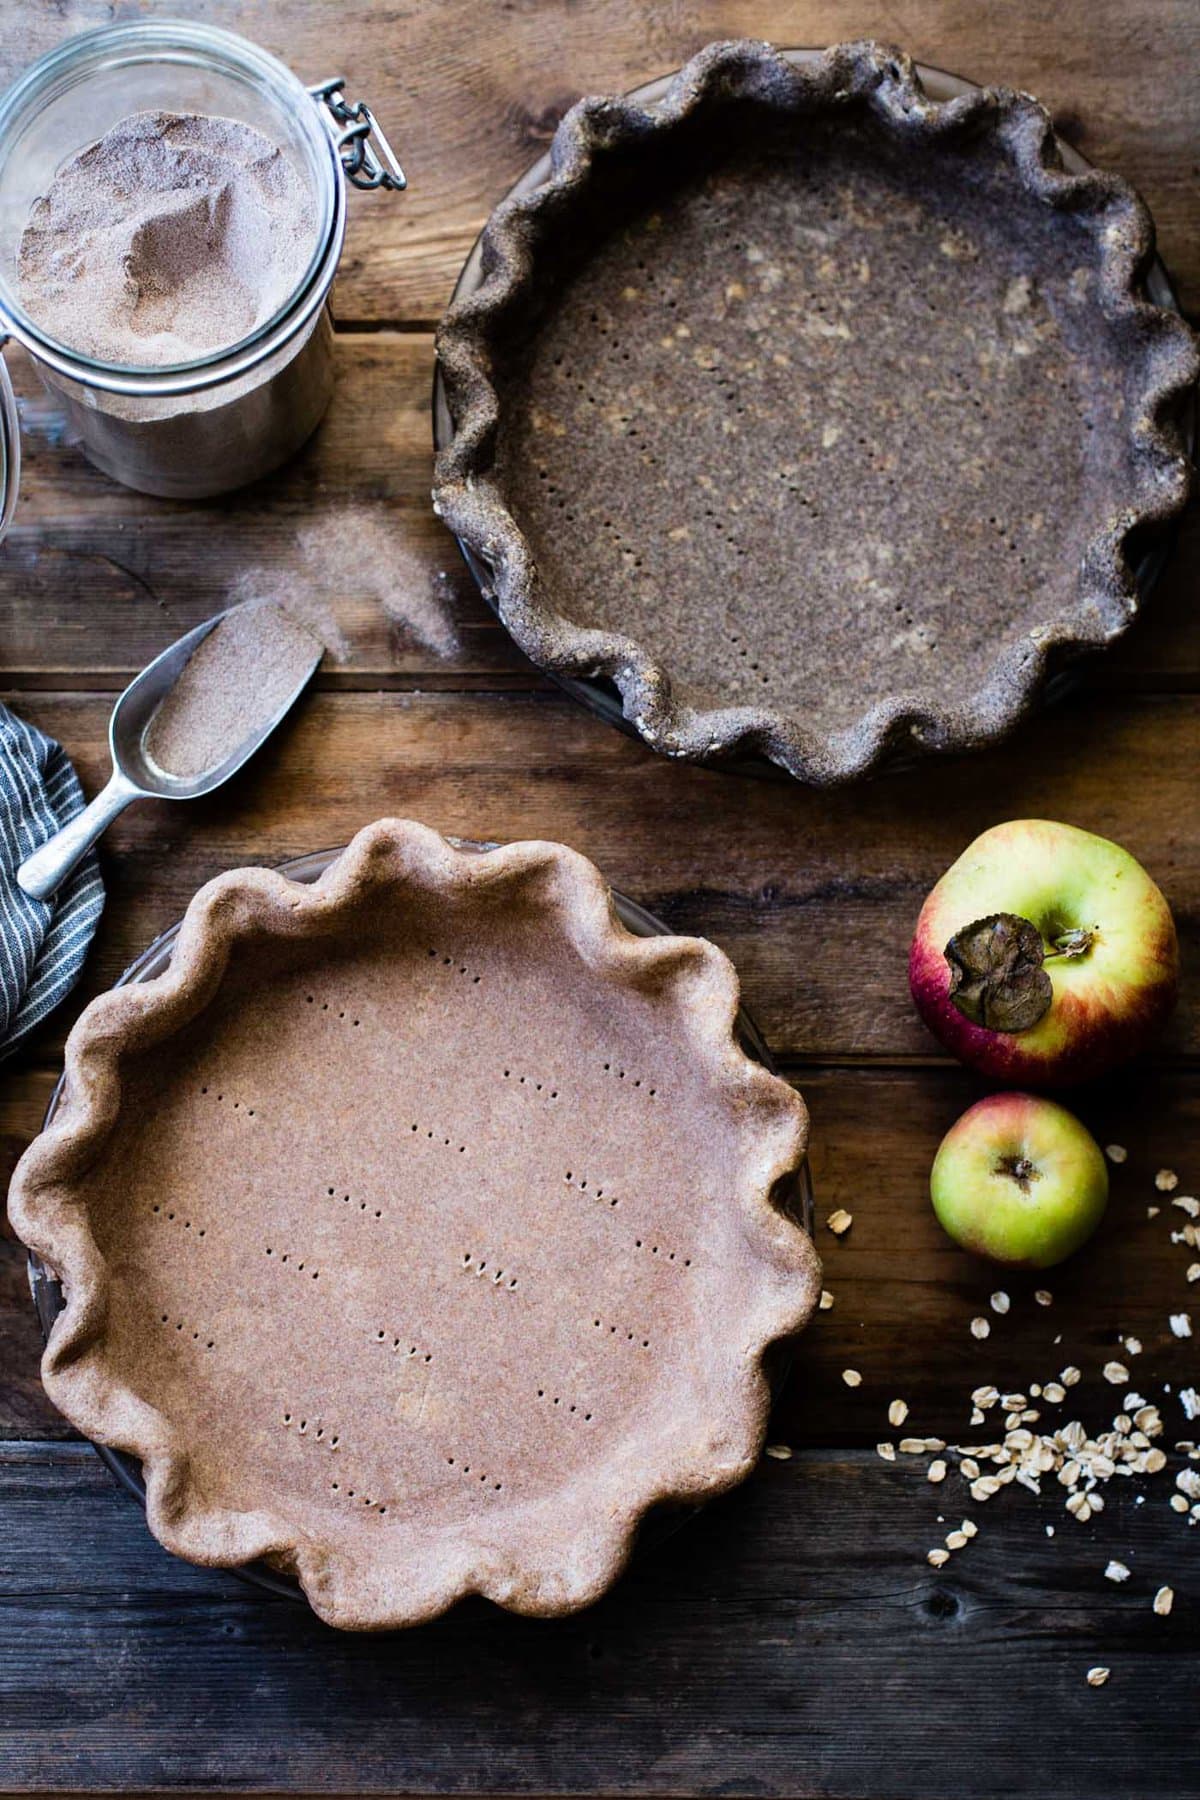
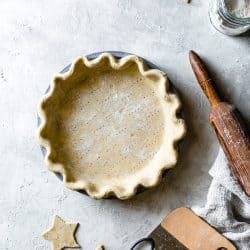
- Ease the dough into a 9-inch glass pie plate, fit it into the corners, and trim it to a 1-inch overhang. (Save the scraps to patch any tears in the dough post-parbaking.) Fold the overhang of the crust under itself, and flute the crust by pressing it between the thumb of one hand and the index finger and thumb of the other hand.
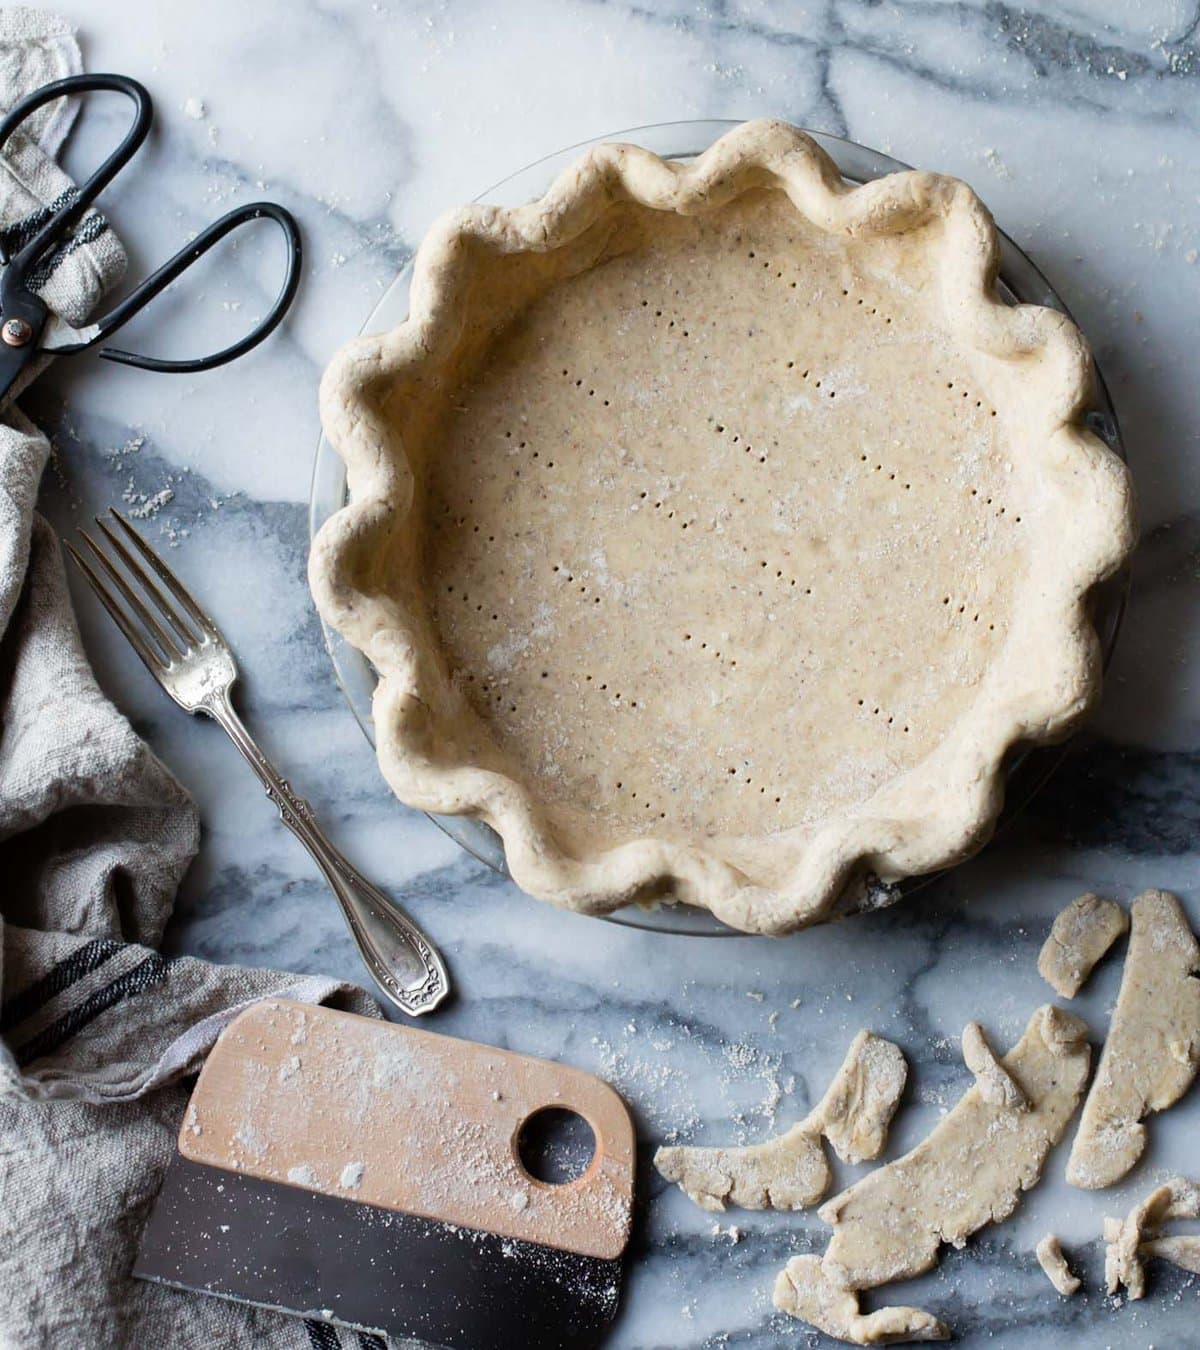
- Prick the bottom of the crust all over with the tines of a fork (this is called "docking"). Chill the crust until firm, 30-60 minutes (or cover and chill for up to 24 hours, or freeze for up to several months.)
Blind-Bake:
- Position a rack in the lower third of the oven and preheat to 400ºF.
- Place the chilled crust on a rimmed baking sheet. Line it with a piece of parchment paper, and fill to the top with pie weights, dry beans, or clean pennies, gently pressing the weights into the sides and corners of the crust.
- Bake the crust for 15-30 minutes (shorter for a metal pan, longer for a glass pan), until the edges are golden and the dough will hold its shape when you lift off the parchment. Carefully remove the weights and parchment and bake until the bottom is dry and lightly golden, about 8-12 minutes longer (for a parbaked crust) or until deeply golden, 15-20 minutes (for a fully baked crust). Use the saved scraps of dough to patch any holes, cracks, or tears in the dough, baking for a few more minutes post-patching.
- Proceed with your pie recipe!
Notes
- Can sub for sweet rice flour: gluten-free all-purpose flour (such as Bob's Red Mill 1 to 1)
- Can sub for oat flour: sorghum, chestnut, or light buckwheat flour
- Can sub for millet flour: sorghum, teff, or buckwheat flour
- Can sub for cornstarch: more tapioca flour
- Can sub for tapioca flour: arrowroot flour
- 10 minutes to mix and fraisage the dough
- 30 minutes to chill
- 10 minutes to do the first turn
- 30 minutes to chill
- 10 minutes to do the second turn
- 30 minutes to chill
- 10 minutes to roll out the dough, get it in the pan, shape it, and dock it
- 30 minutes to chill
- 30-40 minutes to par-bake the crust
- The dough can be made ahead, wrapped, and chilled for up to 2 days or frozen for up to 1 year.
- The shaped crust can be made ahead (baked or unbaked), wrapped, and chilled for up to 2 days or frozen up to 1 year.


Gerhard says
Dear Alanna, just tried my luck with your recipe and was using it for a Tarte Tartin. Somehow it did not turn out the way expected. The though doesn't stick stick/hold together. Its just crumbles. Is it because of the excess moist of the apples? Thanks for your support and regards from Vienna/Austria
Alanna says
Hi Gerhard, I'm sorry that happened! I've used this dough for tarte tatin and it worked well for me. It actually sounds like the dough wasn't hydrated enough. This dough likes to have more moisture than a wheat flour pie dough. If you try it again, I'd recommend making sure you add all the water (and more if it needs it). And do give the dough the fraisage and turns - it really helps it hold together, like magic!
Rose says
I had a similar issue with pliability but this is helpful to know! Thank you!
One other question: you note baking in a glass pie dish. I know with regular wheat dough I typically get best results with metal. Is there a reason you prefer the glass for this recipe? After having a lot of experience working at home and professionally with wheat dough, I am DYING to nail an actually tasty GF pie dough to expand my offerings and always struggle with crumblies. This dough was absolutely delicious but I cannot get the pliability and tenderness of my wheat version. Thanks for any input and for all your work!
Alanna Taylor-Tobin says
Hi Rose,
Thanks for the kind words and the great questions! I'm fascinated to know that you got better results with baking wheat crusts in a metal pan. I never thought about it, but I guess the metal would conduct the heat more efficiently, heating the crust more quickly and giving the butter less time to melt, causing more flakes. That's brilliant!
I've made this crust in both metal and glass pans and never noticed a difference, but I'll keep a closer eye on them the next time I make them. And please let me know if you see a difference too!
In terms of pliability, I've found that I get the most pliable dough when I use the food processor method. And as I said above, hydration is key here! It activates the sticky power of the sweet rice flour, starches, and chia, and softens the bits of flour. So do make sure to add all the liquid and don't be afraid to add more if it feels dry. It will still be more prone to cracking than a wheat crust, but it should be sturdy enough to flute and weave.
I tried to straddle the line between still using some nutritious whole-grain flours and minimizing starches and not using any gums. But for a more white flour-esque crust, you could probably wiggle the starches up, use less of the oat/millet flours, and you could try adding some xanthan gum. Psyllium husk could also be another ingredient to experiment with adding.
Please do let me know if you play with the recipe and feel free to reach out if you have any other questions or observations. Appreciate your input!
Rose says
Alanna, thank you so much for the response! I will definitely try the food processor along with your other tips re: hydration. I agree, I would also like to keep it as flavorful and texturally interesting as possible without having to use any gums which is what always draws me to your GF versions of pastry. Hoping to venture into this territory more in the coming year!
Alanna Taylor-Tobin says
Always happy to help troubleshoot. Please keep me posted if/when you try the recipe again. Fingers crossed!
I also just realized (and I will update the recipe with this info) that when I make this crust using Koda Farms Mochiko sweet rice flour it tends to turn out more smooth, pliable, and flaky. That brand seems to be more finely ground than Bob's Red Mill. I've also heard that Thai sweet rice flour also tends to be very finely ground. So might be worth seeking out for this particular recipe. :)
Gerhard Sallmutter says
dough ;)
Joanna says
Hi, I've baked a lot but I'm a gf pie crust novice! Would you advise starting with this version or your paleo one? Thanks for the advice!
Alanna says
Hi Joanna, Hm that's a great question. My gut says to start with the GF crust, though really the two are very similar in terms of how they handle. If you happen to have any of the flours on-hand (cassava, almond, and tapioca for paleo, or oat, millet, sweet rice, and cornstarch for GF) that could be a deciding factor. Please let me know what you try, or if you have any questions as you go!
Joanna says
Thank you for the advice. I have all of those flours in the house, and I love your almond flour tart crust which was why I was torn about where to start. Thanks again!
Alanna says
Aw I'm so glad you're enjoying that recipe! Please let me know which pie crust you try and what you make with it. :)
Helen says
Hello, what other flour would work instead of millet - just don’t have it, but have everything else.
Alanna says
You could use sorghum, buckwheat, teff, chestnut, or corn flour (not corn starch or cornmeal). More oat flour would probably work too. Let me know what you try!
John says
Besides gluten-free it’s been recommended l do lectin-free also. Pressure cooking is a way to remove lectins from millet, buckwheat, etc. Any thoughts on incorporating these into pie crust?
Alanna says
Hi John, hm that's a good question. I guess you'd have to cook the grains, then grind them, but they'd be more like a paste at that point. I'm really not sure.. But! I do have a paleo pie crust recipe. I googled and it seems that the flours I use here - cassava, almond, and tapioca - are low lectin! Let me know if you try it!
Rachel says
I love your recipes! I made this recipe from Alternative Baker for an apple pie. The resulting bottom crust seemed undercooked. It was very light and squishy. Do you have advice on what we did wrong? Maybe too thick?
Alanna says
Aw thank you Rachel! But oh no to the soggy crust - that's no good! I don't *think* the thickness should affect the bottom that much, but it's possible!
Did you bake the pie on the bottom rack of the oven and set it on a pre-warmed baking stone? Is it possible that your oven runs cold and that you could set it a little higher? Were your apples especially juicy and adding a tablespoon or two of flour or cornstarch next time could help?
This is my favorite GF apple pie recipe, and it's adapted from the one in Alternative Baker. There shouldn't be any soggy bottoms!
Please let me know what you try next! :)
Ash says
Hi
I can't have cornflour - is there any substitute I can use (like Arrowroot flour which looks and behaves in a very similar way). Also, can I sub coconut sugar for cane sugar? Many thanks :)
Alanna says
Hi Ash, coconut sugar will definitely work! Arrowroot flour should work, it just may make the crust a little less crisp than with cornstarch. Please let me know if you try it!
Canadian Baker says
Seriously the best gf pie crust I’ve found. It’s the only pie crust recipe I use anymore!
Alanna Taylor-Tobin says
Aw that completely makes my day! Thanks for trying my recipe and for the kind note and rating :)
Rita says
Must this crust be blind baked before making quiche?
Alanna Taylor-Tobin says
Yes, highly recommend blind baking first so you don't end up with a soggy bottom!
Solange says
Absolutely perfect crust- turned out just gorgeous in every way. Wondering if I could use coconut oil…? I was using vegan butter a lot and heard that it’s horrible for one’s health and so, so artificial compared to real butter. Kerrygold is my favorite real butter however I’ve been using so much of it and do indeed love coconut oil for so many reasons. Just curious…
Alanna Taylor-Tobin says
Aw I'm so glad you love this recipe!
That's a great question! First of all - what kind of vegan butter were you using? I like Miyoko's because it has very natural ingredients, so I don't think all vegan butters are unhealthy.
Dairy butter is usually around 80% fat and 20% water and milk solids. Coconut oil is close to 100% fat, so they're not usually interchangeable in recipes. That said, I did provide a coconut oil pie crust option in my cookbook. It's a little more fussy to work with and needs to be warmer when rolling to make the dough pliable. Please let me know if you try it! You could also try using half butter and half coconut oil.
Agree that Kerrygold is pure heaven!
Reni says
I just made this crust last night and it was the best gf crust I’ve made yet. The texture was fantastic and the dough was easy to work with.
I used the recommended flours in the recipe and I found the final result to have a bitter after note. I’m wondering if this is expected, or if the crust over baked a little while baking the filling. After the blind baking, I had to bake the pie a further 60 min or so for the filling. The rim was not burnt, nor did it even get very dark, but am wondering if over baking was the cause for the bitterness. Would love your feedback! Thank you for a great recipe!
Alanna Taylor-Tobin says
Hi Reni,
I'm so glad you liked the pie crust dough and texture, though I'm sorry to hear about the slight bitter taste! I've found that millet flour can taste bitter at times. My hunch is that it has to do with how old it was and how it was stored (possibly before it got to you). You could try swapping another flour such as sorghum or teff, both of which tend to have a sweeter taste, and see if it makes a difference.
Overbaking *could* make it taste bitter but only if it got too dark, so that doesn't seem to be the case here. Please let me know if you experiment!
Reni says
Hello, I tried the crust again, using the same flours and the result was superb. No bitter aftertaste. I think the issue was chia seeds that were not freshly ground…not sure how long they had sat in the pantry. This time the chia was freshly ground and the taste was perfect.
I have not tried to laminate the dough yet and cannot imagine the texture getting any better than it is! I did do the fraisage properly this time. Last time I smeared the entire disc at one time instead of doing it chunks at a time, having misread the instructions. The texture was great last time and even better this time!
Alanna Taylor-Tobin says
Oh I'm so glad we got to the bottom of that bitter flavor and that you love the crust! What kind of pie did you make?!
Reni says
I roasted a sugar pumpkin and made a yummy vegan pumpkin pie! So addictive, especially with your crust!
I will try lemon meringue next time…
Alanna Taylor-Tobin says
Mmm that sounds divine – save me a slice!
Reni says
I made a vegan pumpkin pie and next will be lemon meringue!
Anna says
Thank you for this recipe, I tried it once and plan to experiment with the different suggested flour substitutions! Would it be possible to use one hen's egg in place of the flax/chia egg, and reduce the water amount? I currently have no good way to grind flax/chia seeds. Thanks again! :)
Alanna Taylor-Tobin says
Hi Anna, I'm so glad you like the recipe! That's a good question about using an egg, I'm so curious how that would work. It seems like it should! Will you please let me know if you try it?
Also just FYI, you can usually find pre-ground flax seed at grocery stores. Bob's Red Mill makes one!
Sonya Parekh says
Hi Alanna!
I was wondering what the difference is between the lemon, yogurt and buttermilk variations of this crust? Thanks!
Alanna Taylor-Tobin says
Oh great question! All variations are adding a little acidity to the dough which I've found makes it less prone to shrinking as it bakes. The buttermilk and yogurt variations are my favorite because they add a little more protein to the dough which makes it a little easier to work with and more flaky. But if someone doesn't have any on-hand, there's no need to buy some just for this recipe; lemon juice or vinegar will add the needed acidity.
Please let me know which version you try!
Sue Venable says
I found your recipe, which really does look delicious, BTW, by searching for gluten free. Then, instead of a recipe I could get to easily the night before Thanksgiving, I found another one which had to be read and read and read, before I finally found the ingredients. When I finally did, the word hit me right away, Oats. Oats contain a protein which is a very close first cousin to gluten and cannot be eaten by those who either have a gluten intolerance or have a digestion problem. It is like false advertising to list your re ipe as gluten free if it has Oats in it. And it could actually be very harmful to someone who has newly found their intolerance and doesn't already know to check for Oats. Thank you. I'm sure those who do not care about the condition of their gut or have iron stomachs like my husband, and those not overweight from gluten will find your recipe most delicious.
Alanna Taylor-Tobin says
Hi Sue,
There's actually a "jump to recipe" button at the top of each of my posts. Makes it easy to get right to the recipe!
Thanks for your concern about the oats. Here in the US, gluten-free oats are considered gluten-free as advertised. One of my Aussie readers let me know that oats are not considered celiac-safe in Australia, but they are here. Here's what beyondceliac.com has to say about it: "Specialty gluten-free oats are grown, harvested and processed in a way that keeps them away from other grains and the high risk of gluten contact, and are widely accepted as safe for those with celiac disease."
You're absolutely right that some people with celiac can't tolerate even gluten-free oats, just like some can't tolerate dairy either, and some can't tolerate any grains at all and do better on a Paleo protocol. Also, many of my readers are GF for reasons other than celiac. Some have IBS, SIBO, or IMO (this is why *I* have to avoid glutenous grains). Some have other autoimmune conditions such as Hashimoto's, Crohn's, or colitis. And some just feel better on a GF diet. So oats are a healthy part of the diets of many of my GF readers.
For my readers who *can't* tolerate oats or don't have oat flour on hand, I've been giving substitution suggestions in most recent recipes including this one. There's additional detail about these subs and ingredients in the post body (one benefit to reading the post rather than skipping straight to the recipe.)
In any case, I hope you found a recipe that was to your liking and that you and your husband had a delicious holiday meal.
Dee says
This recipe was not at all what I expected it to be. For all the work that goes into it, it wasn't worth it. The crust was hard and not "flakey" like you wrote. I have made other gf crusts and by far this one falls short. I really haven't found a gf recipe that comes close to being "flakey" like a gluten one. What a disappointment.
Alanna Taylor-Tobin says
Hi Dee,
I'm sorry to hear that this recipe didn't do it for you. Usually when the crust bakes up hard and not flakey it's because the dough needed a bit more hydration, more so than a wheat dough. It definitely takes some practice to get the technique and feel of the dough down. In any case, I hope you find a gf pie crust recipe that's to your liking!
Sonja H says
Wow that wasn’t my experience w this recipe at all. Funny how maybe one might need to practice a bit more before blaming a recipe.
Dee says
Sonja, I guess you never come across a recipe that doesn't turn out. Good for you.
Travis Huber says
Absolutely amazing. First go around was ok although got hard to hard on me. Pro tip... Don't forget to add the tapioca flour that you made a special trip to the store to get. Second go around was amazing though. Turned out just like gluten-ful crust in constancy and honestly way more flavorful!
Alanna Taylor-Tobin says
I'm so glad that you liked it and that the tapioca flour made it into the second batch, haha! I've definitely been there, it's a lot of ingredients to remember to add. Thanks so much for the sweet note and rating!
Tarah says
Wow. Fantastic recipe. It's a bit of work, but pie dough is always a bit of work. I used white rice instead of sweet rice, leaf lard in place of butter and 8 1/2 Tbsp. ice water. The dough was very easy to work with. I just baked up pie crust cookies with the extra dough and they are just SO GOOD. Flaky, tender, brown nicely, held their shape. I have struggled for 5 years to find a good recipe and this is it! Thank you!!
Alanna Taylor-Tobin says
Ah this makes me so happy! Very cool to know that leaf lard works well in place of butter, and white rice flour in place of sweet rice. Brilliant! Thanks so much for trying my recipe and for the kind note!
Megan H says
What a fabulous dough to work with! I have my own somewhat similar recipe that I have used for years (with cream cheese, without the flax) but it is fiddly and often stressful. This dough came together beautifully and rolled out like a dream; perfect circle and not a crack in sight. I always thought I was just a bad pie-dough-roller-outer, sighing over cracks and straggly edges, but now I have new confidence that it was my dough all along! I had a slight glitch in the beginning; I was thinking tablespoons and not teaspoons as you said, to add in a bit more water, and I made it a little too wet. But I just dusted it with the sweet rice flour and gently worked it in till I got it where it needed to be. I doubled the recipe because I was making a cherry pie, did the sorghum sub for oat flour and the yogurt sub for vinegar. I used 1/2 butter and 1/2 lard. I brushed my bottom crust with an egg-white wash to help prevent soggy bottom before I put in my filling, and because flinging a top crust on always gives me massive anxiety, I just cut out different size hearts from the dough and put them on top, finishing with an egg wash. It looks lovely and tastes even lovelier! Thank you for another wonderful recipe.
Alanna Taylor-Tobin says
Oh I'm so glad you loved this pie crust recipe! Yes this dough likes a little extra moisture than most, it makes it easier to roll out for sure. That pie sounds delicious and so beautiful! Thanks a bunch for the great feedback, I really appreciate it!
Sonja H says
Bravo + thank you dear lady for such a fine GF crust as I have never encountered nor been able to produce. All the effort (of sourcing ingredients and the frisage(sp?) + turning + waiting was worth it). It was gloriously easy to rollout, even had some stretch + bounce when rolling as if it had gluten. And the texture and flakiness is epic. I made your peach ginger pie and oooh lala. I can’t imagine how many trials you had to go through to come town this. So glad I found you. I bought your book … can’t wait to try more!
Rena says
This was my first time making a gluten free pie crust and the flavor was so delish!!! I have a question though. My edges burned. I’m wondering if I pre-baked it for too long. I followed the instruction time for the pre-bake so I’m guessing I should have cut back? I also forgot to brush the egg wash. Could that have been one of the reasons? I knew after the pre-bake and the crust cooling that I think the sides were gong to be overdone. Thoughts?
Alanna Taylor-Tobin says
Hi Rena,
I'm so glad you liked the crust, though I'm very sorry to hear about the edges burning. That's no good!
It's definitely possible that the pre-bake went a little long. I also wonder if your oven might run a little hot? Maybe try using an oven thermometer to rule that out. Also, did you bake the pie on the lower rack of the oven? In my oven, that helps to keep the crust from over-baking. Not brushing with egg white shouldn't effect how the crust cooks, it just keeps the bottom crisp longer. In fact, I don't brush the top of the crust because egg white promotes more browning, which we clearly don't want here!
One thing you could try is covering the edges of the crust with aluminum foil after parbaking and before adding the filling or if you find that it's getting too dark while baking. It's a little awkward to do, but it can shield the crust from the heat of the oven. They also make pie crust protector shields that can be purchased for under $10.
What filling did you use in the pie? If it's a filling that needs a long bake such as apples, it might be ok to skip the parbaking step altogether.
Let me know if that helps or if I can help troubleshoot further. Thanks so much for the feedback on this recipe, I really appreciate it!
-Alanna
Jen says
I made this our crust for apple pie this week, I used sorghum flour instead of millet flour. The crust was easy to work with and turned out very good! Thank you!!!
Georgee Young says
I love your recipes and I am very much looking forward to making this tomorrow. I have a question about your advice to not put a glass pie pan directly into the oven. Should we leave the chilled pie crust out on the counter for a bit before putting it on the rimmed baking sheet to put in the oven? Or by advising us not to put it directly in the oven do you mean that putting it on the rimmed baking sheet straight out of the fridge as opposed to on the oven rack will suffice? Thanks!
Alanna Taylor-Tobin says
Ah great question! So it should be safe to move the pan straight from the refrigerator into the oven. It's *not* safe to move it from the freezer directly to the oven because that dramatic shift in temperature can cause some glass dishes to shatter. I did this for many years and never had that happen, but this is what the internet tells me.
So if you chill the crust in the fridge before baking and put it right into the oven, that shouldn't be a problem.
Let me know how you like the crust, and bojon appétit!
Georgee Young says
Thanks for your fast response. Made your pumpkin pie w/ this crust. It was delicious. Can’t wait to try your other recipes w/ this crust.
Alanna Taylor-Tobin says
Yay! I'm so glad the crust and pumpkin pie filling were hits. Thanks so much for the note, I appreciate it!
Em says
Hello!
I'm looking at making your pie crust, which looks delicious, by the way!
Is it possible to use coconut flour as a substitution by any chance?
Alanna Taylor-Tobin says
Aw thank you! Coconut flour is tricky to substitute in baking recipes because it's about three times more absorbent than other flours. But I love the idea of developing a coconut flour pie crust recipe and I'll add it to my list of recipe requests!
Deanna Huston says
Can I substitute psyllium husk for flax or chia?
Alanna Taylor-Tobin says
That's a great question and I think it would work. It sounds like you can use the same amount whole psyllium husks to replace the flax/chia. Please let me know how it turns out if you try it!
Jane says
Crust came out great; used as a top crust for a chicken pie;
Subbed br. Rice flour for,the millet as I didn’t have any in the house; I did add a bit more ice water; rolled it out between 2 sheets of wax paper as no time to chill it. One of the better GF crust recipes I’ve tried! So thank you! I’m looking forward to trying it with an Apple galette.
Alanna Taylor-Tobin says
Woohoo, I'm so glad you liked the crust and that those changes worked well - brilliant! I love using this crust for pot pie - thank you for the reminder of a yummy thing to make for dinner. Please let me know how you like the apple galette!