This gloriously flaky gluten-free pie crust recipe rivals a wheat crust! It's super flavorful thanks to whole food ingredients: sweet rice, oat, and millet flours plus flax or chia seed (no xanthan gum!). A couple of classical pastry techniques make it easy to work with and give it extra layers.
I'll show you how to use these ingredients and techniques to get the flakiest GF pie crust, plus how to shape and blind bake it for all your pie needs. Use it in sweet and savory pies, tarts, galettes, quiches and turnovers.
The recipe is adapted from my award-winning cookbook Alternative Baker: Reinventing Dessert with Gluten-Free Grains and Flours. You can learn more about baking with gluten-free flours in my gluten-free flours guide!
Looking for a flaky gluten-free pie crust that tastes like it was made with wheat flour? I've spent years developing a recipe that tastes and feels like a whole wheat pie crust – buttery, flaky, and full of flavor.
Here's why this recipe is (IMHO) the best gluten-free pie crust out there:
- It's super flaky and easy to work with. It can be rolled out, fluted, weaved, and crimped with ease.
- It's made from whole-grain gluten-free flours that add nutritional value and loads of flavor. As a bonus, you don't need to source a particular flour blend to make it!
- It's free of xanthan gum, which some folks are intolerant of (plus it just sounds icky!)
- You'll feel like a professional pastry chef while you make it! I'll show you a couple of classic pastry techniques that create layers upon layers of flaky goodness.
- It can easily be made dairy-free and vegan by using plant butter.
- You can use it to make pies, savory tarts, galettes, and quiche.
A Decade of Great Gluten-Free Pie
I first developed this gluten-free pie crust recipe in 2013 and I loved it so much, it inspired me to write an entire cookbook about baking with alternative flours and seasonal produce! I was eating a slice of a crumb-topped apple pie ala mode made with this crust, and I literally forgot that it was gluten free. I knew I needed to share it with the world!
This is *not* the simplest gf pie crust recipe out there. More conventional recipes rely on storebought gluten-free all-purpose flour blends that are loaded with starches and gums and don't have much nutritional value. They may be easy to make, but they tend to bake up pale, bland, and pasty.
My recipe starts with whole-grain gluten-free flours, enough starch to make the dough easy to work with, and flax or chia seed instead of any gums. It's one of the more advanced recipes in my book and on my site due to the number of flours and starches it uses (5) and the techniques it requires (fraisage and turns). But I've been making it over and over for the past ~10 years with no changes. It's very much worth the effort!
But don't take my word for it. Here are a few things readers have said over the years in the comments section below:
Seriously the best gf pie crust I’ve found. It’s the only pie crust recipe I use anymore!
I just made this crust last night and it was the best gf crust I’ve made yet. The texture was fantastic and the dough was easy to work with.
The crust was great! I even got a "this takes just like regular dough!" So flaky and crisp. Can't wait to try it again!
Singularly the best pie crust I have ever made.
Absolutely delicious! I used this recipe for two two-crust chicken pot pies, and the group I served them for loved them! One person commented that if this was how gluten-free tasted, then maybe they should go gluten free!
This pie crust is amazingly good. Buttery, nutty flavor; nearly as easy to handle as wheat dough; and a lovely fine flakey texture. I also appreciate the whole-grain ingredients, and the use of chia instead of gum.
You nailed this recipe!! It was perfectly buttery, flaky magic! I can’t get over how amazing it is! This will forever be my go to gf pastry dough!
I've recently added a few ingredient options to make this pie crust recipe more accessible (such as using pre-ground flax seed instead of having to grind your own chia seed). I've updated the post with beautiful process photos that Sarah helped me shoot for my book.
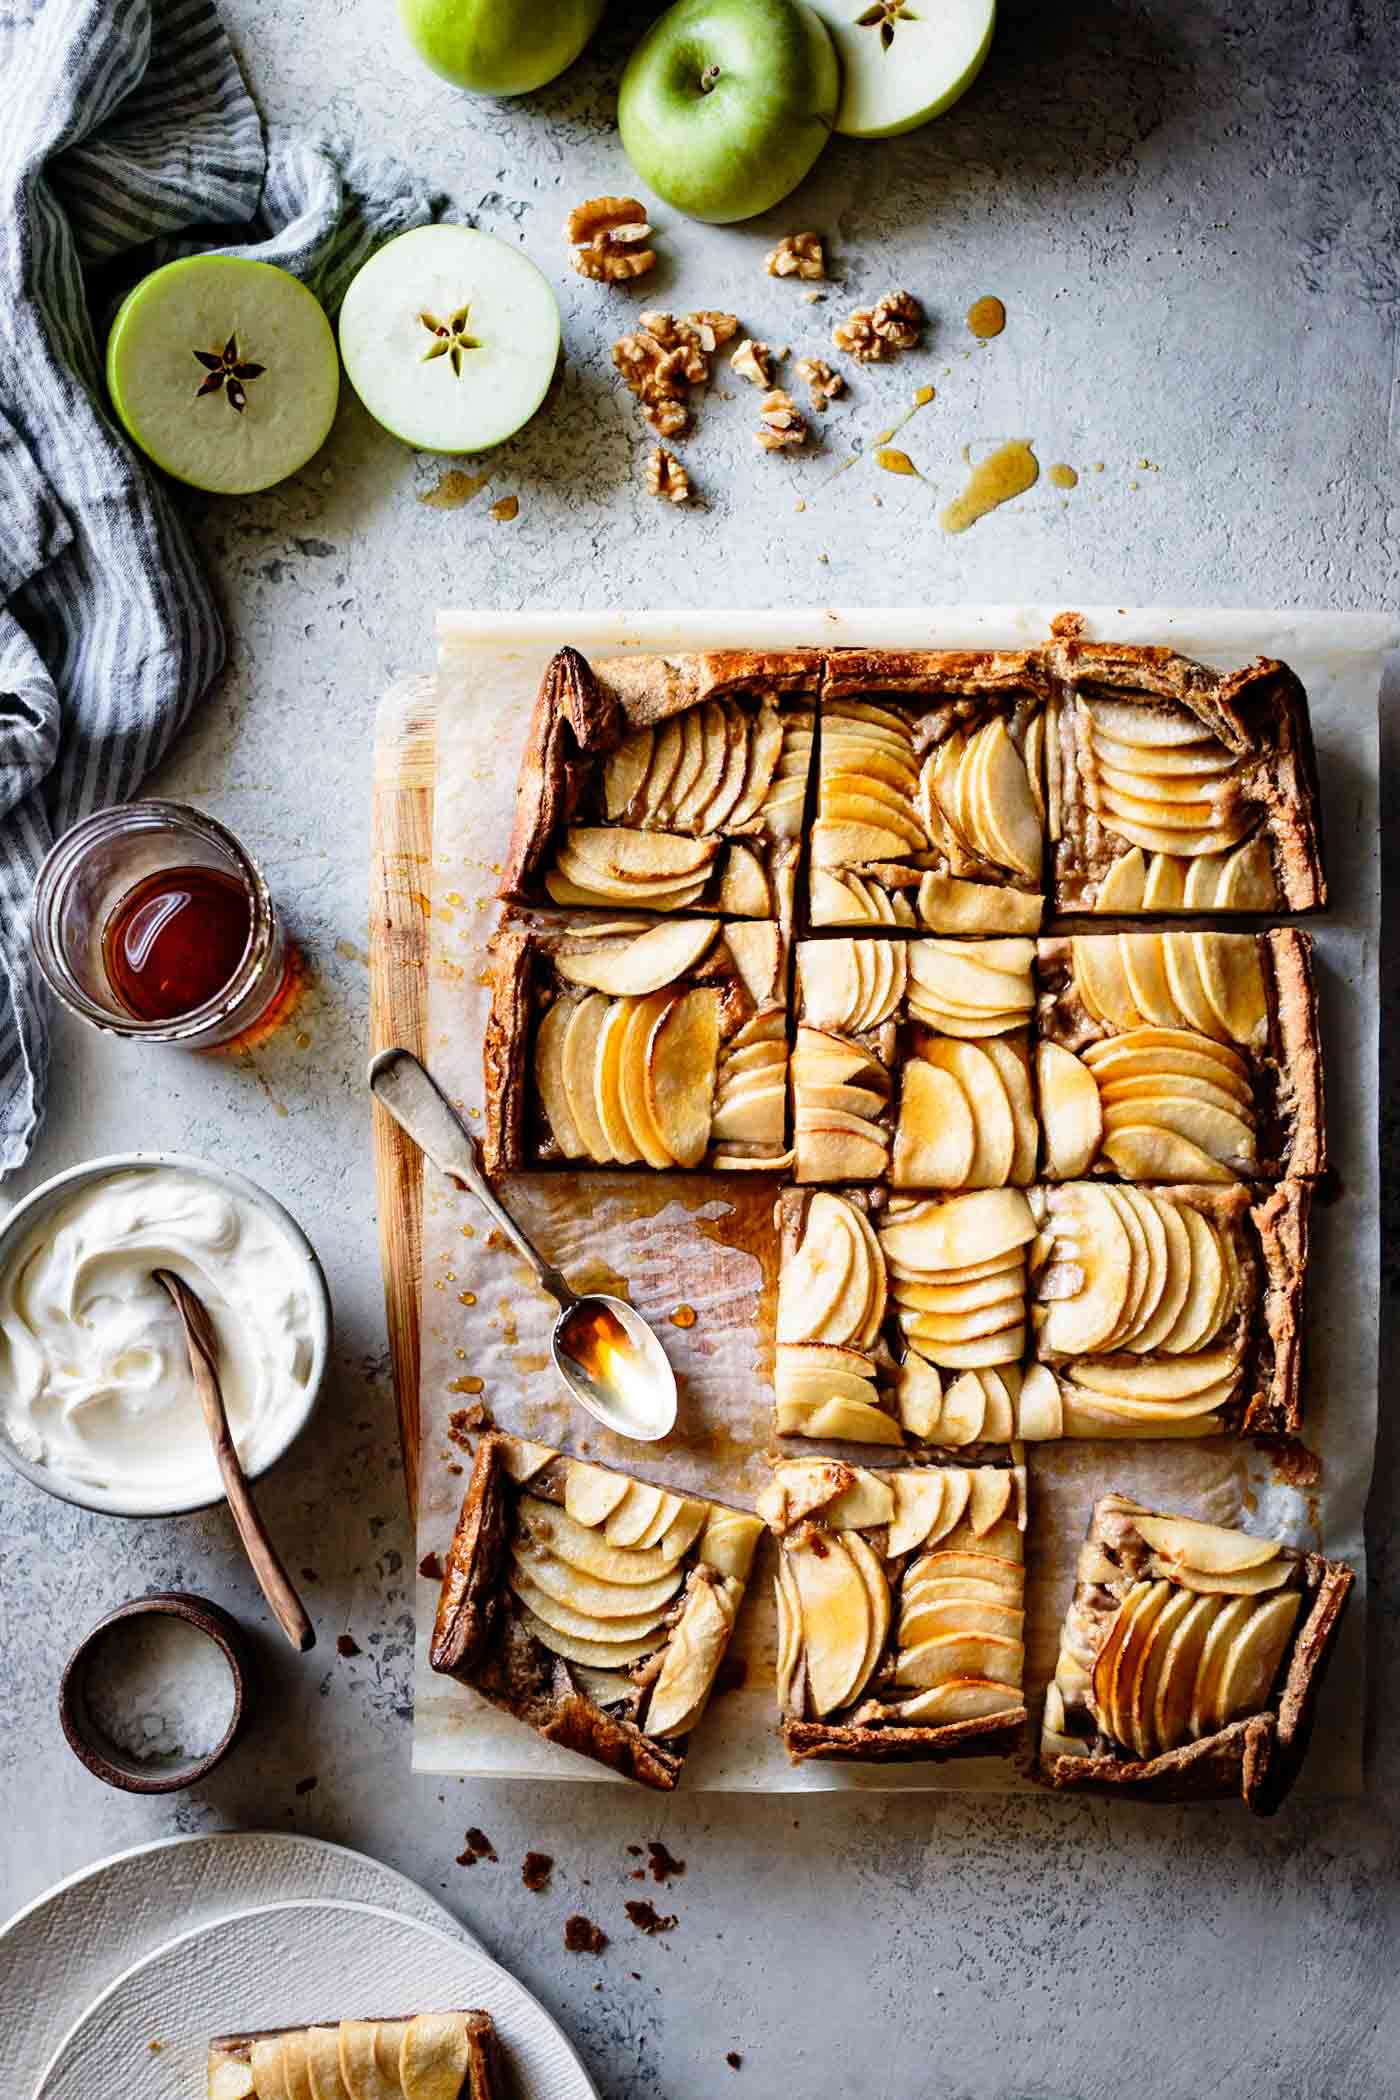
And I've shared some of my favorite pie, tart, galette, and quiche recipes that you can make with this crust. You can find all my favorite gluten-free pie recipes here!
GF Pie Crust Video
My friends Nadia and Rob made a dreamy video of this pie crust (the teff flour version used for a plum frangipane galette from my book). You can see how the dough comes together between 7 minutes and 12 minutes in the video!
Ingredients & Substitution Suggestions
Flours
I've tested this recipe with many different combinations of gluten-free flours and starches and this combination makes the flakiest, easy to work crust. I've added substitution suggestions in case of dietary restrictions or trouble sourcing ingredients. Substitute by weight for best results!
I use Bob's Red Mill flours but any brand should work. You can find these at most well-stocked grocers.
- Sweet rice flour adds stickiness and a neutral flavor.
- Sub any GF AP blend (Bob's Red Mill 1 to 1 is recommended as it uses sweet rice flour as its base).
- Oat flour adds tenderness and a creamy / nutty flavor.
- Sub sorghum flour.
- Millet flour adds a buttery flavor and keeps the crust delicate.
- Sub sorghum flour, or for a stronger flavor use buckwheat or teff flour.
- Cornstarch makes the crust shatteringly crisp.
- Sub more tapioca flour (though cornstarch works best!)
- Tapioca flour makes the dough extensible (aka stretchy) so it's easy to work with.
- Sub arrowroot flour.
Other Ingredients
- Butter makes the crust rich and tender. For best results, use a high-quality European-style butter with a high fat content such as Kerrygold, Vermont Creamery, or Straus.
- For a dairy-free & vegan pie crust, use a good plant-based butter such as Miyoko's cultured unsalted butter. Or get the recipe for a version made with coconut oil in my book!
- Ground flax seed or chia seed add stickiness that make the dough smooth and pliable. For the most attractive crust, use golden flax or white chia seed. These take the place of the usual xanthan gum that's in most recipes.
- Sub 1/2 teaspoon xanthan gum.
- Salt and a little sugar sharpen the flavors and promote browning. No need to omit the sugar if using this in a savory recipe; it just enhances the flavor and doesn't add much sweetness.
- Sub maple sugar or coconut sugar.
- Vinegar or lemon juice add acidity that keep the dough tender and prevent it from shrinking as it bakes.
- Yogurt or buttermilk can also be used to add acidity – these make extra lovely dough since they add a little protein as well!
- Ice water brings the dough together.
- Sub chilled water.
What Makes this Pie Crust so Flaky?
Unlike most gluten-free pie crust recipes out there, my version uses two techniques to get big, tender flakes similar to a rough puff pastry.
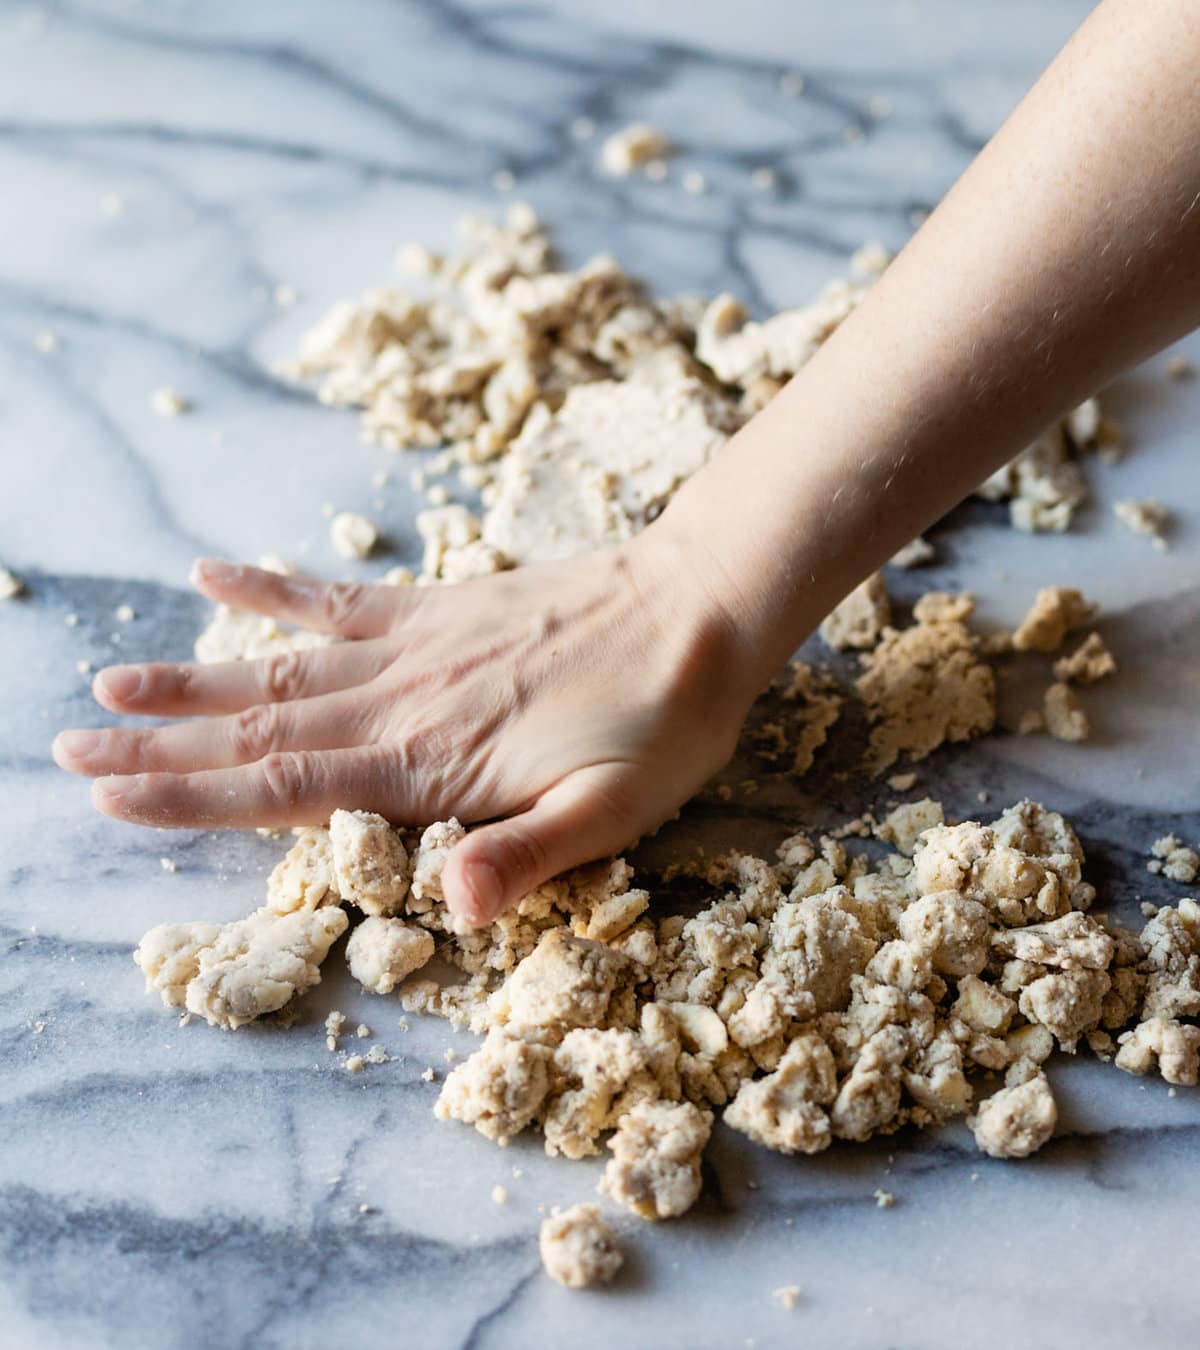
- Fraisage: scraping portions of dough along the counter
- Turns: rolling the dough out and folding it up over itself
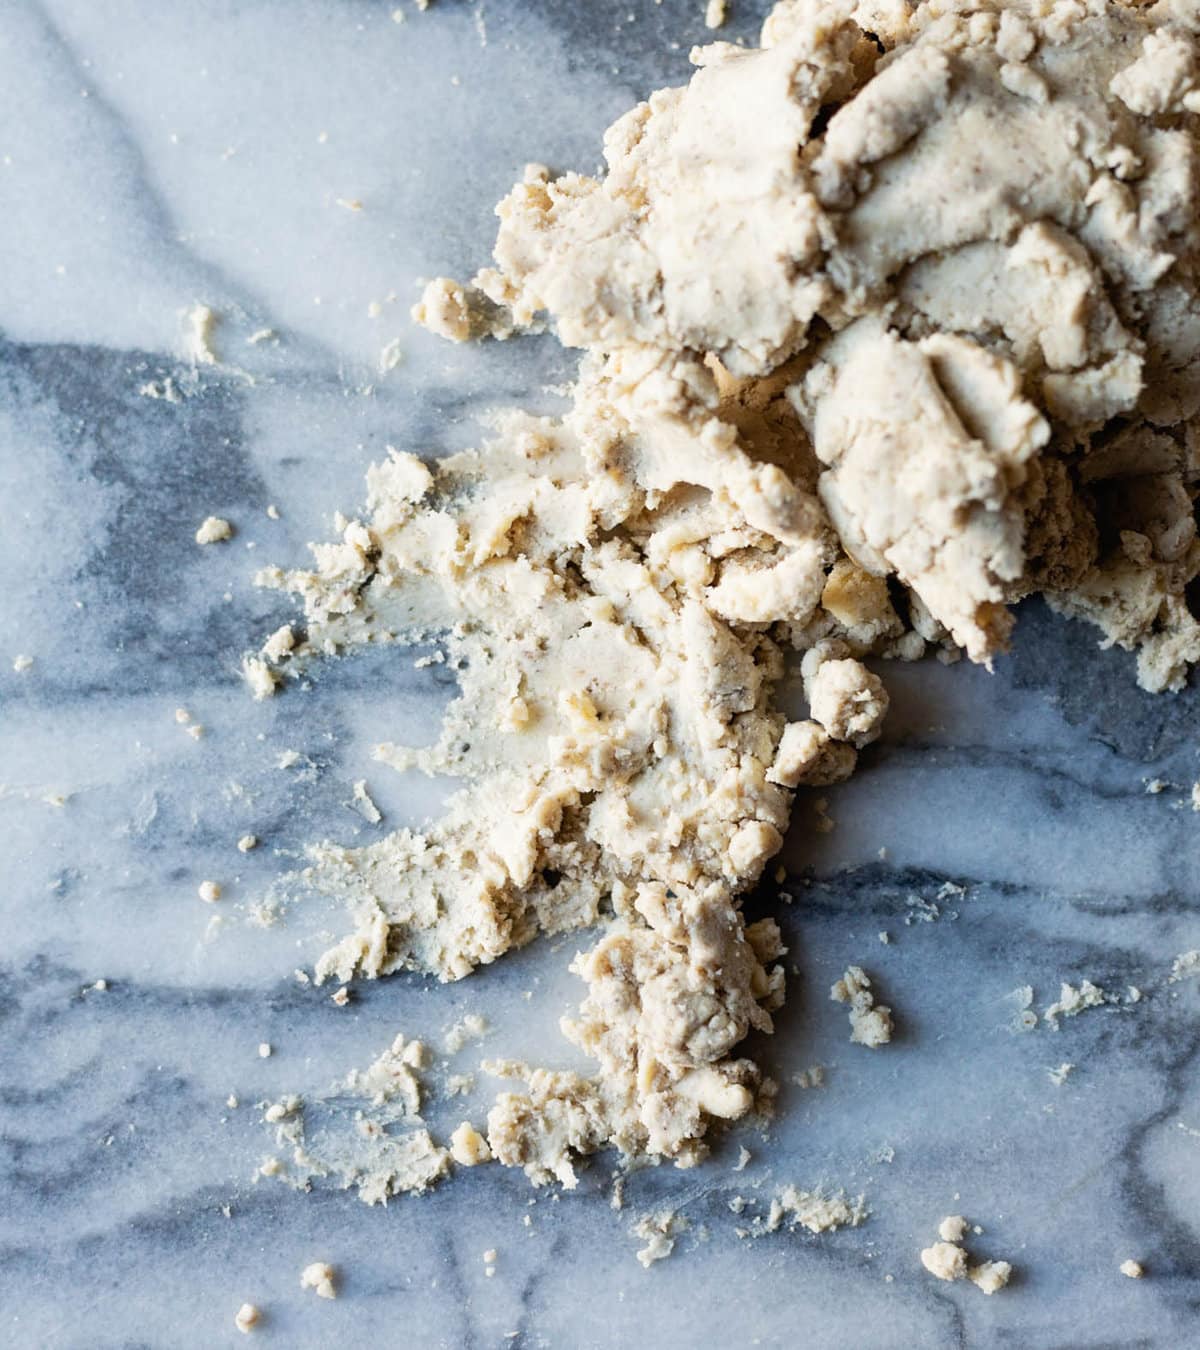
When we leave big chunks of cold butter in the dough, these methods form the butter into long, wide sheets encased within multiple layers of dough.
When the cold dough hits the heat of the oven, the butter sheets let off steam which raise the layer of dough above it.
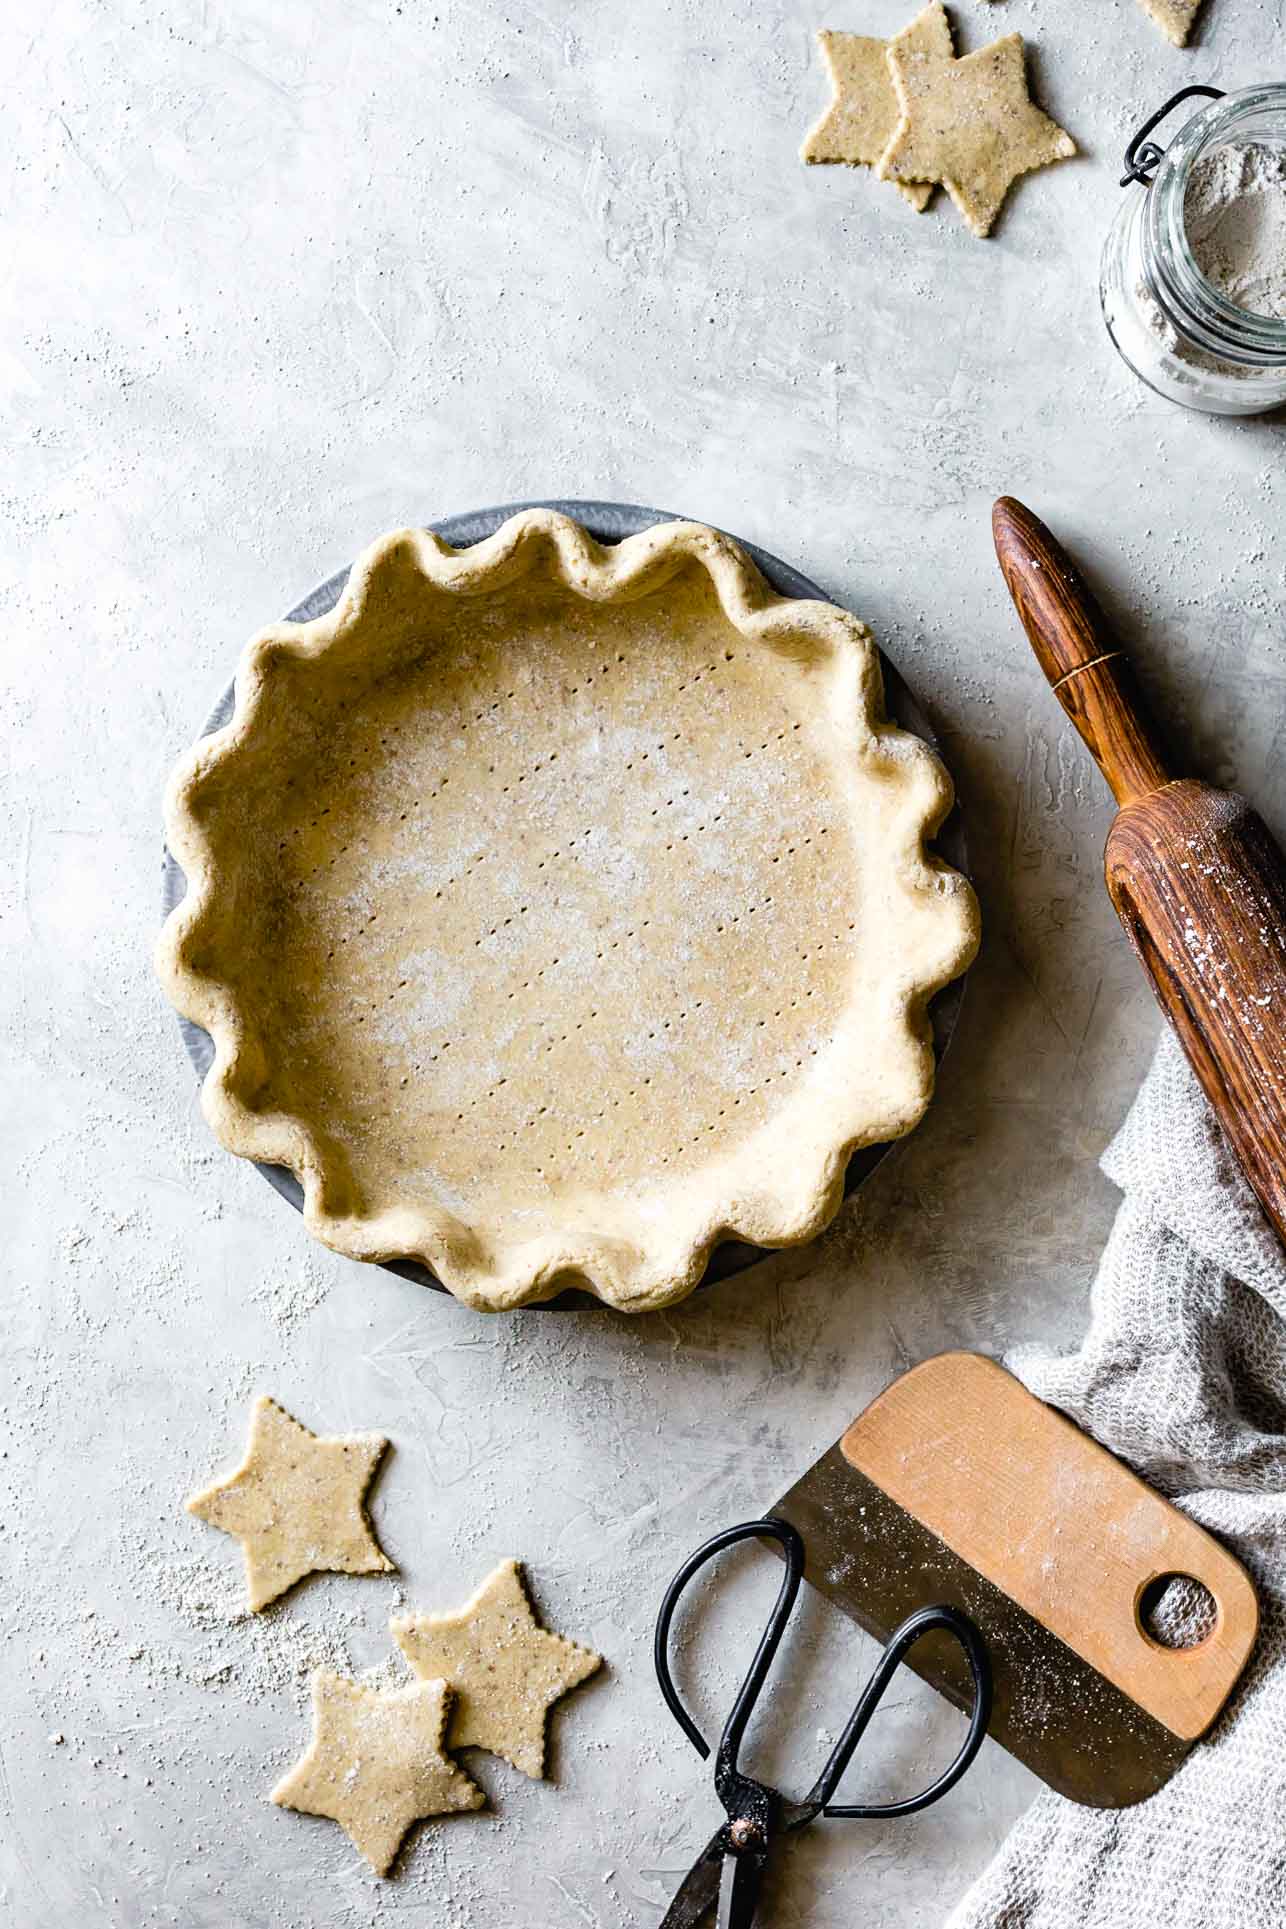
The process is downright magical and will make you feel like a badass pro baker when you pull your masterpiece from the oven. The photos below show these methods in action!
How to Make a Gloriously Flaky Gluten-Free Pie Crust
- This recipe makes enough dough for a single crust 9-inch pie or a 10-inch tart or galette. Double the recipe if you're making a double-crust pie such as this apple pie with a cut-out crust or a lattice pie.
- This recipe takes several hours to complete, but much of the time is inactive chilling time (for both you and the dough!)
- If you can, make the dough a day ahead. It gets smoother and more workable as the flours absorb moisture in the fridge. It can also be popped in a freezer-safe bag and frozen for up to a year.
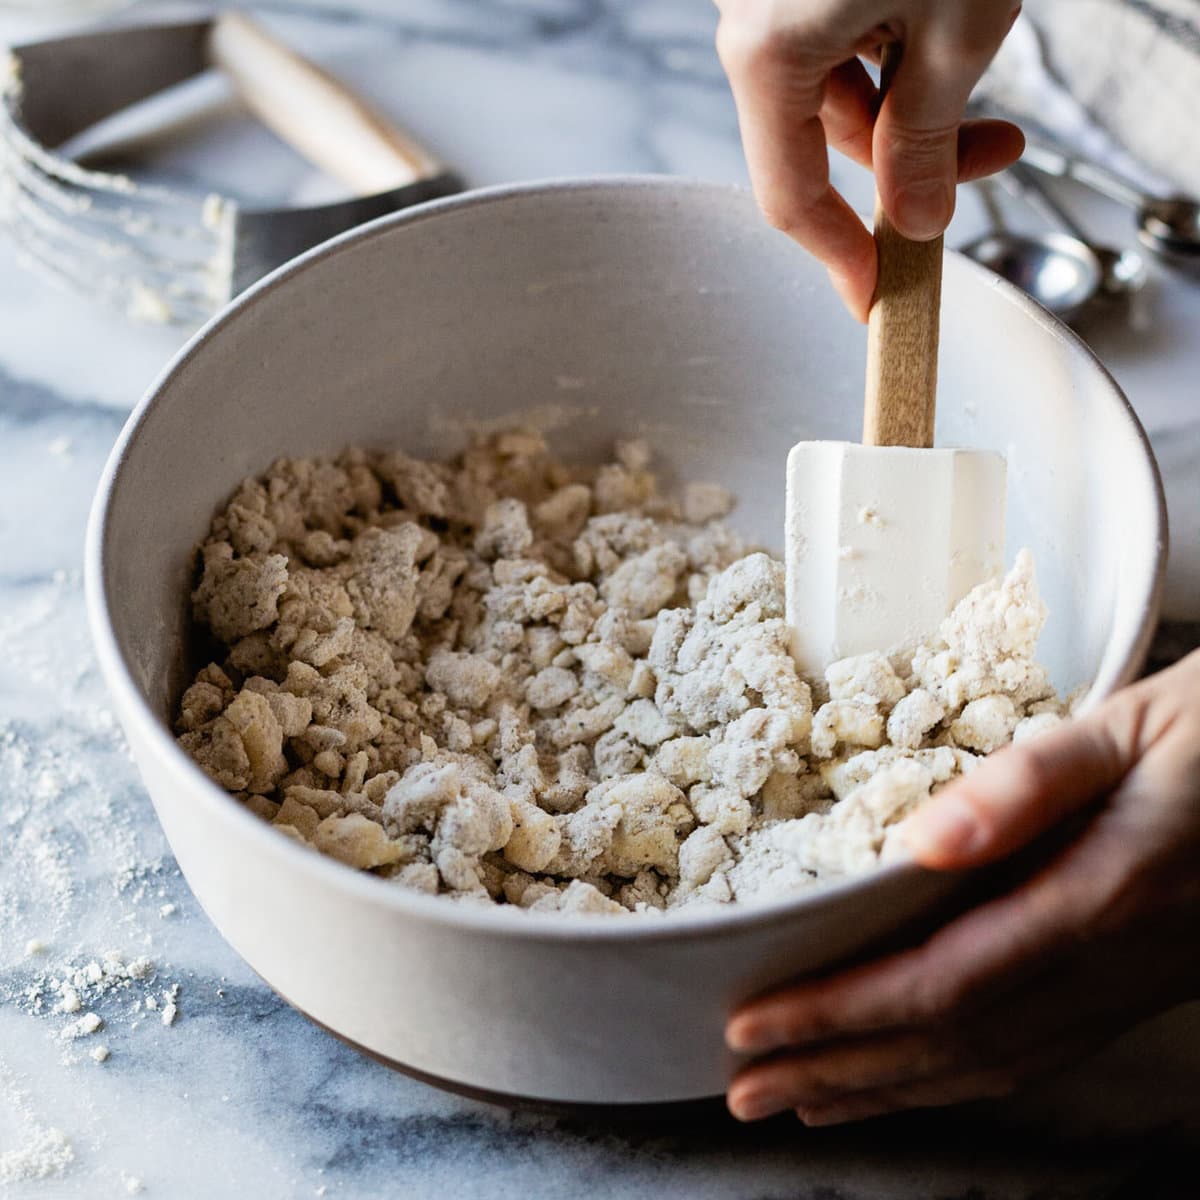
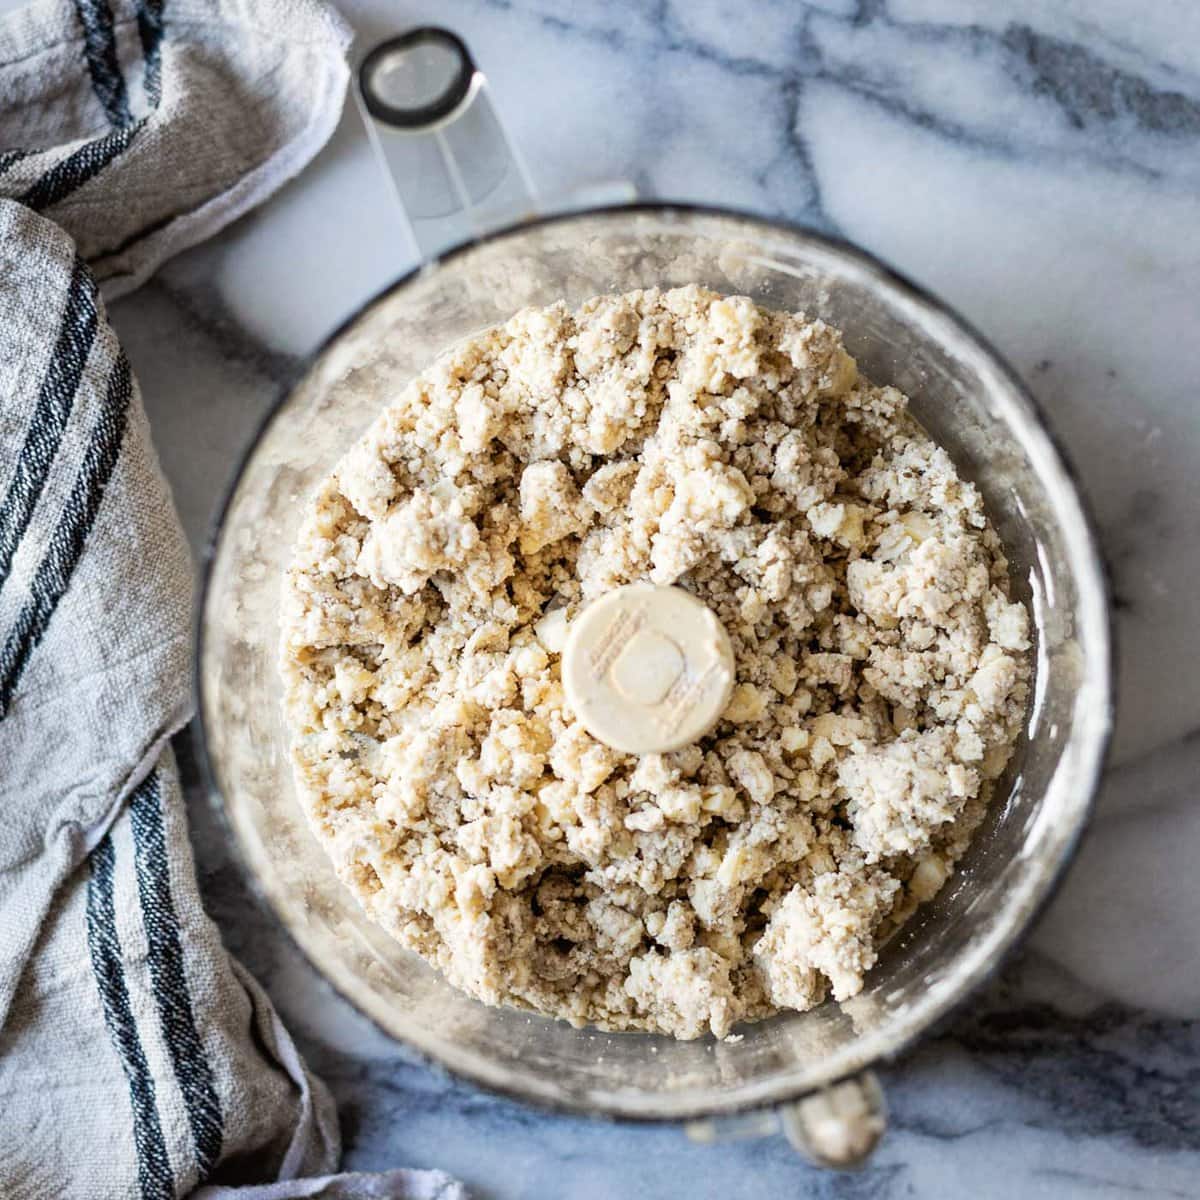
- I've shared two mixing methods for the dough: by hand and in a food processor. I usually use the food processor method, which makes the dough more smooth and pliable. But by hand, you have more control over the dough, which is best when you're just starting out, and it tends to be flakier since the butter can stay chunkier.
Method: By Hand
Fraisage
Method: Food Processor
Step 2: Open the feed tube and pour in the ice water mixture in a slow and steady stream as you pulse the mixer. Squeeze the dough; it should hold together easily without feeling overly wet or sticky, and there should be large pea-sized butter pieces throughout.
Method: Turn the Dough
- Turning the dough (i.e. rolling it out and folding it over itself) is the method used to make croissants, puff pastry, and danish pastry.
- Here it builds extra flaky layers and it also makes the dough more smooth, pliable, and easy to work.
Shape the GF Pie Crust
Blind-Baking
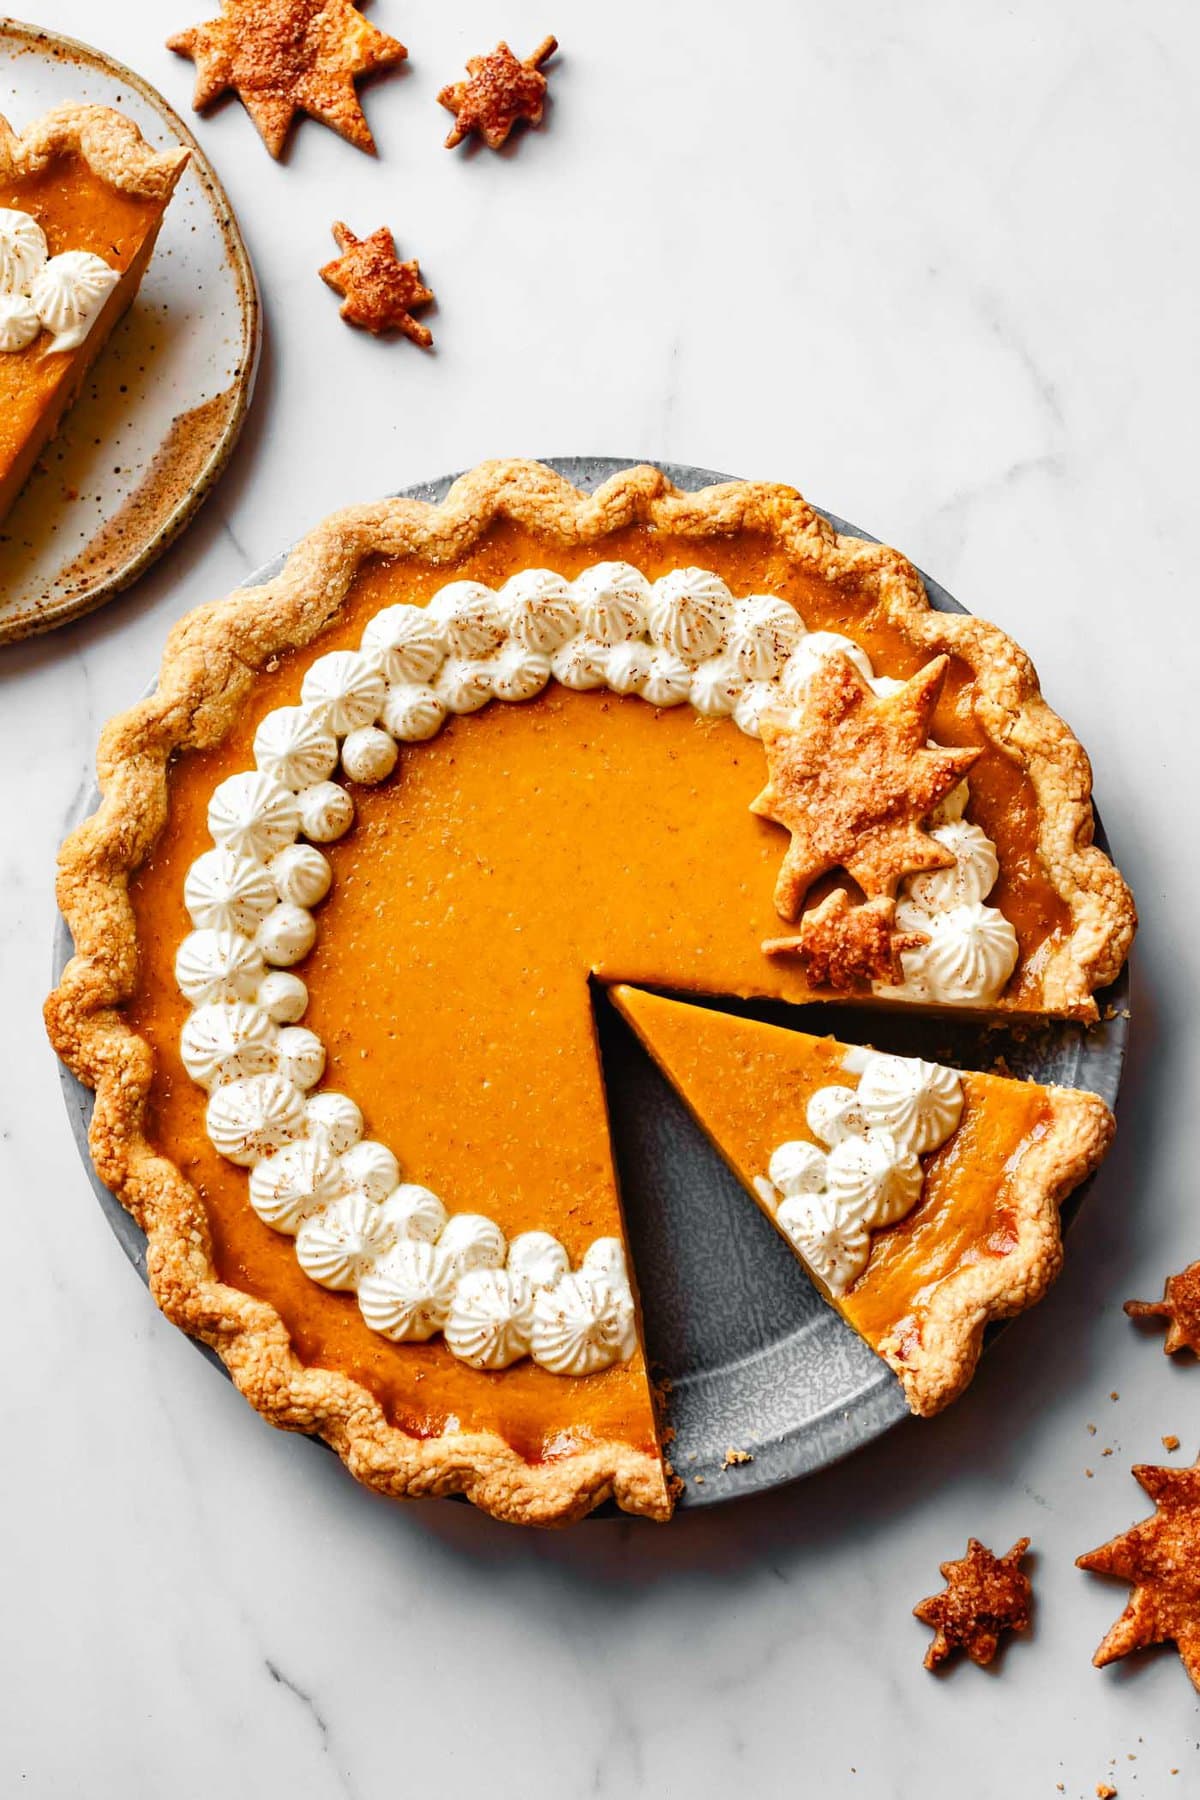
Blind-baking a pie crust means baking it for a time before you've added any filling. This method works best for custard-based pies where the filling takes less time to bake than the crust, such as quiche or pumpkin pie.
Step 1: Place a piece of parchment paper in the chilled crust and fill to the top with pie weights or dried beans. Place the crust on a rimmed baking sheet (to make it easy to maneuver and catch any buttery drips) and bake in the lower third of the oven at 400ºF.
Step 2: Bake the crust for 15-30 minutes (shorter for a metal pan, longer for a glass pan), until the crust will hold its shape when you lift off the parchment. Carefully remove the weights and parchment and bake until the bottom is dry and lightly golden, about 8-12 minutes longer (for a parbaked crust) or until deeply golden, 15-20 minutes (for a fully baked crust).
Step 3: If there are any holes or tears in the dough, use the saved scraps of dough to patch them before adding the filling, baking for a few more minutes post-patching.
TBG Tip: To keep the crust extra-crisp, brush the hot crust with a little bit of beaten egg white, then return to the oven for a minute or two. This creates a barrier between crust and filling, keeping the crust crisp for a couple of days after baking.
Congratulations, you're now ready to fill and bake your gluten-free pie crust!
Allergy-Friendly Variations
Gluten-Free Dairy-Free Pie Crust / Gluten-Free Vegan Pie Crust
Use vegan butter in place of the butter, and decrease the salt if the butter is salty. I like Miyoko's cultured vegan butter the best. Or get the recipe for a version made with coconut oil in my book!
Grain-Free / Paleo Pie Crust
Get the recipe here for a paleo crust made with almond and cassava flours!
How to use your perfect gluten-free pie crust
Some of my favorite pie recipes wrapped up in this buttery gf pie crust goodness!
Sweet
- Gluten-Free Pumpkin Pie – ultra-creamy pumpkin custard filling made with 10 ingredients
- Apple Galette with Maple Walnut Frangipane – flaky buckwheat crust folded around nutty frangipane and topped with thinly sliced apples. Rustic & fancy!
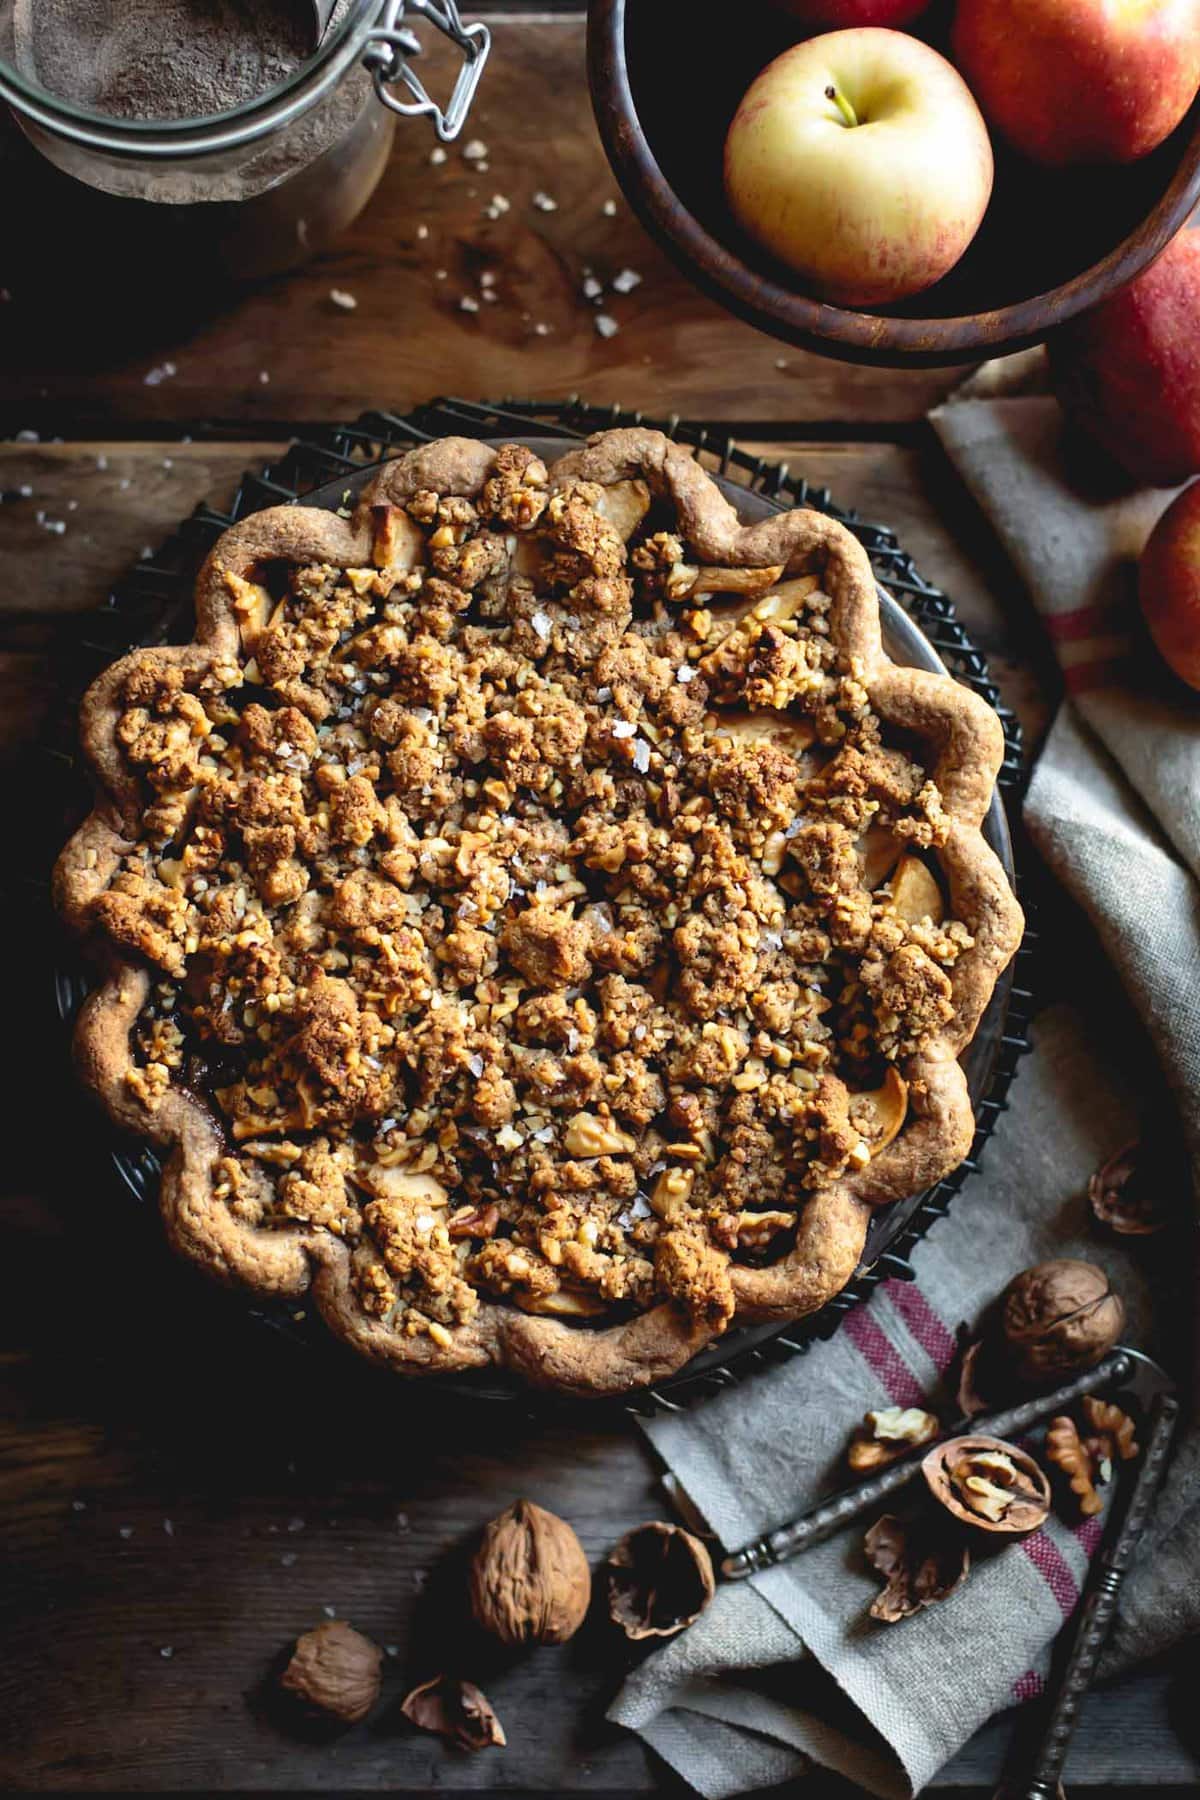
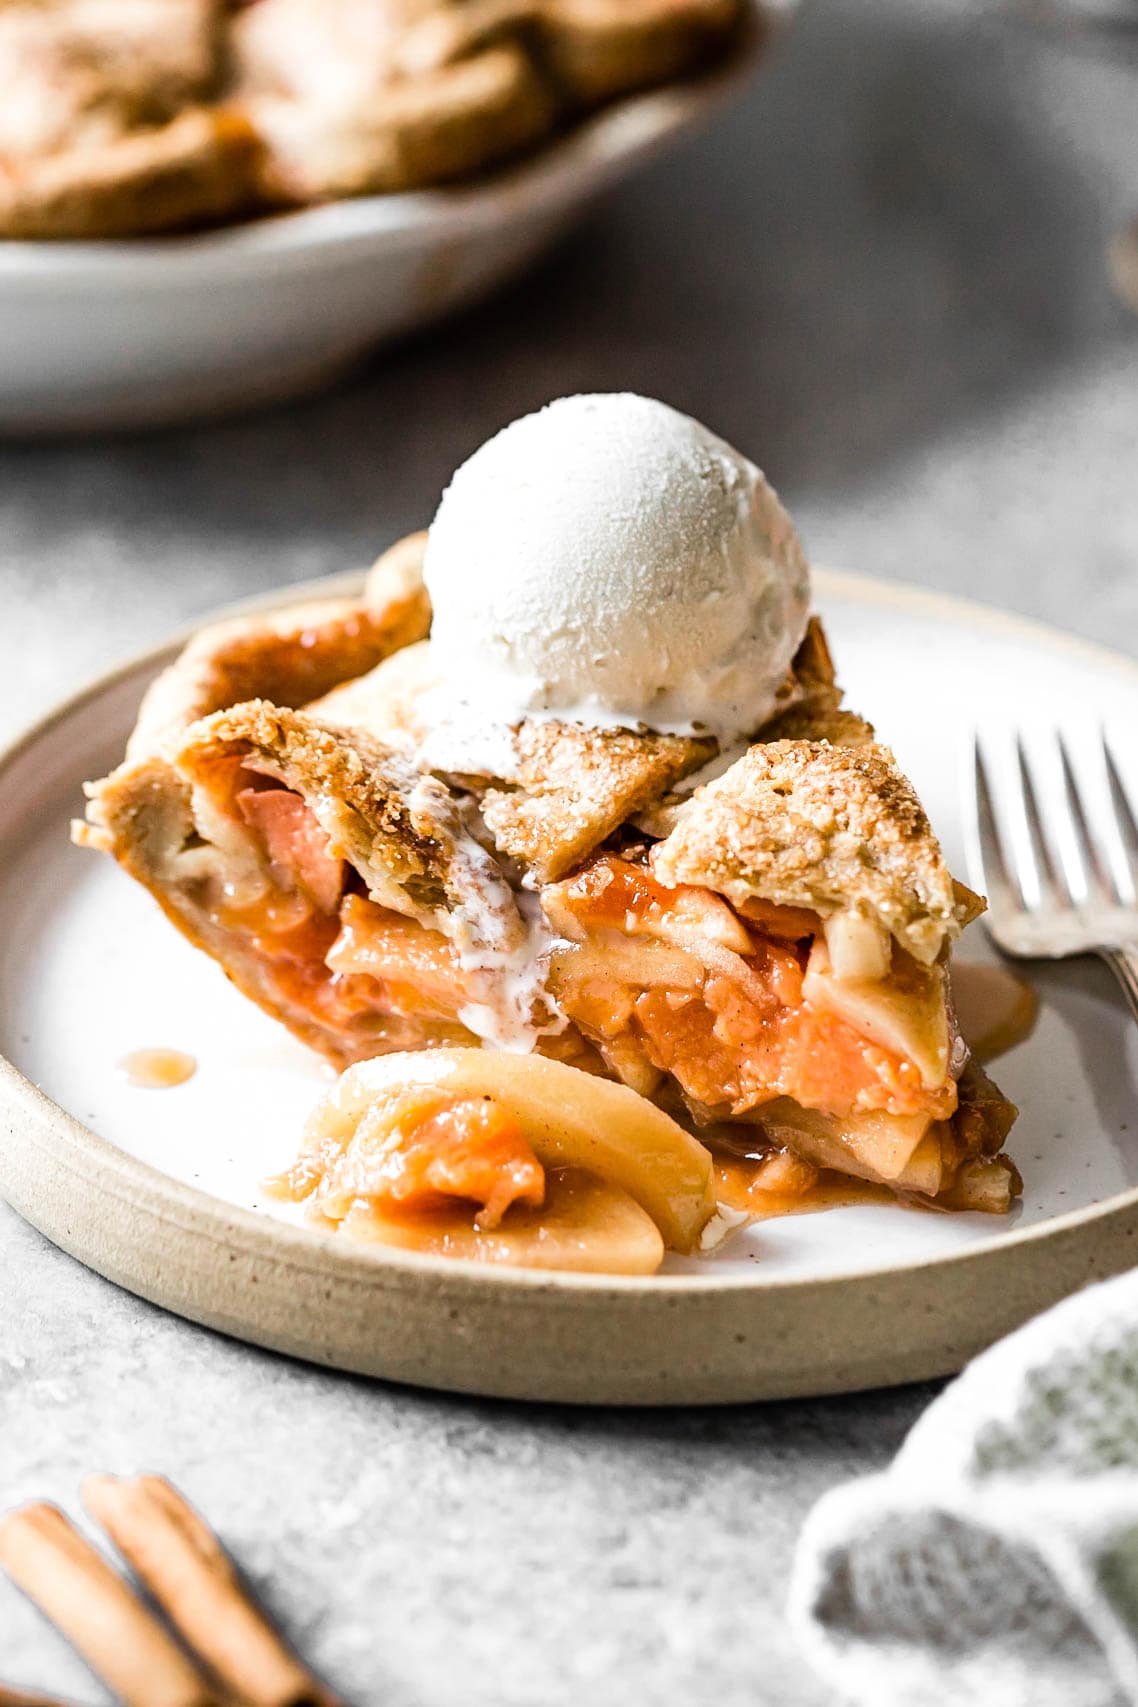
- Maple-Sweetened Apple Pie – perfectly juicy apples sweetened with maple and kissed with spices in a pretty cut-out crust.
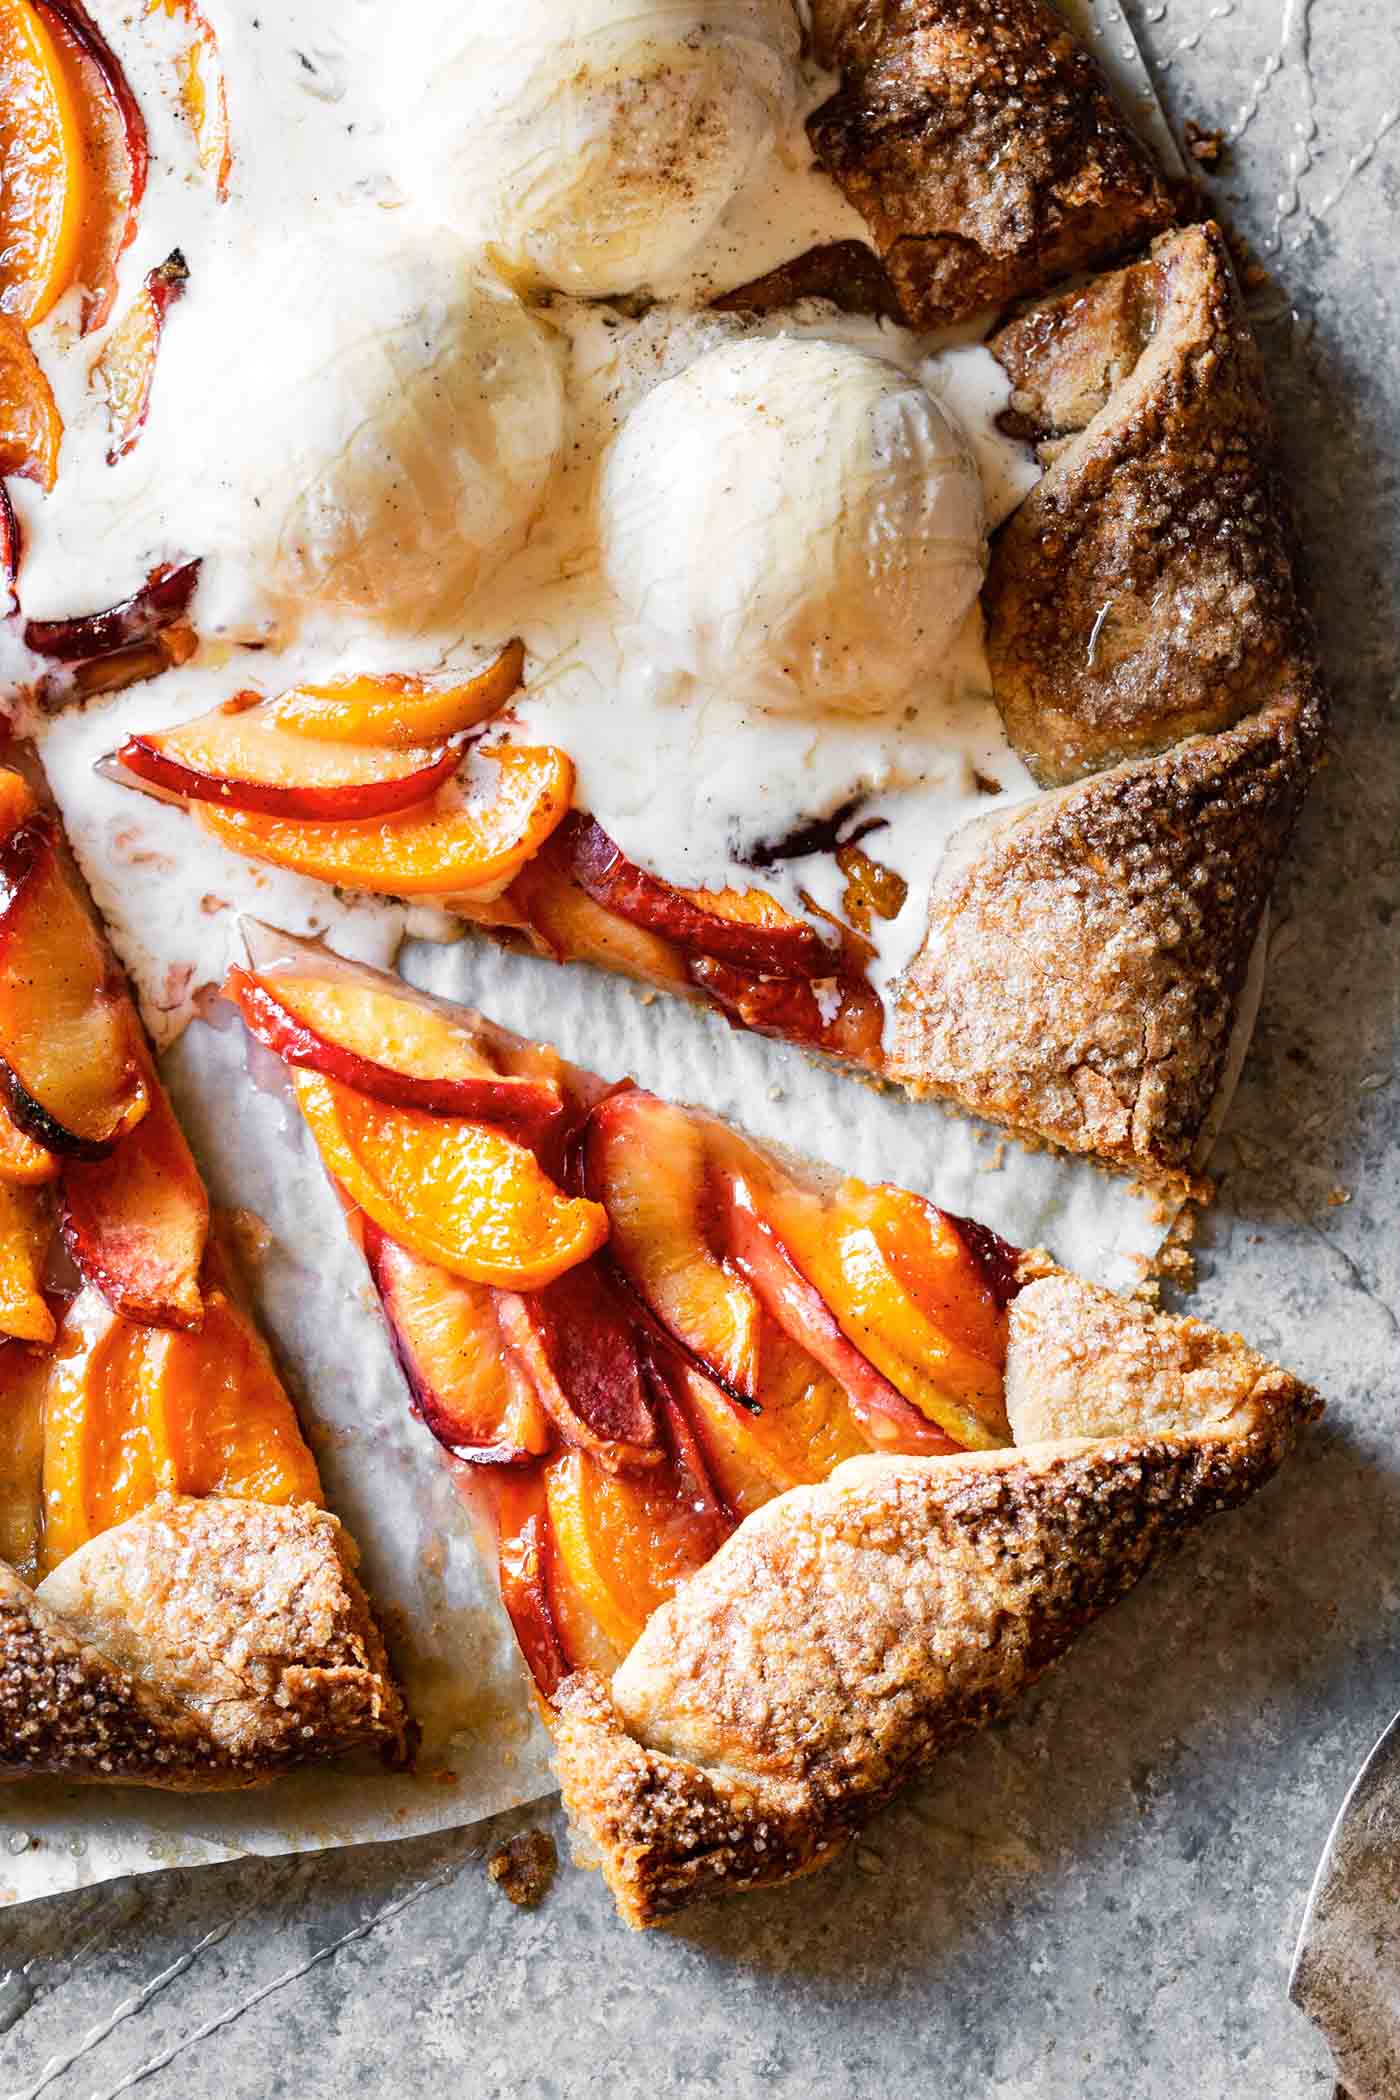
- Stone Fruit Galette – flaky pastry wraps slices of summer stone fruit flavored with honey and cardamom.
- Gluten-Free Cherry Pie – make this with fresh or frozen cherries! A slug of whiskey and pinch of spice make the flavors pop.
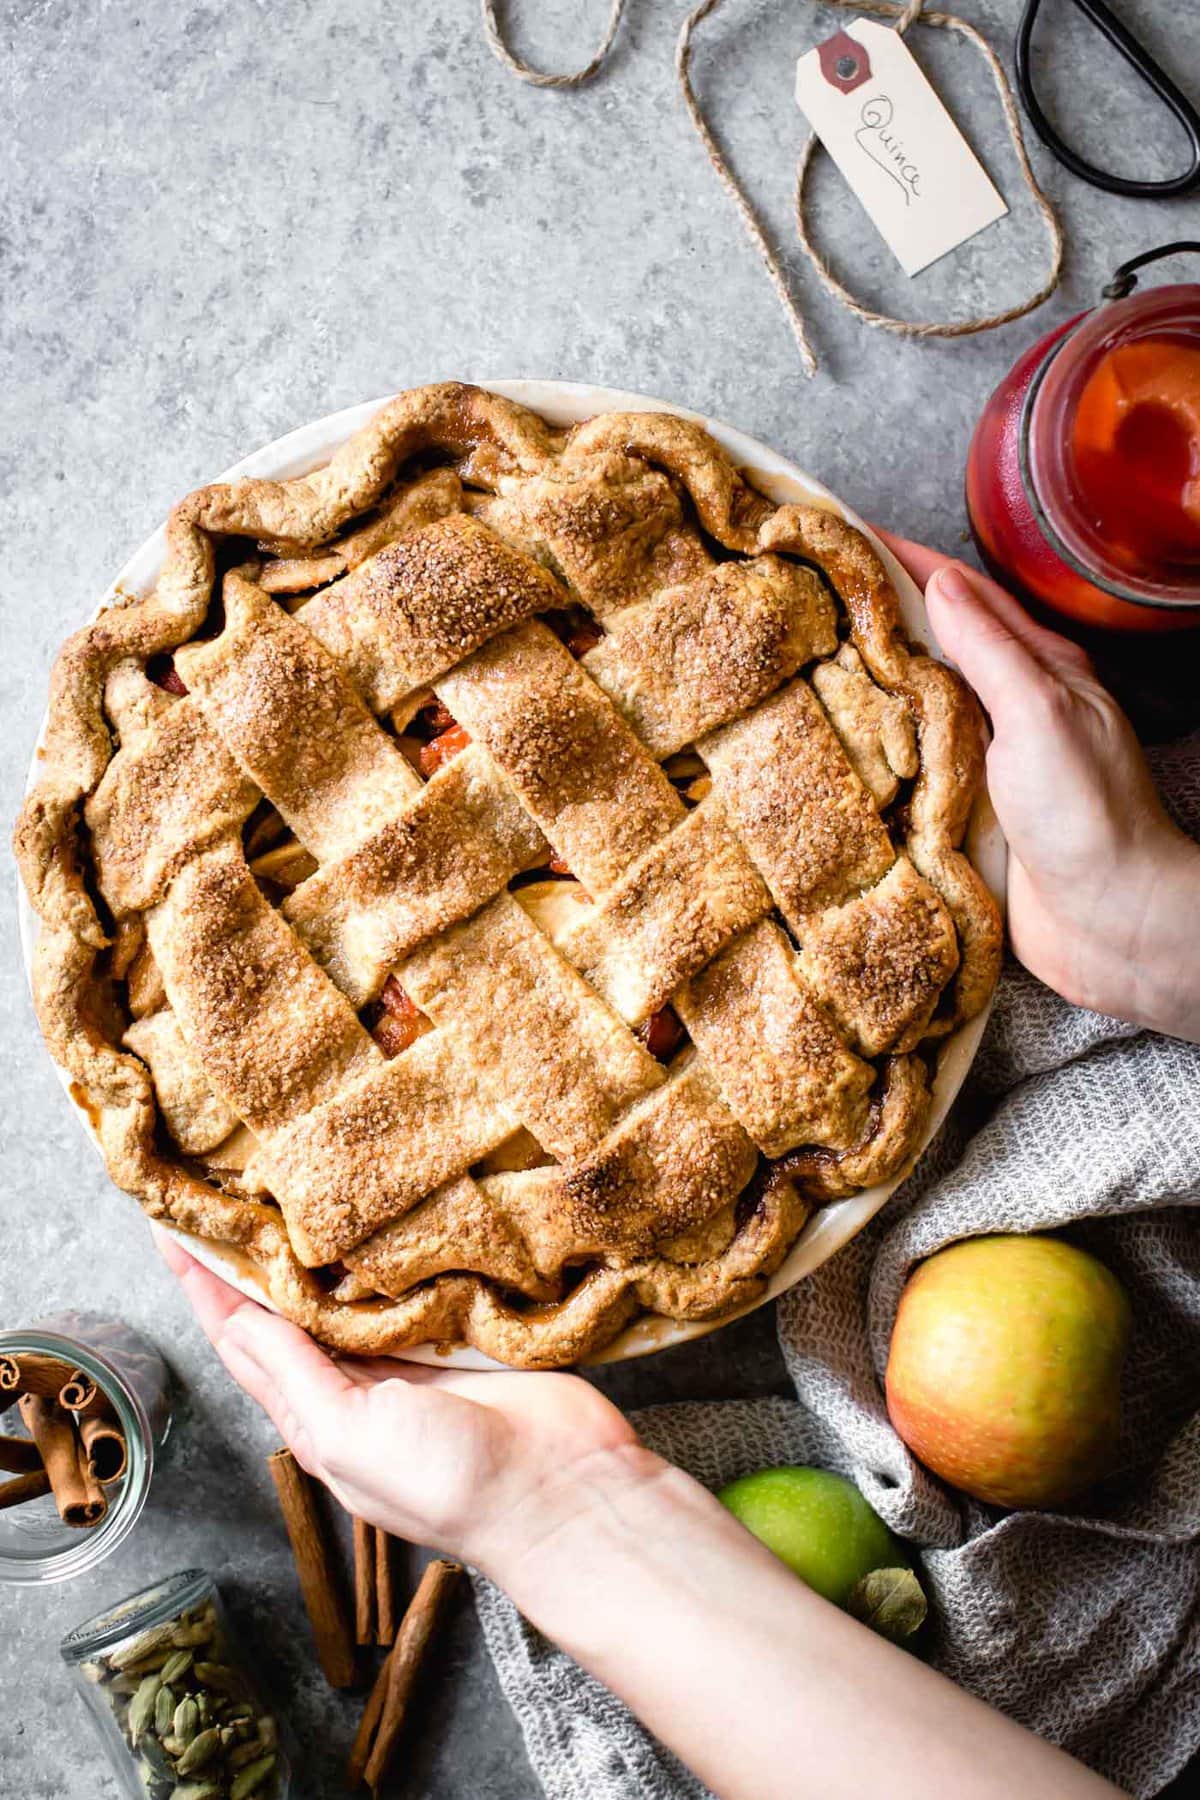
- Apple Quince Pie – double your pome pleasure with spiced poached quince and tangy apples, all commingling under a lattice crust.
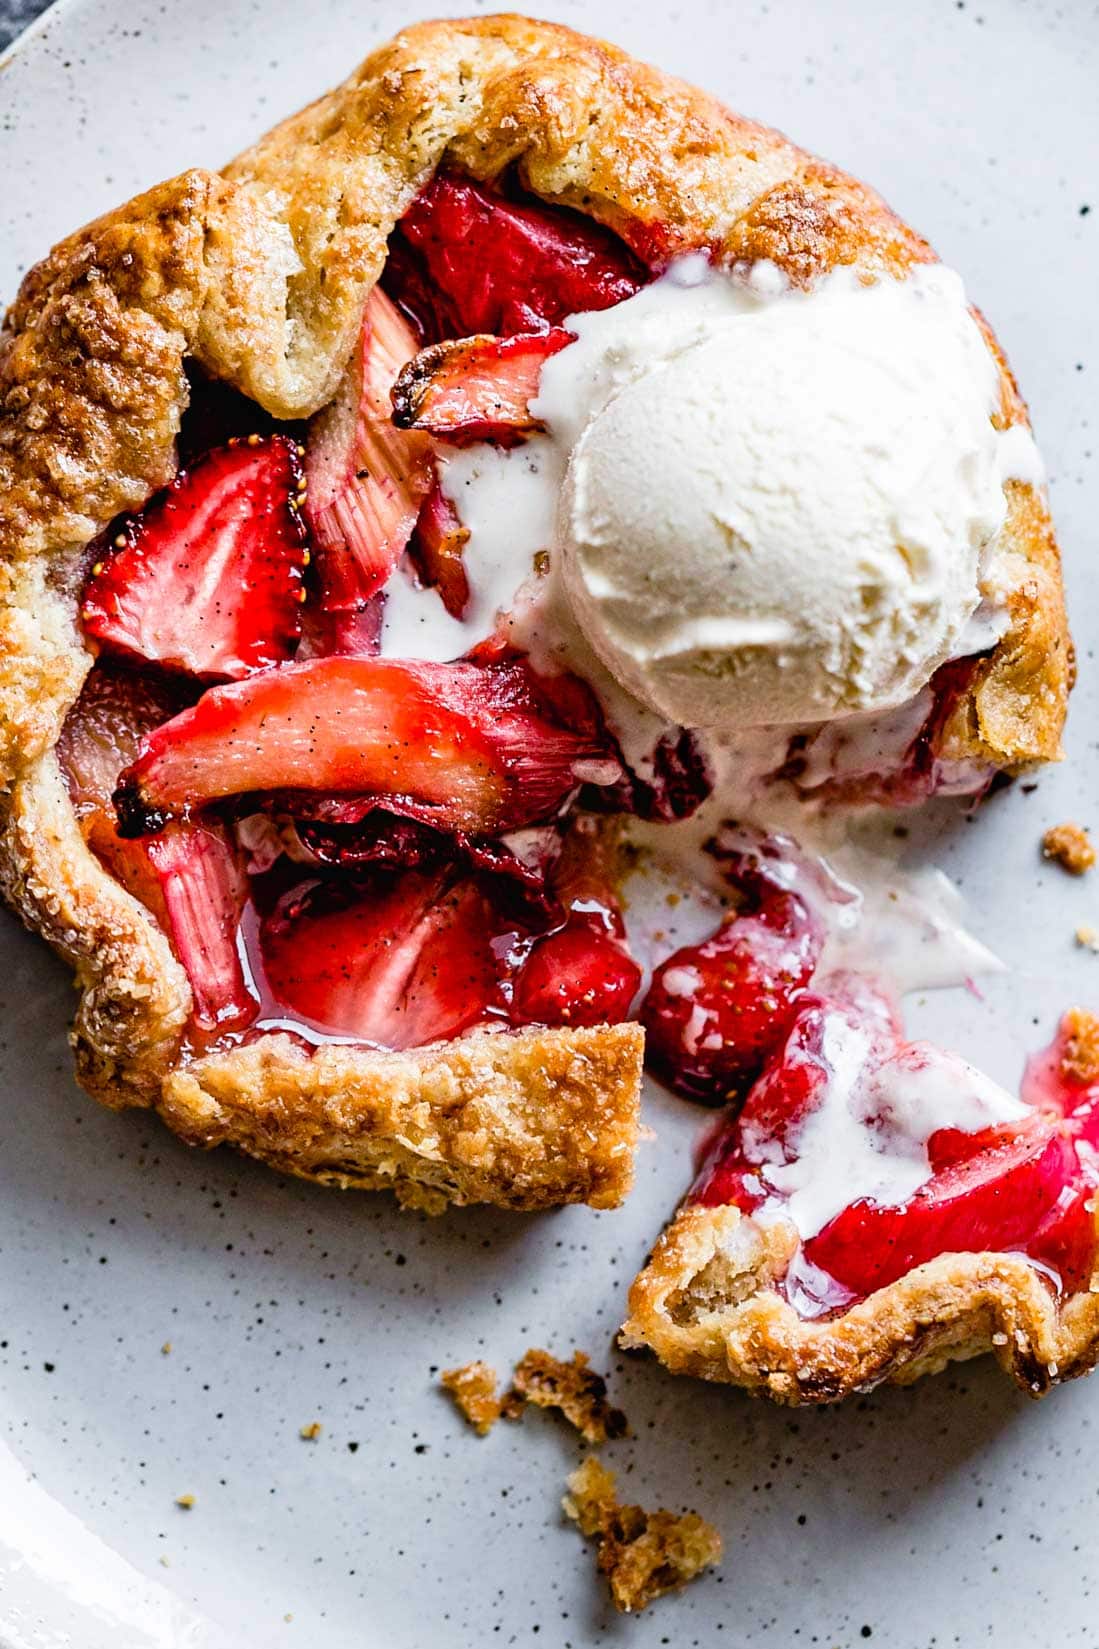
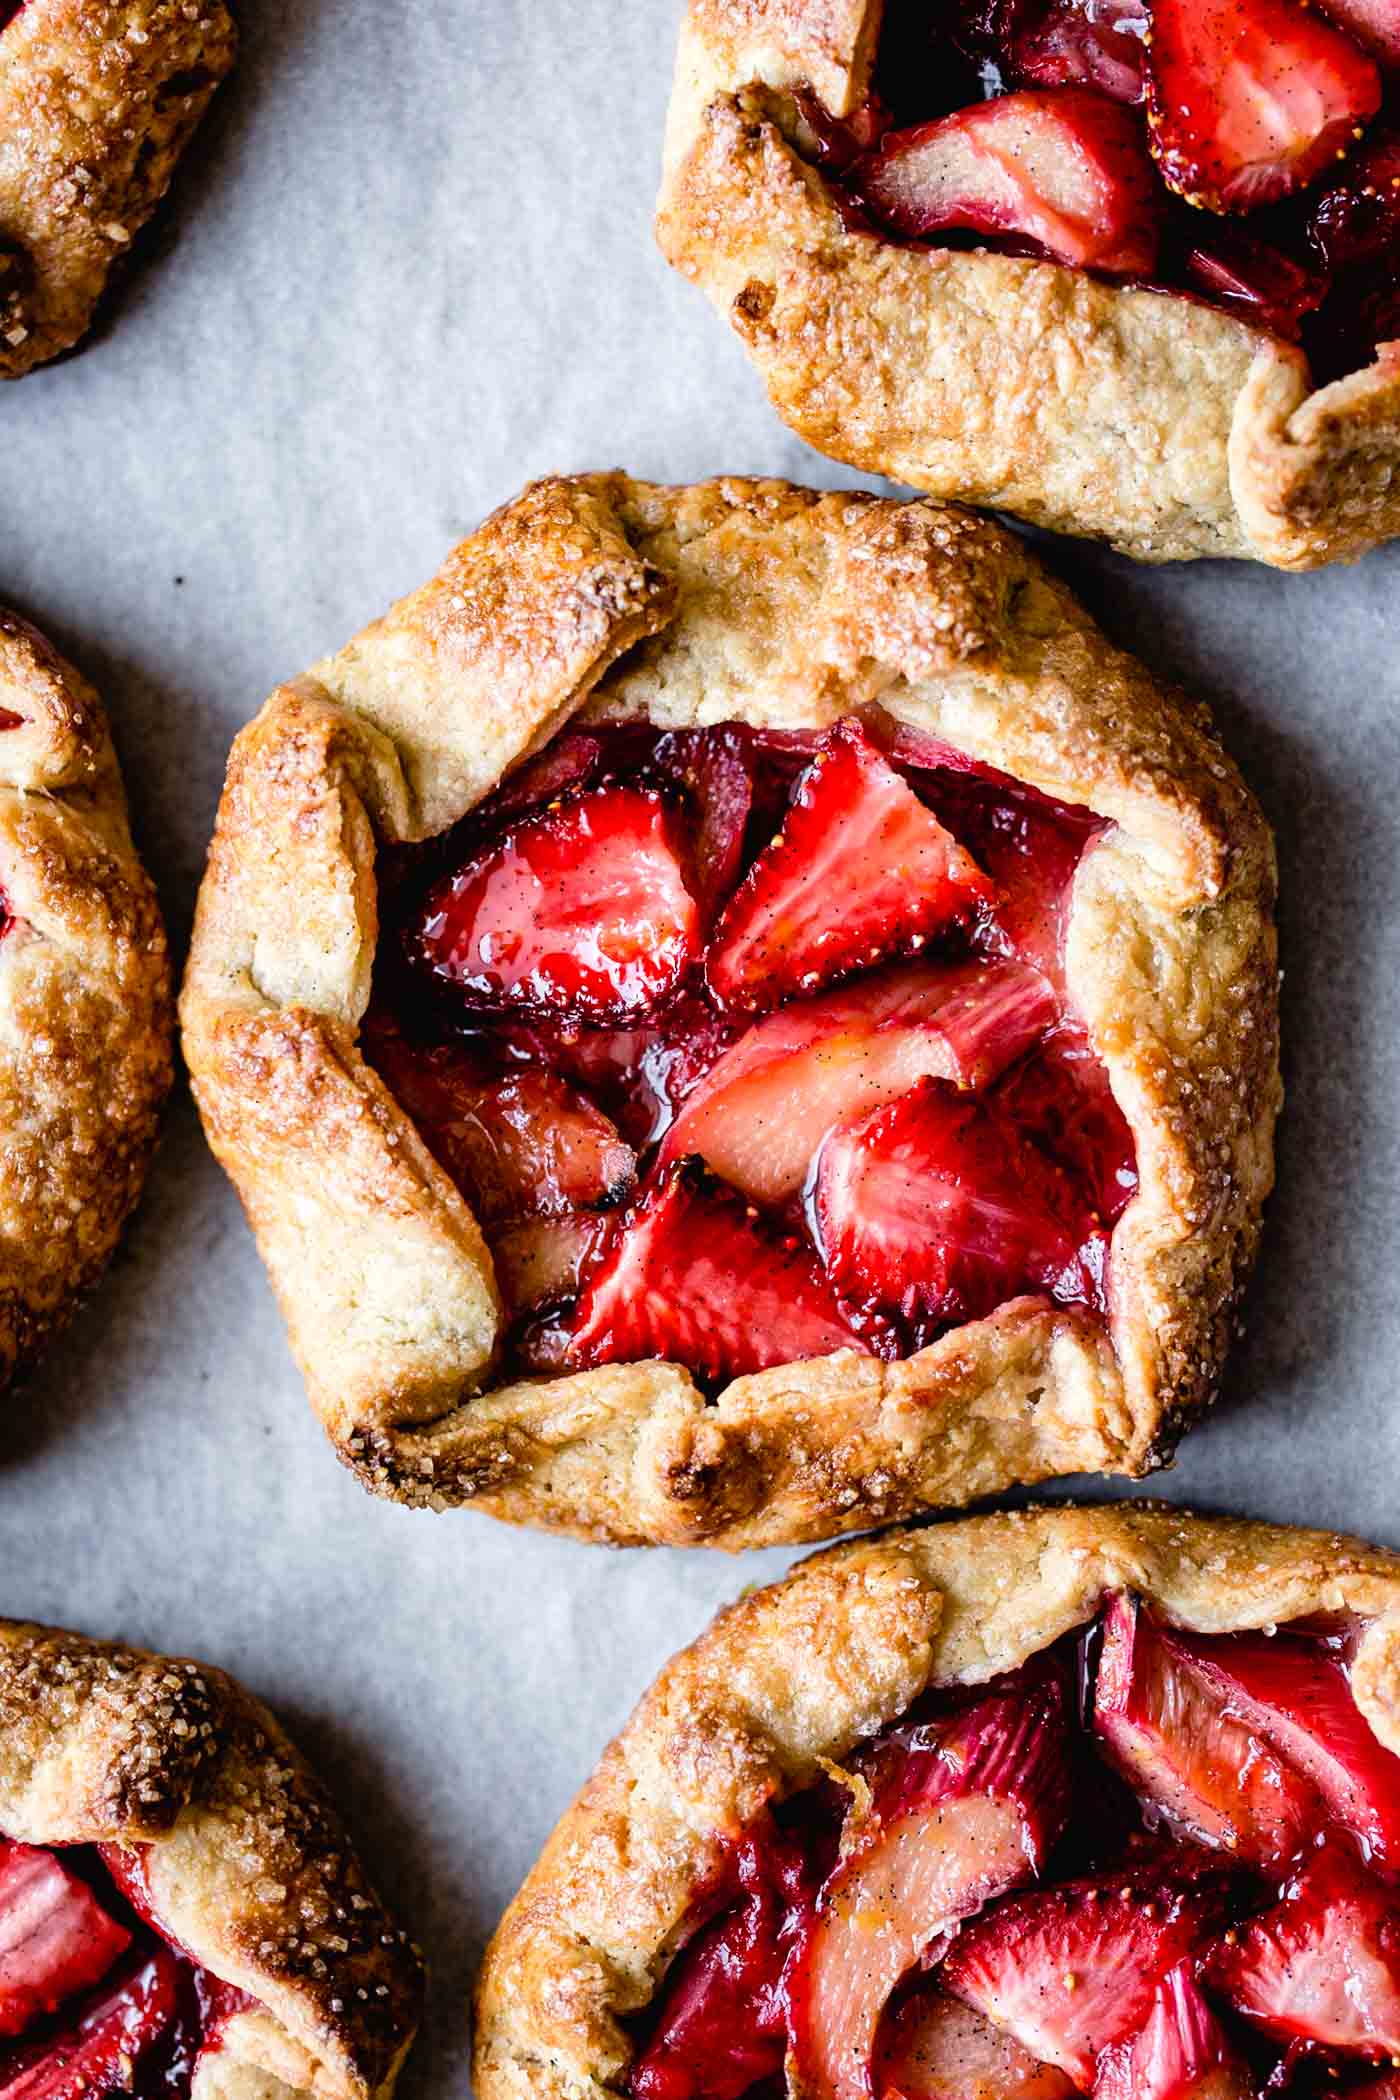
- Strawberry Rhubarb Galettes – jammy berries meet tart rhubarb laced with vanilla and rose.
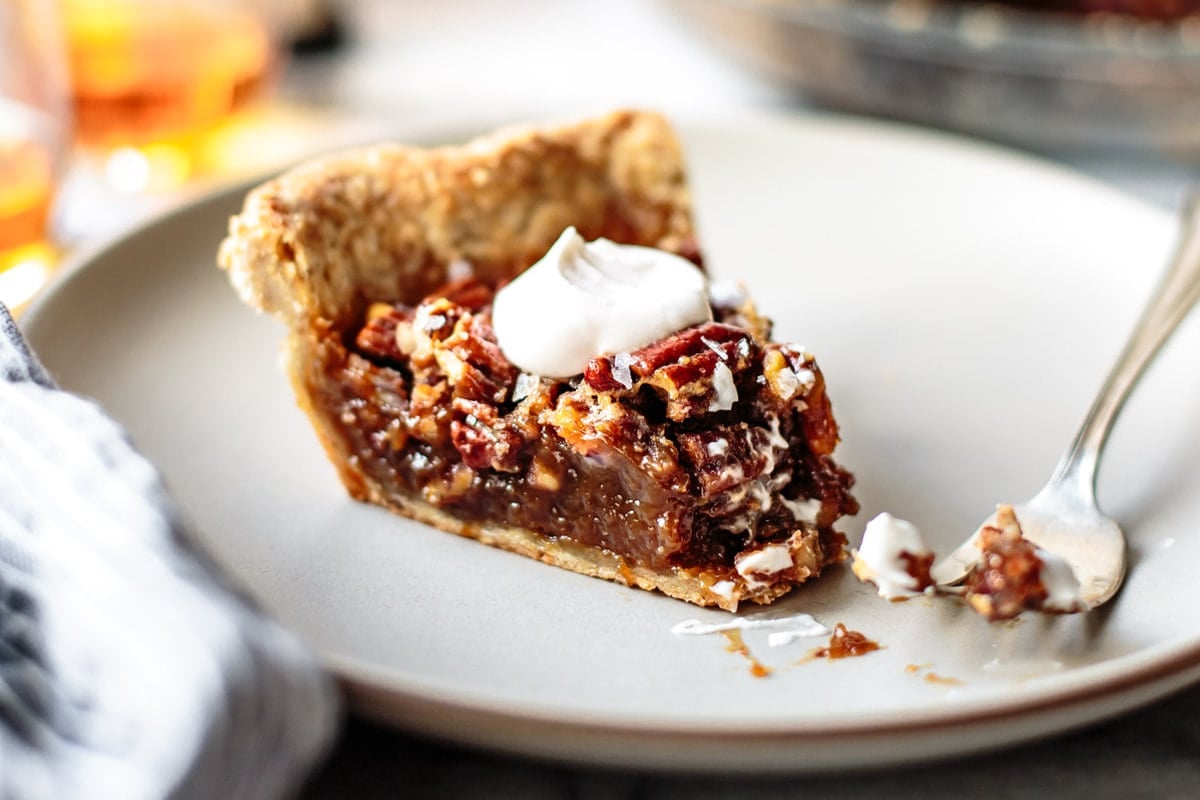
- Gluten-Free Pecan Pie – not-too-sweet, free of corn syrup, and a little bit boozy.
- GF Apple Tarte Tatin – buttery, caramelized apples baked under a lid of flaky gluten-free pastry.
- Pecan-Topped Sweet Potato Pie – One of my all-time favorites! Nutmeg-scented sweet potato custard beneath a top layer of crispy pecan streusel. So good!
Savory:
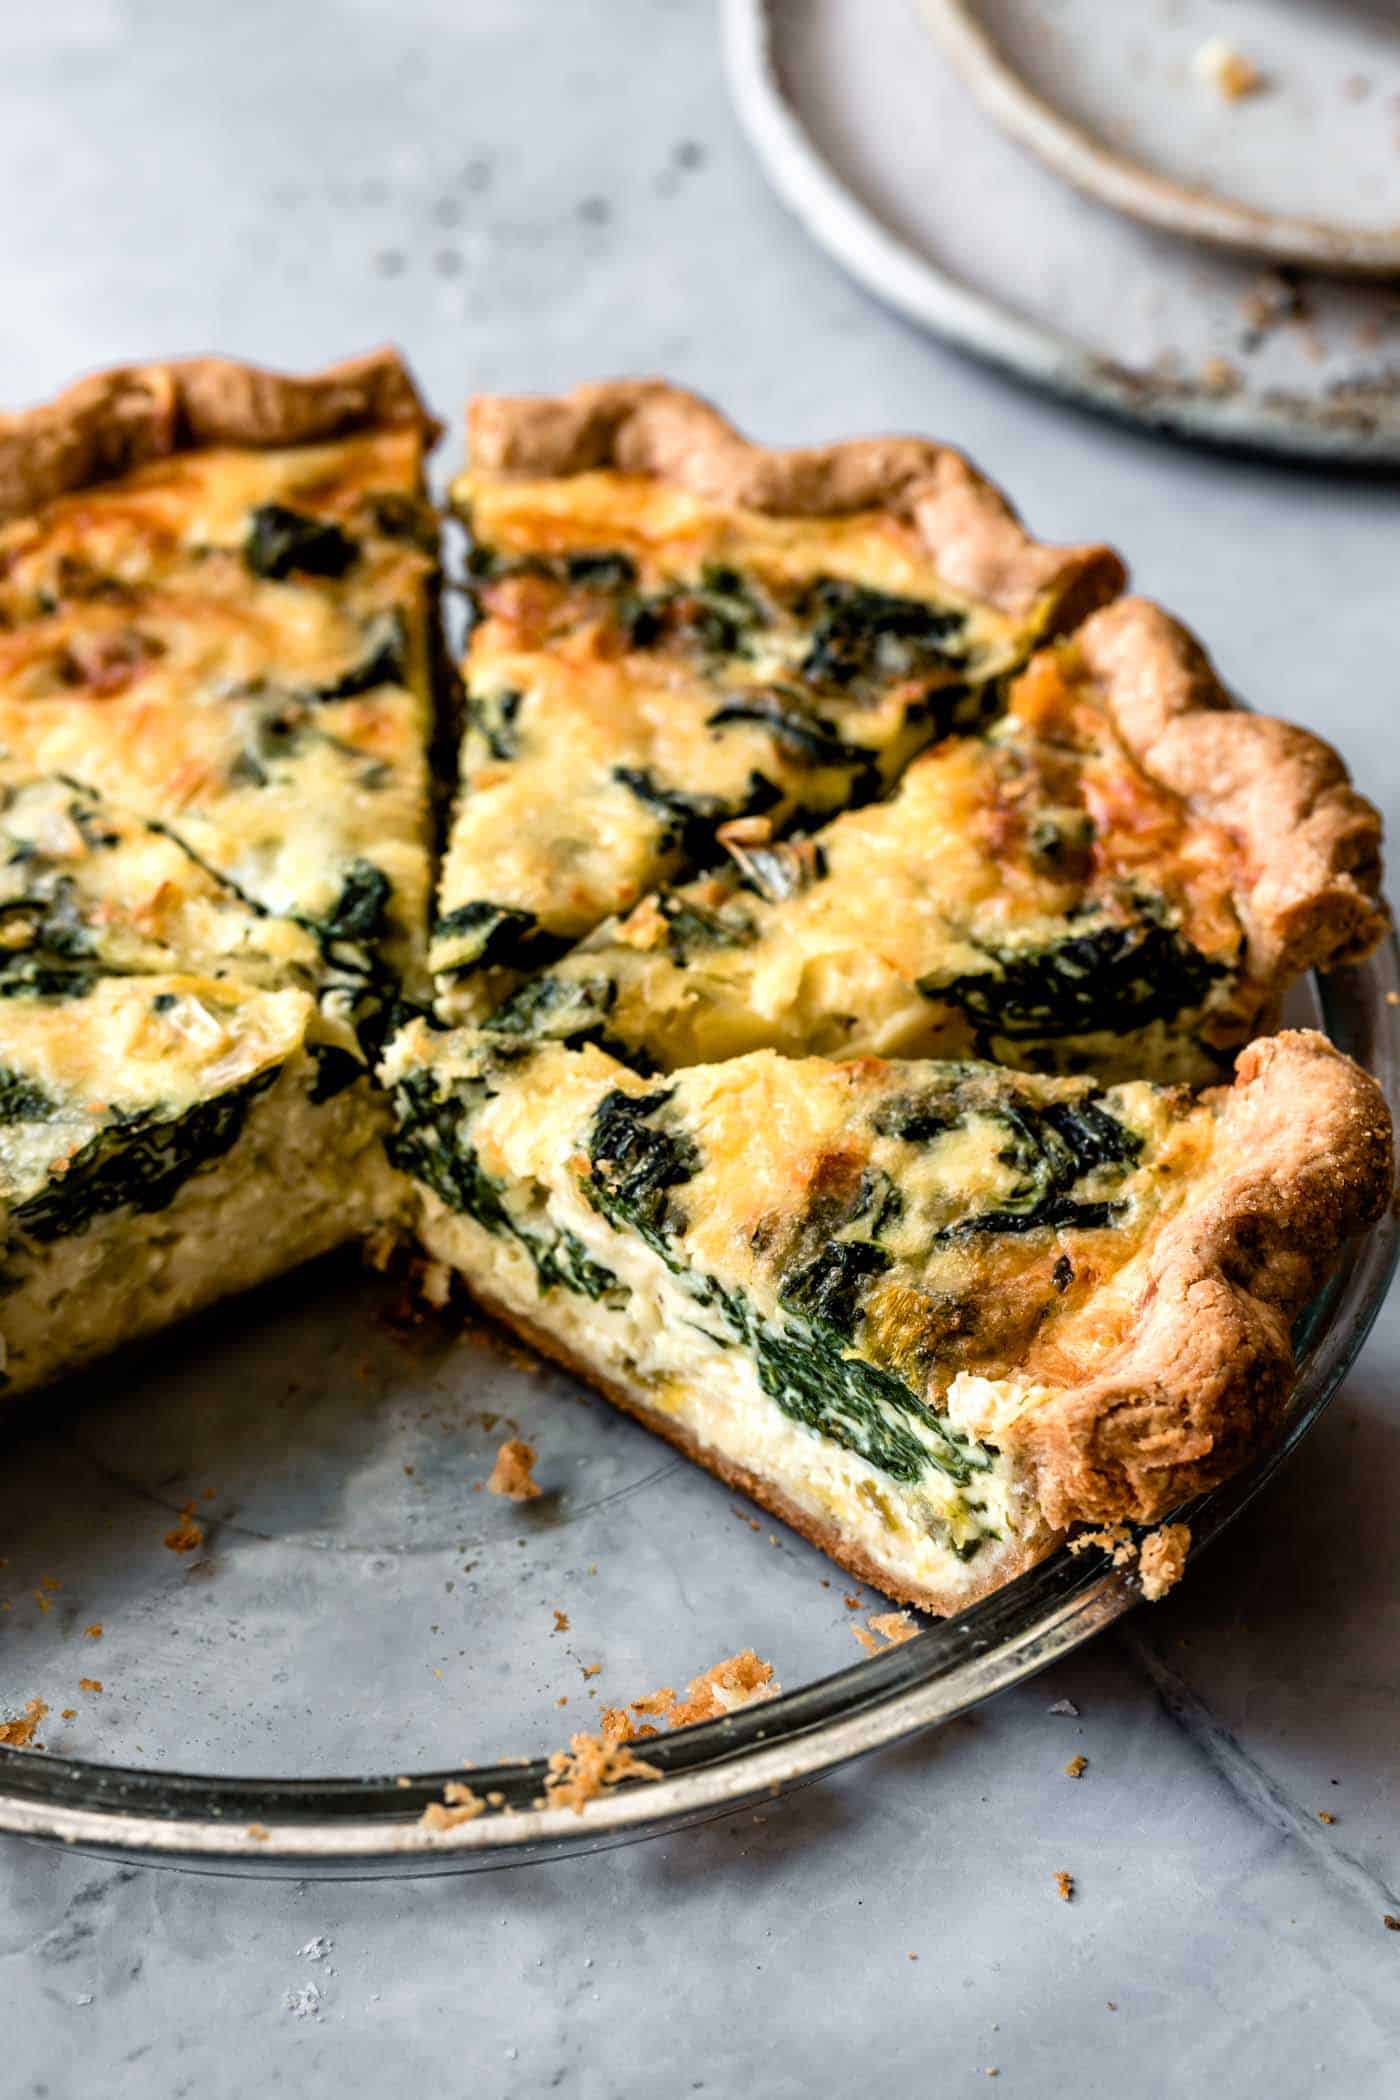
- Gluten-Free Spinach Quiche – crispy crust meets savory custard studded with spinach, leeks, and gruyère cheese.
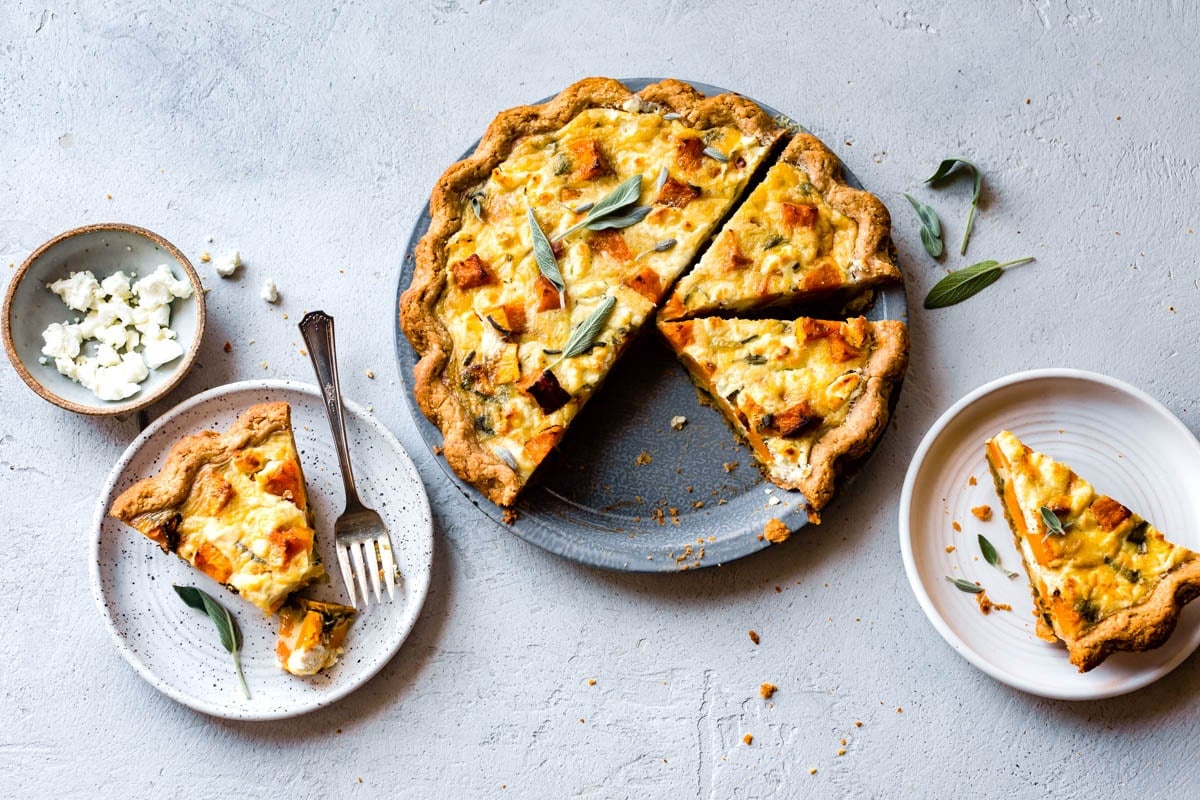
- Roasted Butternut Squash Quiche – brimming with the fall flavors of roasted winter squash, slivered sage, creamy goat cheese, and sweet leeks.
- Heirloom Tomato Galette – flaky gf pastry wraps cheesy filling and sliced heirloom tomatoes.
- Sweet Potato Kale Galette – a showstopping vegetarian main dish with cheesy kale filling and a pretty mosaic of roasted sweet potato slices.
- Ricotta Beet Tart with Beet Greens Pesto – make use of sweet beets from root to leaf with this stunning savory rustic tart.
- Eggplant Parmesan Hand Pies – pretty much my dream meal! Roasted eggplant, tomatoes, mozz, parm, and basil wrapped in pretty gf pie crust parcels.
- Bacon, Leek, and Fennel Quiche – a hearty dish for cool months, this savory quiche makes a killer brunch.
- Pear, Blue Cheese, and Hazelnut Tart – an exquisite combination of savory / sweet / earthy flavor delights.
The Flakiest Gluten-Free Pastry Recipe
However you enjoy this gluten-free pie dough recipe – savory or sweet, in a pie, tart, quiche, or galette – I hope you love its flaky, buttery goodness. As always, feel free to leave any questions or comments in the notes below.
Happy baking, friends!
*Bojon appétit! For more Bojon Gourmet in your life, follow along on Instagram, Facebook, or Pinterest, purchase my gluten-free cookbook Alternative Baker, or subscribe to receive new posts via email. And if you make this gluten-free pie crust recipe, I’d love to know. Leave a comment and rating below, and tag your Instagram snaps @The_Bojon_Gourmet and #bojongourmet.*
Tender & Flaky Gluten-Free Pie Crust
Print Recipe Pin RecipeIngredients
- 6-8 tablespoons ice water (from 1 cup ice cubes filled with cool water)
- ½ cup (78 g) sweet white rice flour (preferably Mochiko brand)*
- ¼ cup + 2 tablespoons (35 g) GF oat flour (preferably Bob's Red Mill)*
- ¼ cup (35 g) millet flour (preferably Bob's Red Mill)*
- ¼ cup (30 g) cornstarch*
- 2 tablespoons (15 g) tapioca starch/flour*
- 2 ½ tablespoons (15 g) finely ground golden flax seed or white chia seed (I grind mine in a coffee grinder)
- 1 tablespoon (15 g) sugar (granulated, maple, or coconut)
- ½ teaspoon fine sea salt
- 8 tablespoons (115 g) cold, unsalted butter (preferably European-style such as Straus, Kerrygold, or Vermont Creamery), sliced ¼-inch thick
- 1 teaspoon apple cider vinegar or lemon juice**
Instructions
Make the dough (by hand):
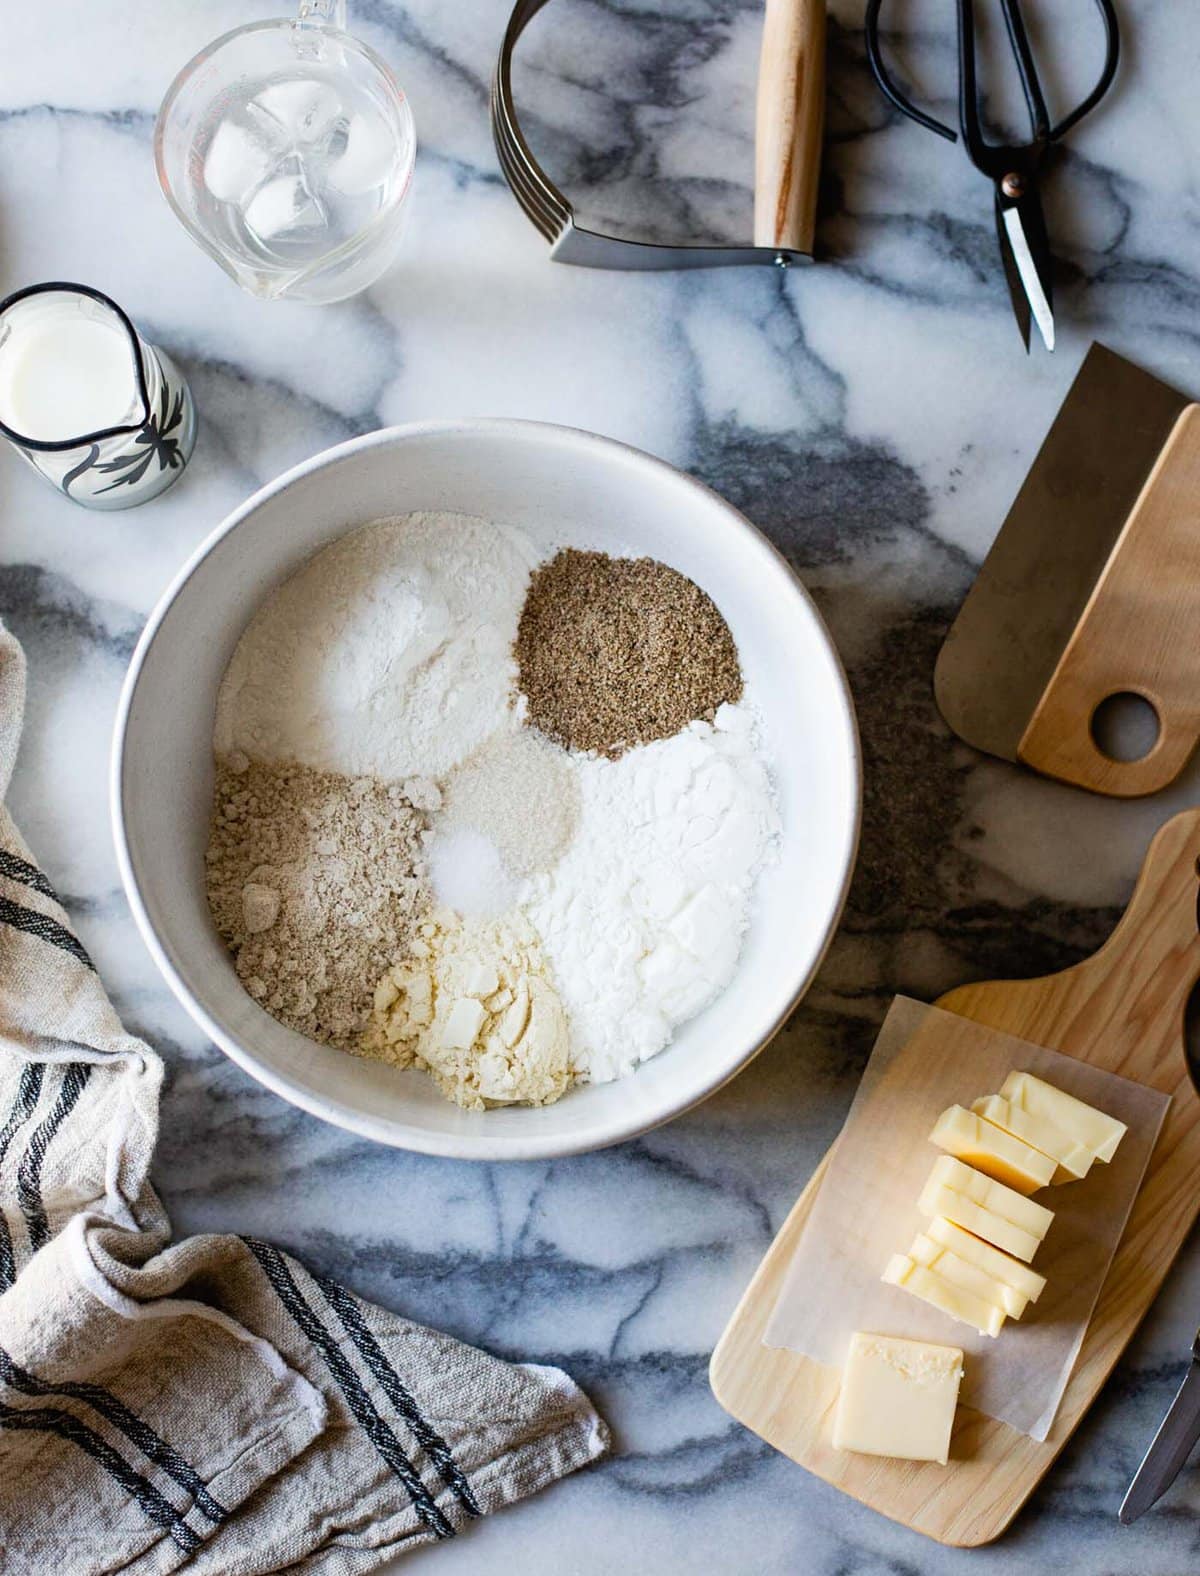
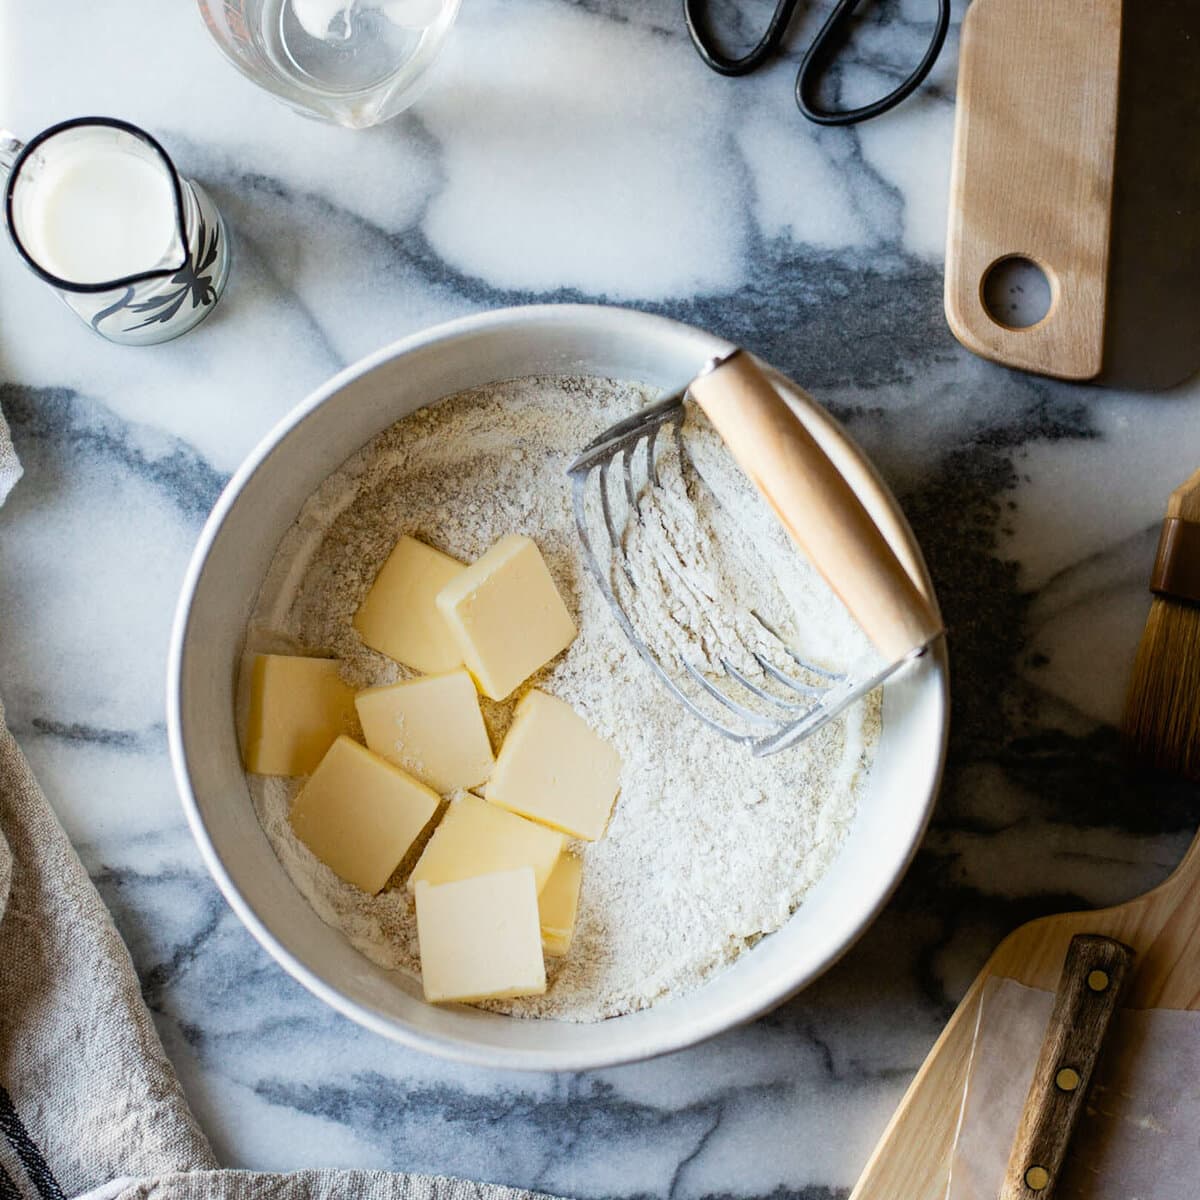
- In a large bowl, combine the sweet rice, oat, and millet flours with the cornstarch, tapioca flour, ground flax or chia seed, sugar, and salt.
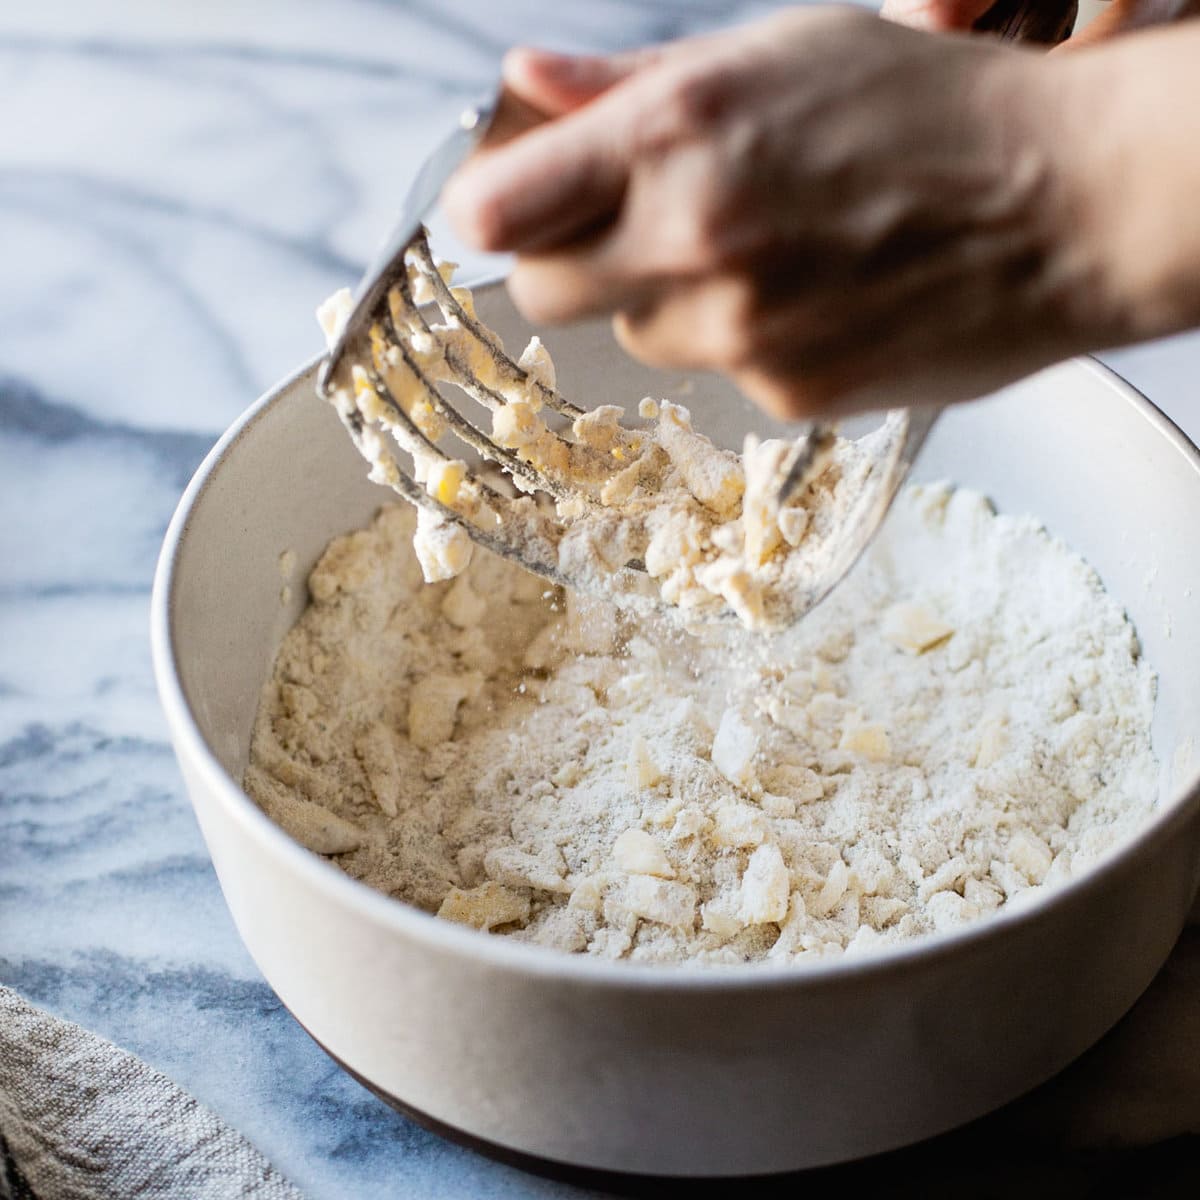
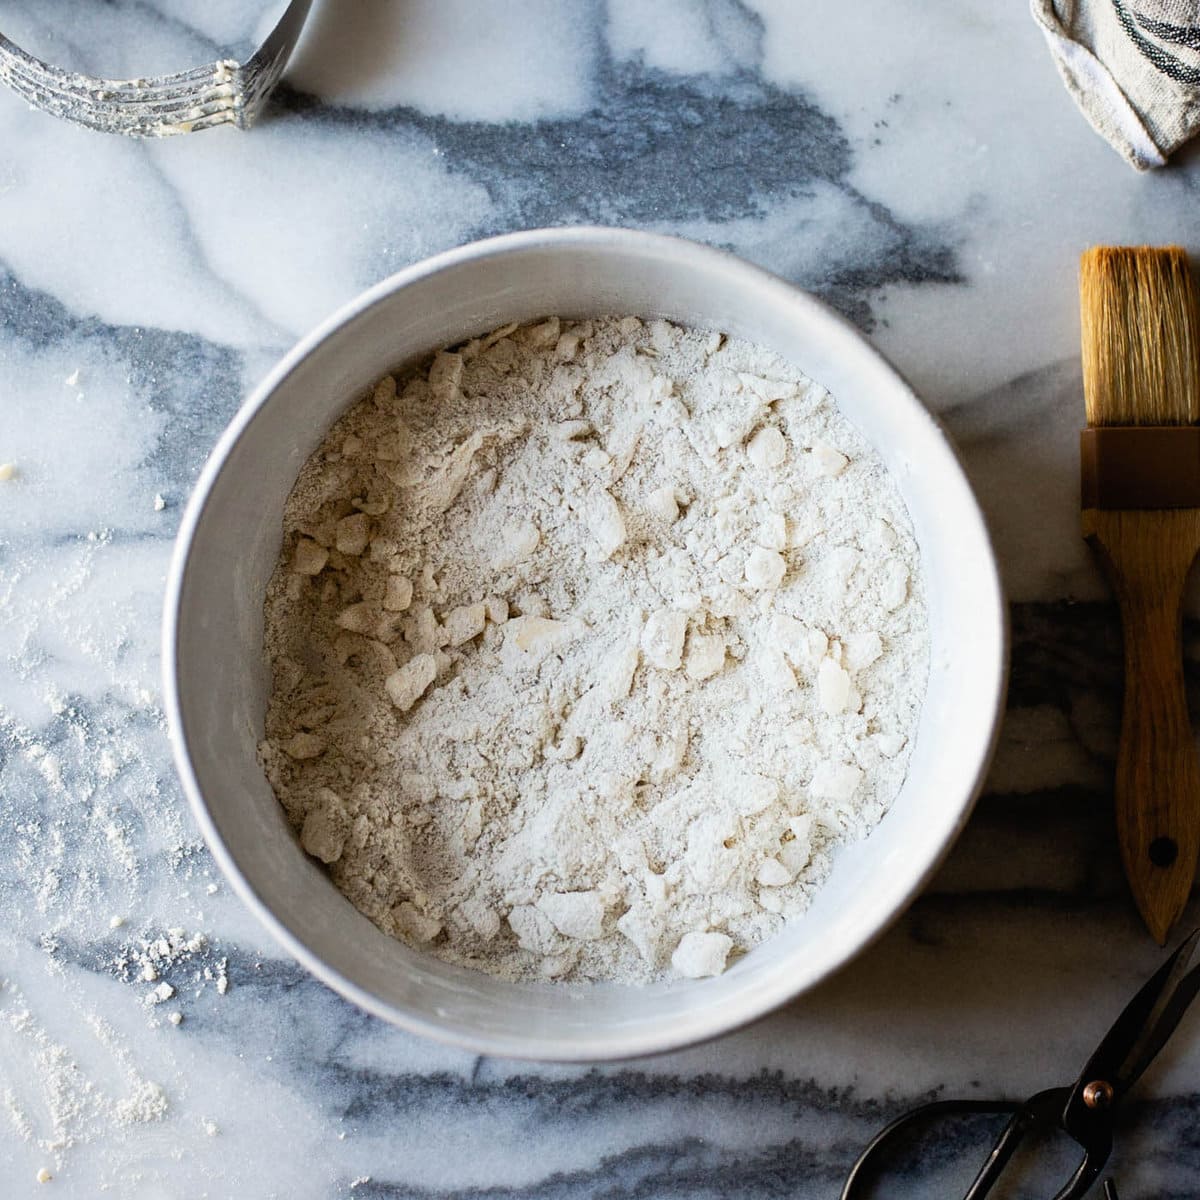
- Scatter the butter pieces over the top, and work in the butter with a pastry blender or your fingers until the mixture resembles gravel, with lots of butter chunks the size of almonds or large peas.
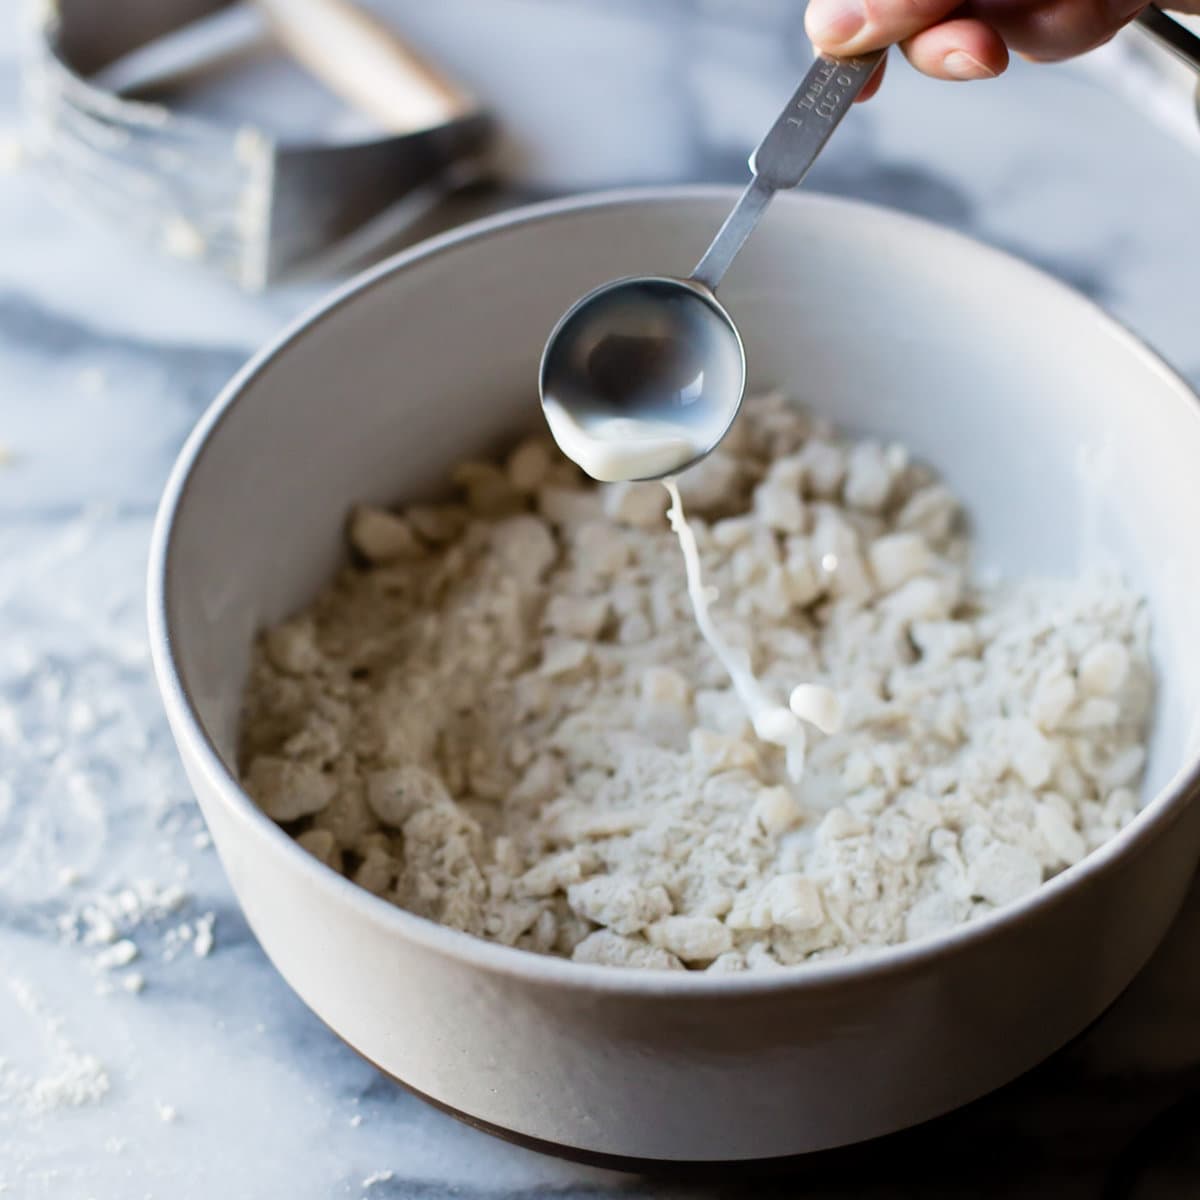
- Stir together 6 tablespoons of the ice water, drained, with the apple cider vinegar or lemon juice. Sprinkle the water into the flour mixture 1 tablespoon at a time, tossing the dough with a flexible silicone spatula to moisten it evenly.
- Give the dough a sueeze: it should hold together easily without feeling overly wet or sticky. Toss in more ice water by the teaspoon until this texture is achieved, adding it directly to the dry floury bits that like to hang out on the bottom of the bowl. You may need up to 8 tablespoons of ice water, total (I always need the full amount but you may need more or less depending on how cold your butter is!). Note that this dough should feel more moist than a wheat flour dough. These GF flours perform better with more hydration and we don't have to worry about making it too moist because there are no glutens to turn tough.
- Fraisage the dough: dump the crumbly dough out onto a clean counter or work surface. Working quickly in order to keep the butter cold, use the heel of your hand to scrape portions of dough across the counter.
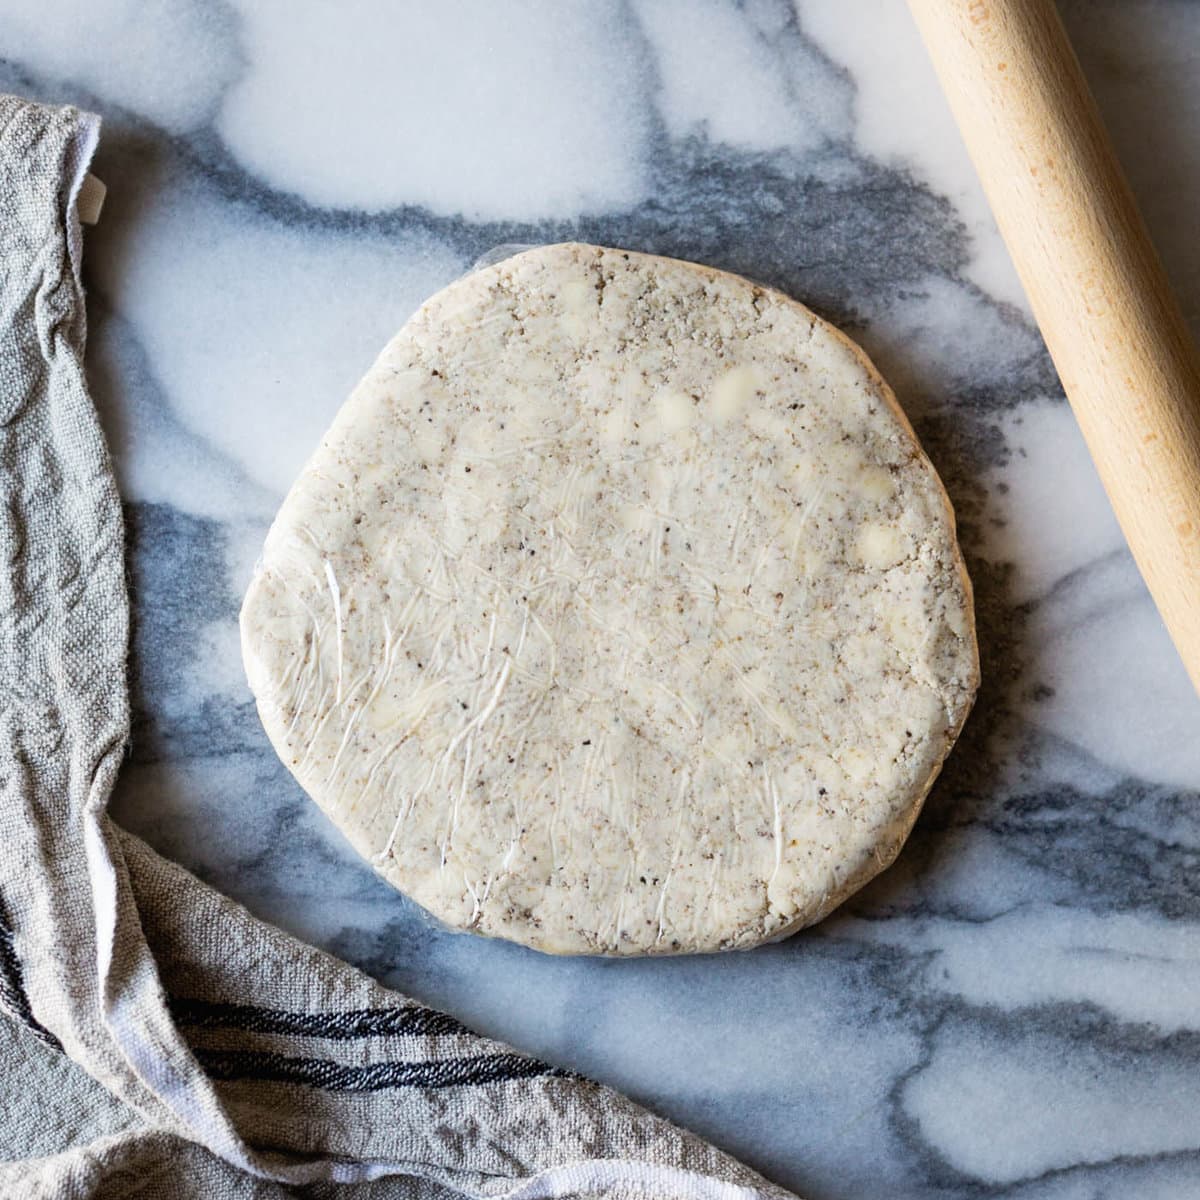
- Use a metal bench scraper to scrape up the dough and gather it into a ball. Flatten it into a disk and wrap the dough in plastic wrap, a plastic bag, or beeswax wrap. Chill until firm, 30-60 minutes or up to 24 hours.
Make the dough (in a food processor):
- If using a food processor, combine the flours and starches, sugar, salt, and ground chia / flax seed in the bowl of a food processor. Scatter the butter pieces over the flours but don't pulse just yet! Stir together 6 tablespoons of the ice water, drained, with the vinegar or lemon juice.
- Open the feed tube and pour in the ice water in a slow and steady stream as you pulse the mixer. Squeeze the dough; it should hold together easily without feeling overly wet or sticky, and there should be large pea-sized butter pieces throughout. Gently pulse in more ice water by the teaspoon until this texture is achieved. Note that the dough should feel more moist than a wheat flour dough.
- Gather the dough into a ball, flatten it into a disk, wrap in plastic wrap, a plastic bag, or beeswax wrap and chill until firm, 30-60 minutes or up to 24 hours. It's not necessary to fraisage the dough if using this method since the butter gets broken down into smaller pieces.
Turn the Dough:
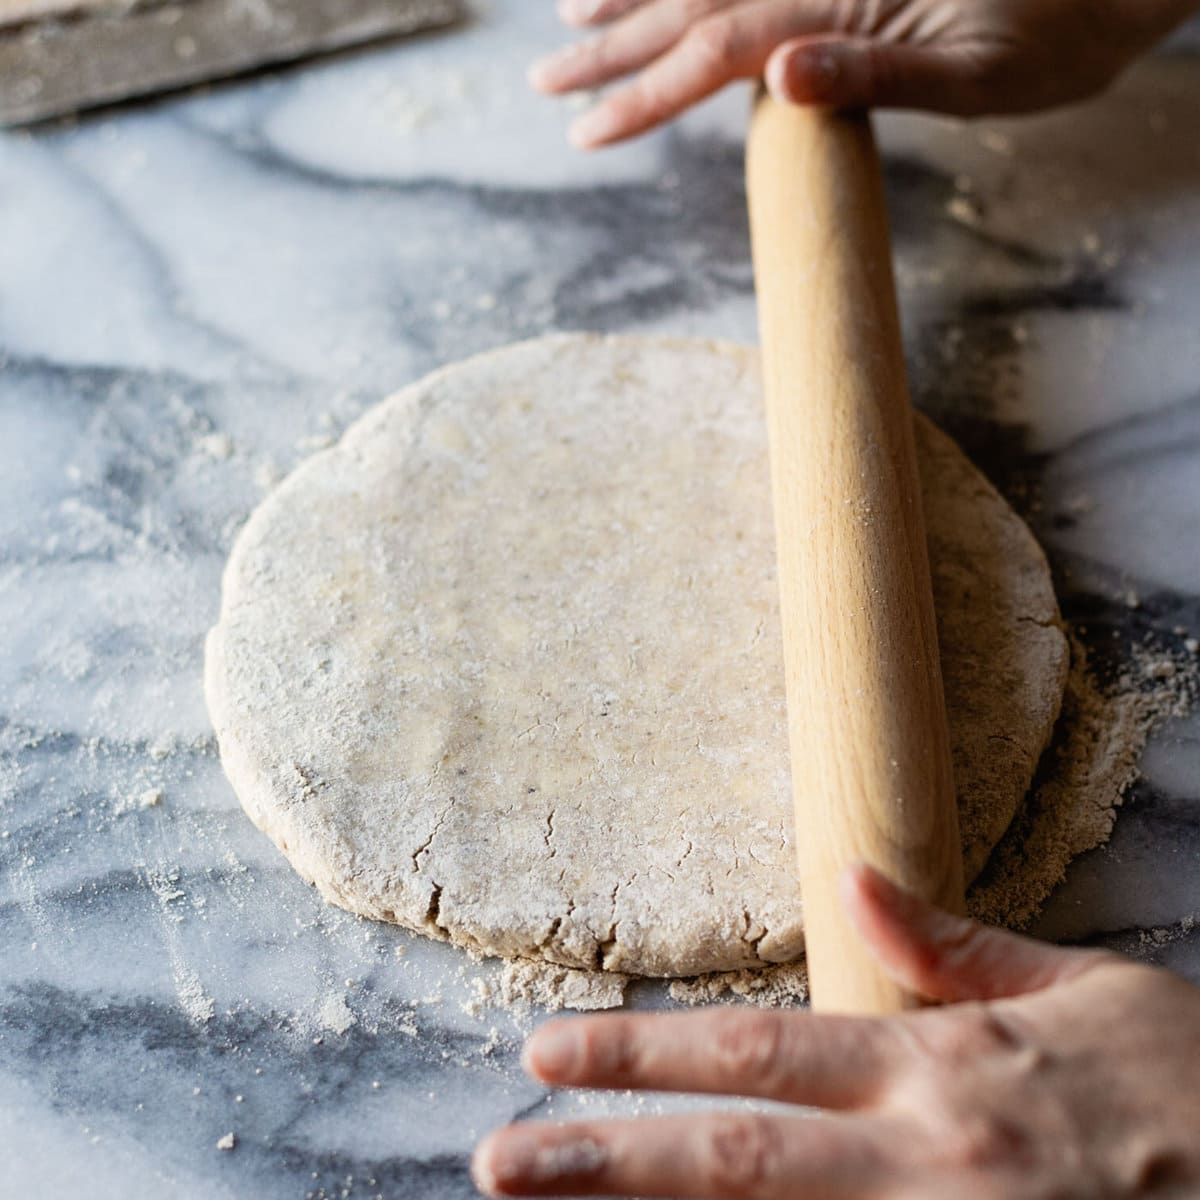
- Whichever method you've used (by hand or in a food processor), remove the dough from the fridge, unwrap, and place it on clean work surface dusted lightly with oat flour. If the dough is very cold, it may need to soften for 5-10 minutes to make it easier to roll. (Note that if you don't have a metal bench scraper to move the dough around, it's best to roll out the dough on a sheet of parchment paper.)
- Using a rolling pin, begin to press and roll the dough out into a large ¼-inch thick oval. The dough will crack and tear at first and that's ok, just smush it back together. Periodically dust the dough with oat flour, sweeping excess flour away with a dry pastry brush. Use the bench scraper to flip the dough over occasionally, dusting the dough with flour to keep it from sticking.
- As you work, if the butter starts to soften or stick to the surface, pop it back in the fridge to firm up for 5-10 minutes.
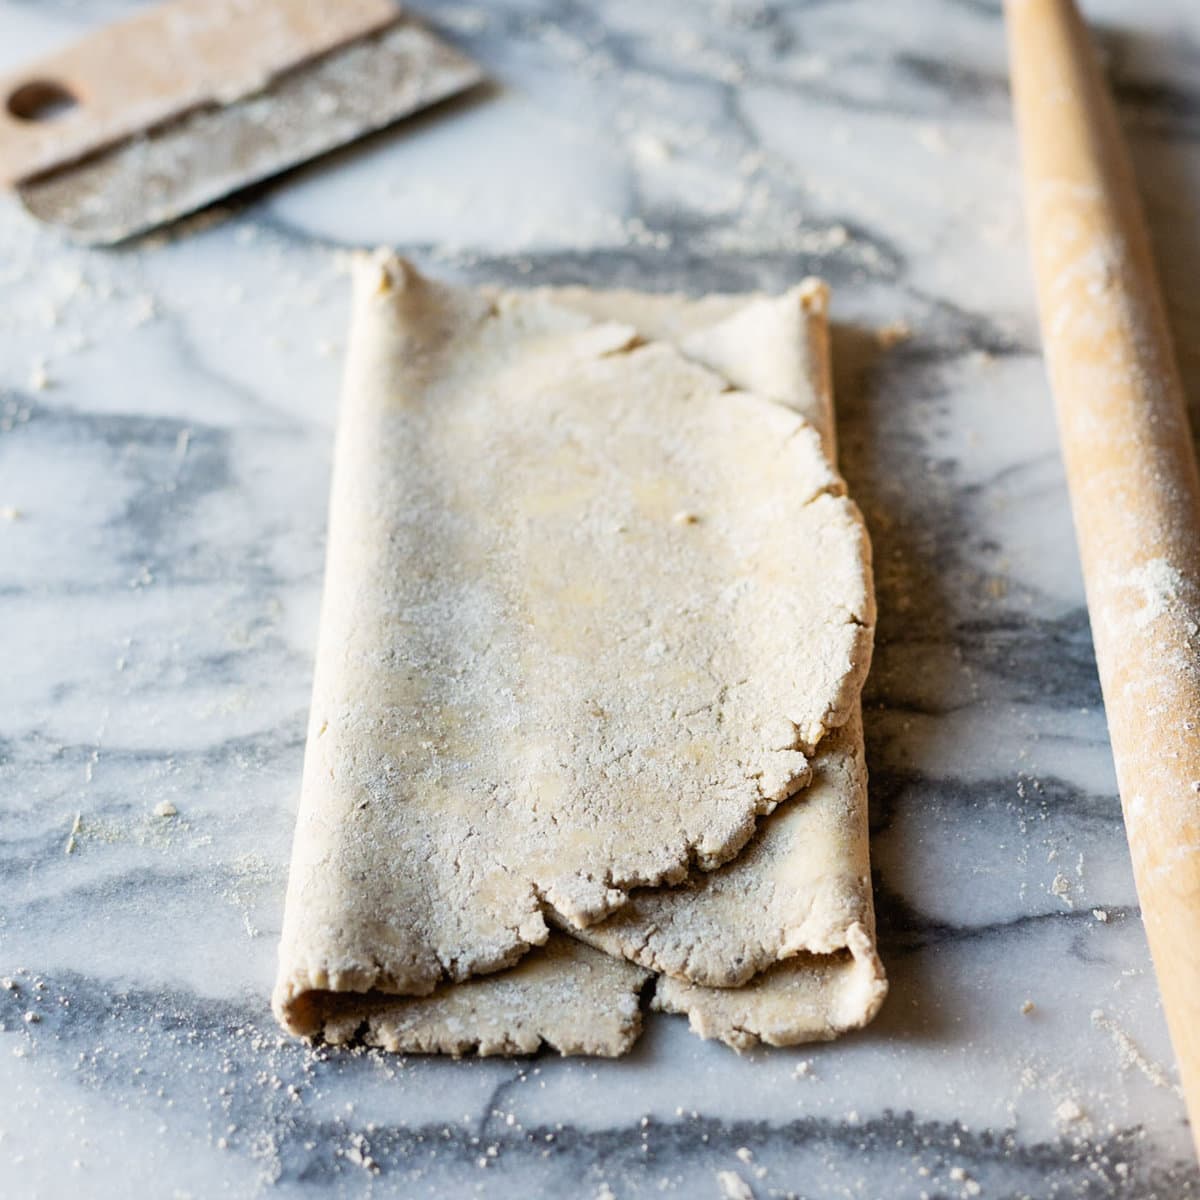
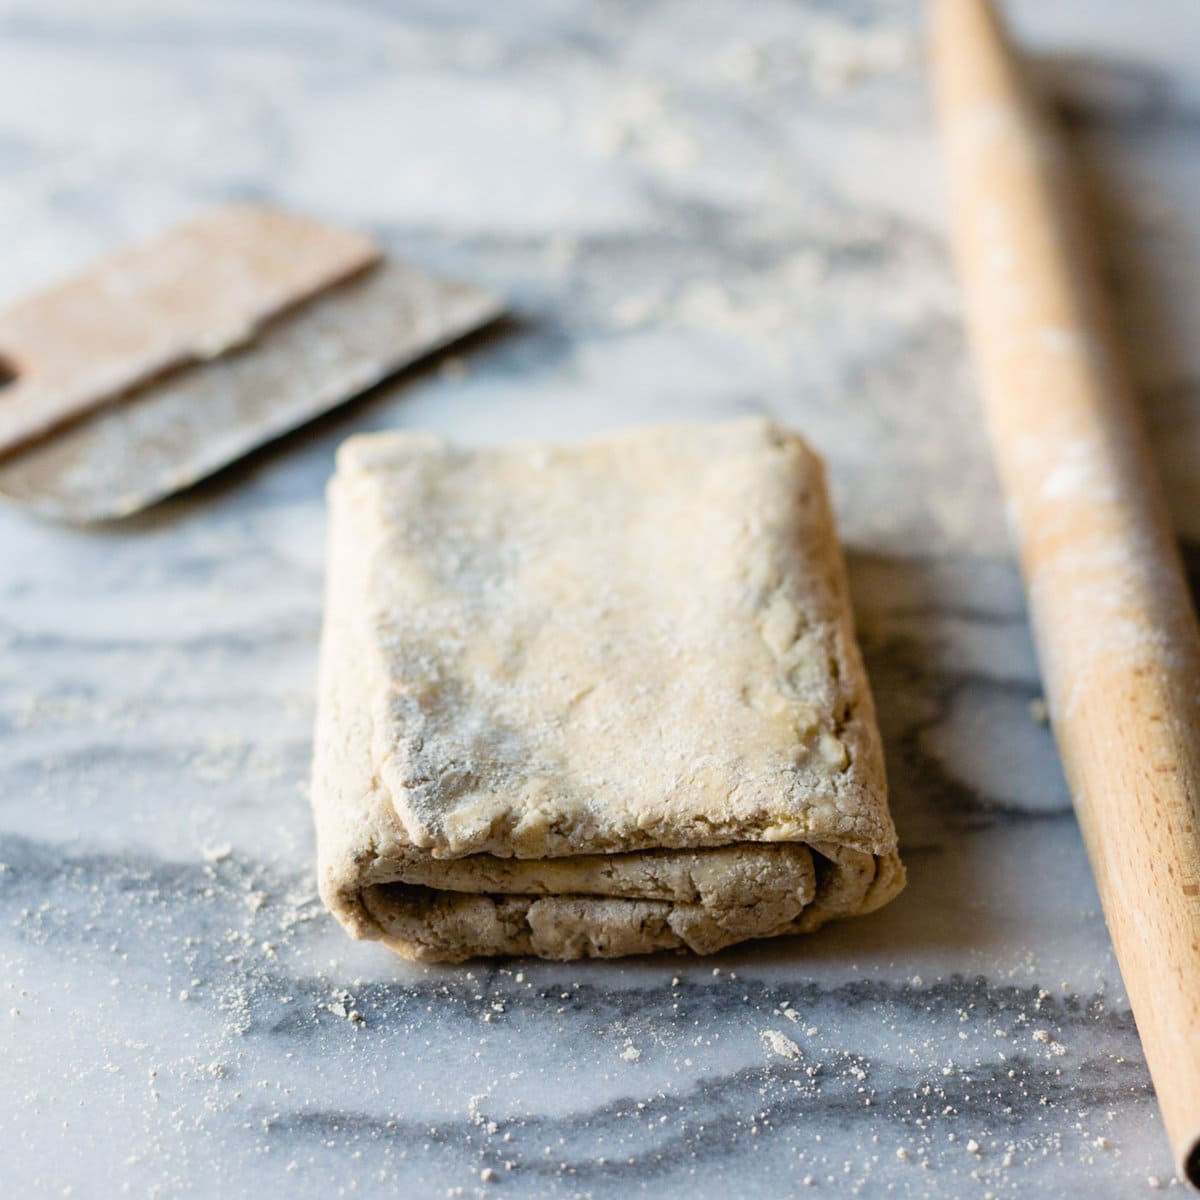
- Once the dough is rolled out to ¼-inch thickness, fold it in thirds like folding a letter. Then fold it in thirds the other way. Flatten the folded dough slightly, re-wrap, and chill until firm, 30-60 minutes or up to 24 hours.
- Repeat the turning process one more time. The dough will become more and more cohesive and pliable as you work with it, which will make it easier to shape and help it bake up tender and flaky.
- Wrap the dough and chill it again until firm, 30-60 minutes and up to 2 days. Or freeze the dough for up to 1 year until ready to use.
Shape the crust:
- Remove the dough from the fridge, unwrap, and place on a lightly floured surface. Roll out the dough into a 12-inch circle, dusting the dough lightly with oat flour flour as needed, rotating and flipping it to prevent it from sticking.
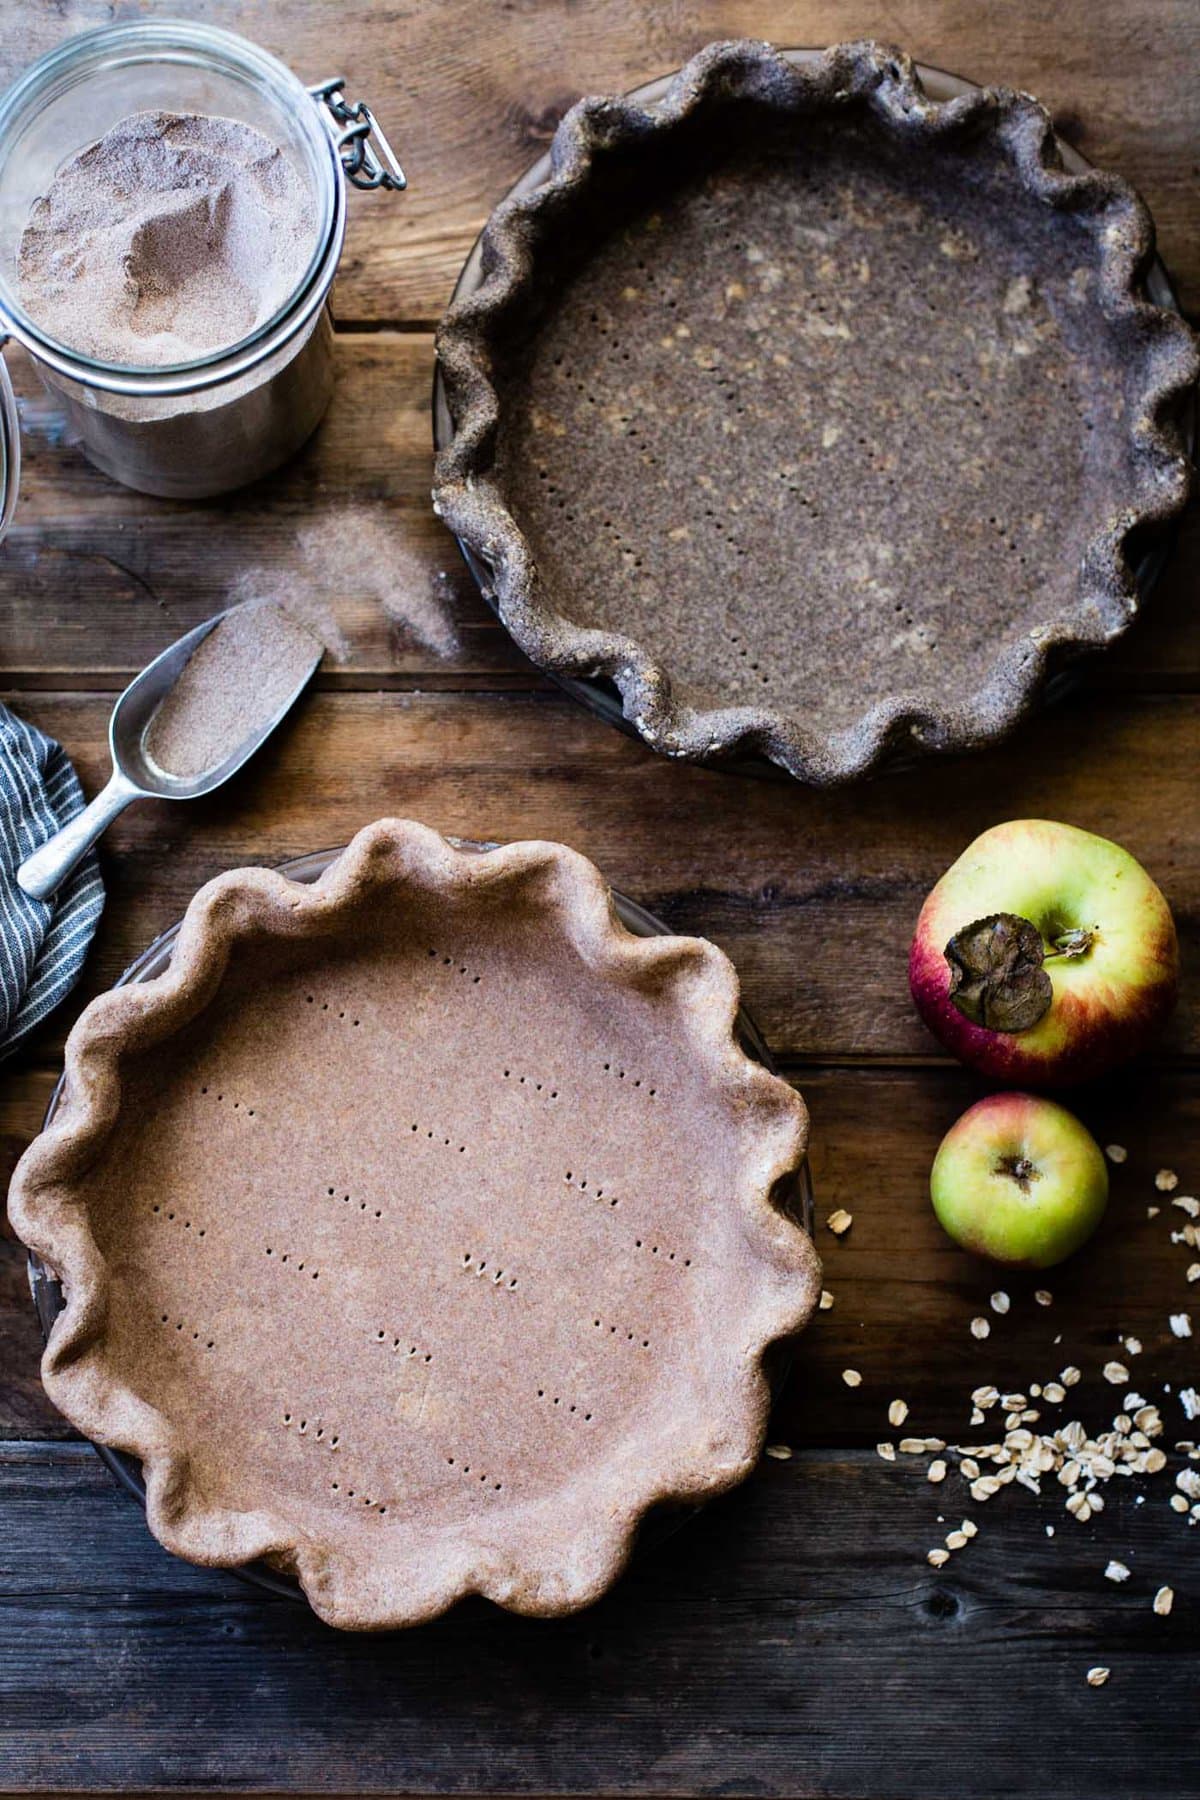
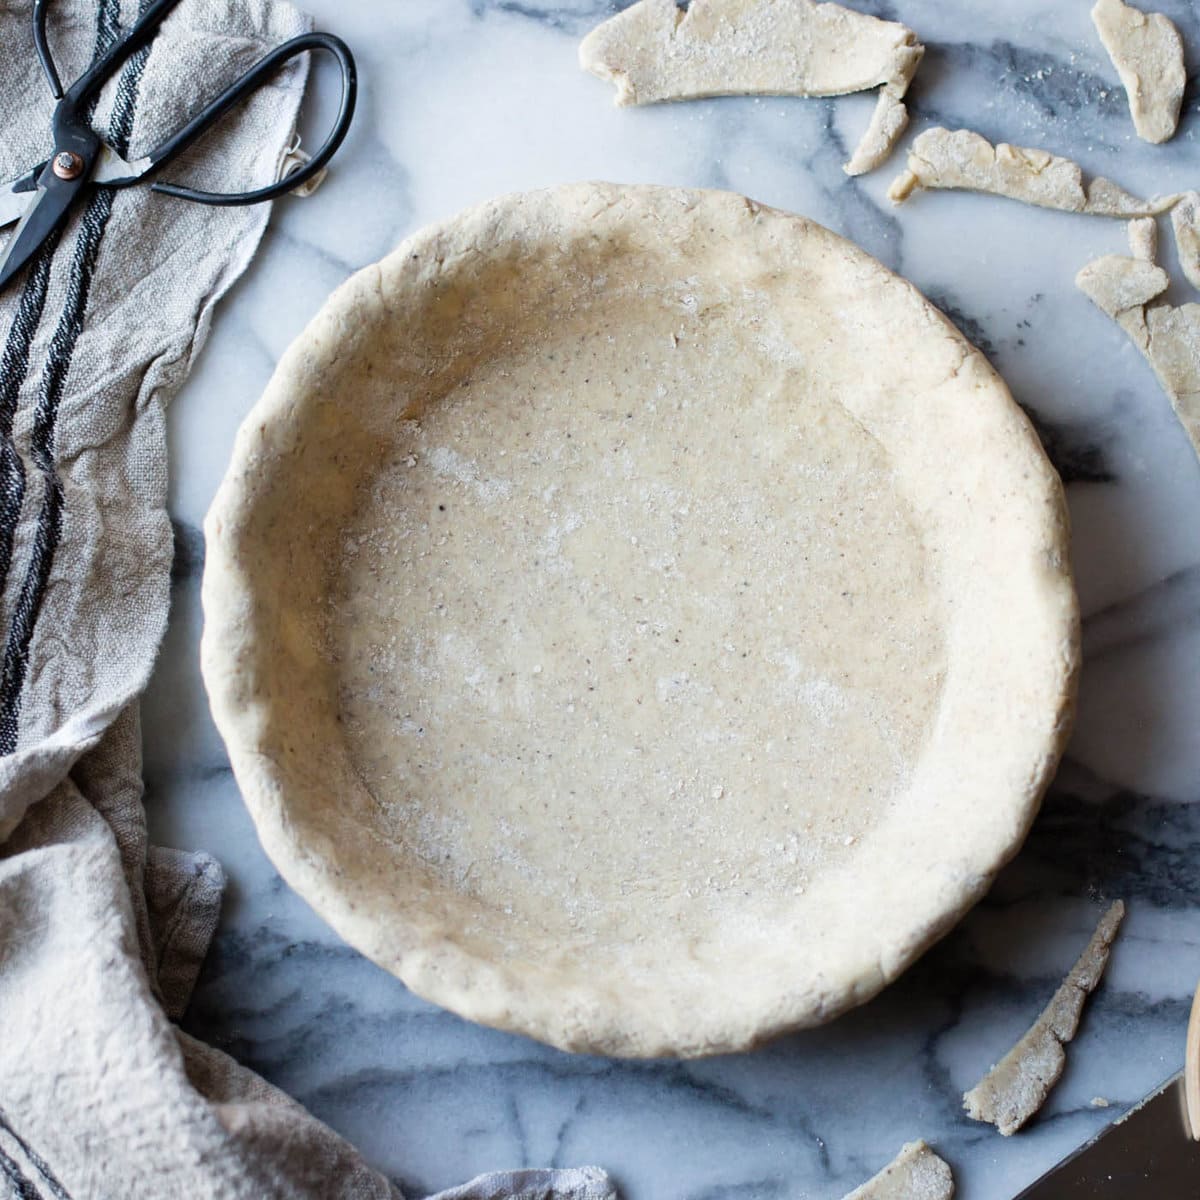
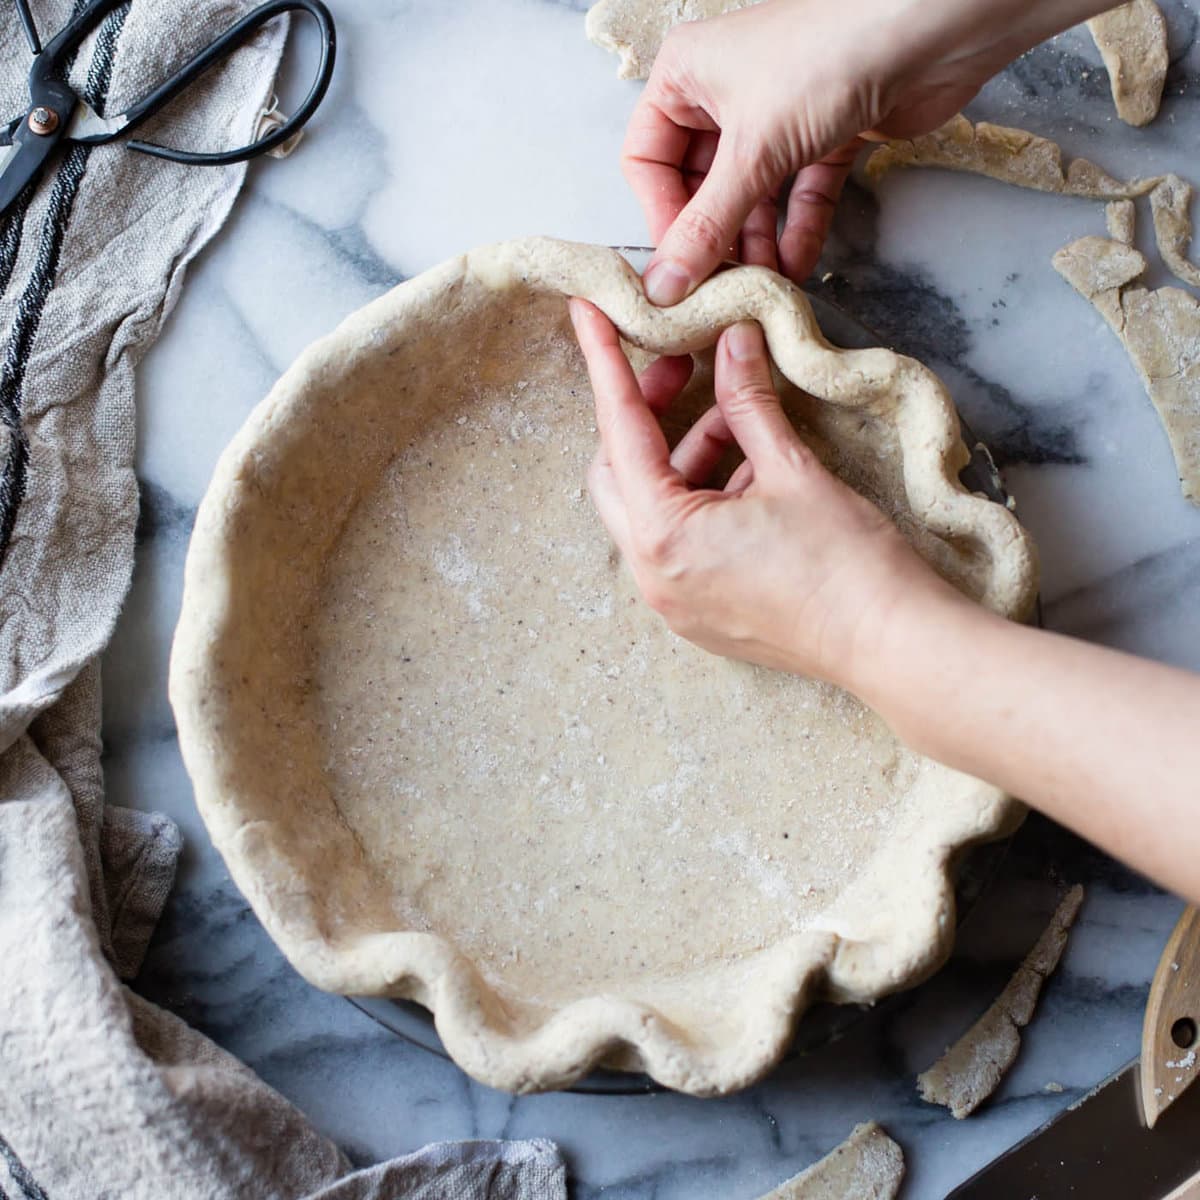
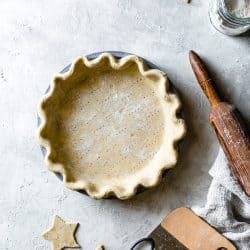
- Ease the dough into a 9-inch glass pie plate, fit it into the corners, and trim it to a 1-inch overhang. (Save the scraps to patch any tears in the dough post-parbaking.) Fold the overhang of the crust under itself, and flute the crust by pressing it between the thumb of one hand and the index finger and thumb of the other hand.
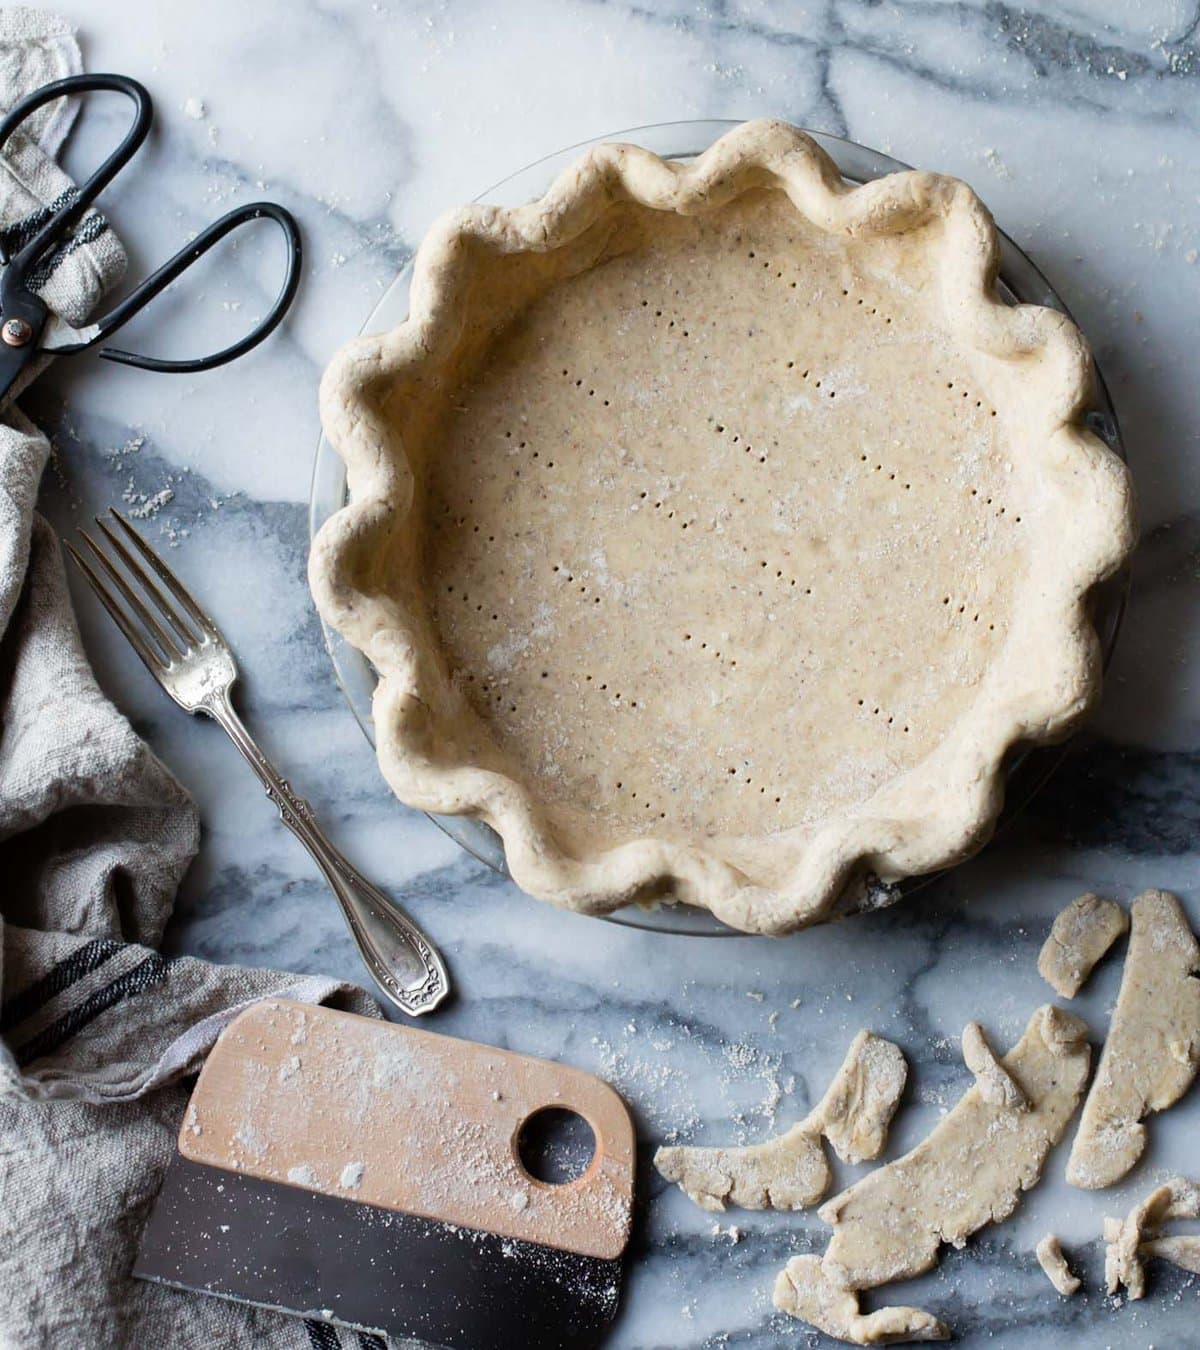
- Prick the bottom of the crust all over with the tines of a fork (this is called "docking"). Chill the crust until firm, 30-60 minutes (or cover and chill for up to 24 hours, or freeze for up to several months.)
Blind-Bake:
- Position a rack in the lower third of the oven and preheat to 400ºF.
- Place the chilled crust on a rimmed baking sheet. Line it with a piece of parchment paper, and fill to the top with pie weights, dry beans, or clean pennies, gently pressing the weights into the sides and corners of the crust.
- Bake the crust for 15-30 minutes (shorter for a metal pan, longer for a glass pan), until the edges are golden and the dough will hold its shape when you lift off the parchment. Carefully remove the weights and parchment and bake until the bottom is dry and lightly golden, about 8-12 minutes longer (for a parbaked crust) or until deeply golden, 15-20 minutes (for a fully baked crust). Use the saved scraps of dough to patch any holes, cracks, or tears in the dough, baking for a few more minutes post-patching.
- Proceed with your pie recipe!
Notes
- Can sub for sweet rice flour: gluten-free all-purpose flour (such as Bob's Red Mill 1 to 1)
- Can sub for oat flour: sorghum, chestnut, or light buckwheat flour
- Can sub for millet flour: sorghum, teff, or buckwheat flour
- Can sub for cornstarch: more tapioca flour
- Can sub for tapioca flour: arrowroot flour
- 10 minutes to mix and fraisage the dough
- 30 minutes to chill
- 10 minutes to do the first turn
- 30 minutes to chill
- 10 minutes to do the second turn
- 30 minutes to chill
- 10 minutes to roll out the dough, get it in the pan, shape it, and dock it
- 30 minutes to chill
- 30-40 minutes to par-bake the crust
- The dough can be made ahead, wrapped, and chilled for up to 2 days or frozen for up to 1 year.
- The shaped crust can be made ahead (baked or unbaked), wrapped, and chilled for up to 2 days or frozen up to 1 year.


dana says
Wizardry I say. Wizardry! Bravo, friend! Sharing this one with my GF friends for sure.
Alanna says
Ha - thanks, Dana! From the wizardress herself. ;)
Monet says
Oh my goodness. I'm sending this to my dear friend, Kate, who received a diagnosis of celiac last year. Thank you for the beautiful work here, my friend!
Alanna says
Thanks, Monet! I'm so sorry for your friend Kate - celiac sounds like no fun. I hope this pie dough helps. Pie helps most things. Thanks for sharing it along, my dear.
Dawn | KitchenTravels says
Wow, what a gorgeous crust and pie! Sadly, butter and other dairy products do not agree with me. I'll have to try a vegan adaptation of this. Thanks for the details, so helpful!
Alanna says
Thanks, Dawn! Please let me know if you try this sans dairy - I've been wanting to give that a go myself.
moragsmum says
Your painstaking research for the cause is SO admirable ... a real scientist in the kitchen! Thanks so much for this!
Alanna says
Thanks for the kind words, moragsmum! It is one of my favorite things to do. I am weird like that.
Anonymous says
I'm always so excited to read your new posts. Everything I've made from your site becomes an instant favourite and your photos are lovely to boot. I made your GF buckwheat chocolate chip cookies last night and they are EXCELLENT. It's been almost a year since I had a decent cookie (since the GF always fall short) and I'd kind of given up hope of finding one. I just wanted to say thank you for sharing your recipes; you've made what I thought was going to be a horrible, if necessary, dietary change so much easier for me.
Alanna says
I can't thank you enough for this sweetest of comments! It means so much to me that you're enjoying these recipes. I'm so glad you gave the cookies a go and liked them. (You might also like the GF ginger molasses cookies I've posted previously.) Wishing you a lovely week - you've certainly brightened up mine.
Angela @ Canned-Time.com says
Gorgeous Allana and I'm sure just tasty!! I'm a pie person more than a cake, so your blog is ♪ always on ♫ my mind .....
Alanna says
Yes, pie! I'm a pie girl, too. Thanks for the sweet note, Angela!
Madeline says
The only time that "being flaky" is a compliment! This pie crust looks delicious and good for us as well…YUM! :D
Alanna says
Haha! Thanks, Mom!
Christine McMurry says
Looks amazing, Alanna! Alex has been rambling about pie a lot lately, and I promised I'd make him one when I come home next month. Good timing on this recipe. I'll have to give it a shot.
Alanna says
Thanks, Chris! I hope you both enjoy it. I'm on an über pie kick lately myself. Thanks for the note!
Cheri Savory Spoon says
Hi Alanna, another great recipe. I always look forward to your post, your instructions are always very clear and your writing just flows. Lovely work, will be making this pie dough soon. Happy-week-end!
Alanna says
Aw, thanks, Cheri! What a nice thing to say - I really appreciate that! Please let me know how you like the pie dough. Hope you have a lovely week.
Cathleen says
Wow. I can't believe how perfect this looks! I have GOT to make this sometime!
Alanna says
Aw, thanks, Cathleen! DO IT!
london bakes says
Oh goodness, this crust looks wonderful! The perfect amount of flake and crumb.
Alanna says
Thanks, Kathryn! I'm still hoping for a bit more flake, but that just means eating more pie... :)
Ashley says
I only recently found your blog and I am just in love with it! The delicious recipes, the gorgeous photos, the smart and useful info (I heart science!), the easy writing. Thank you so much for sharing with us! And I can't wait to see what's coming, especially with rhubarb (I'm obsessed)!
Alanna says
Aw! What a sweet note - thank you, Ashley! I'm so glad you're enjoying my ramblings here. :) I'm obsessed with rhubarb, too! So far this year I've only made a shrub, but I just got some more so we'll see what happens. Meanwhile, feel free to peruse the rhubarb recipes on this site. Happy spring.
Maria Sisci says
I don't kno how i'm JUST discovering your blog. Love it. Love this idea.
Alanna says
Thanks for stopping by and for all the sweet comments!
Anonymous says
Thank you! I love your cooking science. I always like to know why things do what they do and it helps to understand the reasoning behind baking ingredients.
- Bobbi
Alanna says
Thanks for saying so, Bobbi. :)
Abby says
I just stumbled upon your blog and am enthralled!
Seeing the care you took to create this GF crust made me wonder if you've ever attempted a GF phyllo dough (a contradiction in terms, I'm thinking). If you have, would you care to share your recipe and/or strategies?
Alanna says
Hi Abby - thanks for the sweet note! I haven't tried my hand at either gluten or non-gluten phyllo dough, but I would surely post about it if I did. :)
Judy says
Can I double the recipe to make a crust for bottom and top of a pie?
Alanna says
Absolutely! Be sure to cut plenty of vents in the top to let the steam escape as this dough doesn't like excess moisture. Let me know how it goes. :)
Jaime Hammack says
i'm loving this detailed tutorial and can't wait to try it out. yum!
Alanna says
Thanks Jaime! Let me know how you like it!
Nicole says
Ok. I have been reading a ton about parbaking pie crust. What I can't seem to find is a guide on how one adjusts the final cooking time of the whole pie. So for example, the pumpkin pie recipe calls for 45-50 minutes of cooking time with a raw pie crust. If I parbake, then how long would I cook the pie? I can't seem to figure out how to make sure the final pie, both the crust and filling are adequately cooked. I don't want to over cook the crust and undercook the filling. Any advice would be greatly appreciated or even just pointing me to a good resource. Thanks for such a great recipe...can't wait to make pie!!!
Alanna says
Excellent question! I don't usually have trouble with the crust overcooking when I parbake it, unless the pie calls for an hour or more of baking. Bake the pie on the bottom rack and use the guidelines for the filling being baked to determine doneness. (Such as "bake until the filling is puffed and set.") If the crust is browning too much, place the whole pie on two criss-crossed pieces of foil and fold the foil up over the edges of the pie to shield it from the heat. (I hardly ever need to take this step.) Hope this helps!
Gaspégirlatheart says
This looks lovely for a one-crust pie. I want a flaky crust for a tourtiere and will need a top crust as well. Lots of air vents--I saw that advice but what about the freezing and par-baking of the top crust. I'm really unsure what to do about that. Has anyone done a top crust? Must have a flakey, gum-free pie crust for New Year's day.
Alanna says
Hi there, so usually for a double crust pie you don't parbake anything, but I would keep the bottom and top chilled as long as possible, then when you assemble it, chill or freeze the whole thing for 20 or 30 minutes to get it really cold. I've never made a tourtiere so I can't be sure. But I did use this crust to make a shaker lemon pie and it worked pretty well. Please let me know if you try it out!
Anonymous says
Hello!!
I was ecstatic to discover your website!! Baking is one of my most treasured pastimes, but have to go GF for loved ones. Thank you, thank you, so much for your work!
I have a quick question for you. Bob's Red Mill has both white rice flour and sweet white rice flour. The first is easier to find, from what I've seen. Is there much of a difference between the two, as far as gluten free baking is concerned?
Thank you! <3
Cassy
Alanna says
Hi Cassy! Definitely use the sweet white rice flour if you can find it. It's milled from sticky rice (used to make mochi) and has a naturally sticky texture. If you can't find that, you can give regular rice flour a try, but it will probably make the dough more brittle and less flaky. You can also try using a GF all-purpose blend in its place. Let me know! :)
Gaspégirlatheart says
THANK YOU! Tomorrow we'll find out.....
Alanna says
Sweet! Please come back and tell me how it goes. :)
Gaspégirlatheart says
My first French Canadian Tourtiere turned out great! I wasn't a big fan of the finished dish but in fact, the crust was the best part. It was golden, flaky and delicious! I am so grateful to have a gluten free pie crust that works this well. Probably won't make another meat pie but after giving up on gluten-free crusts WITHOUT xanthan gum, this is exciting! I see lots of pot pies and desserts in our future. I doubled your recipe for a two-crusted pie in a glass pyrex pan and had enough left over for 8 cinnamon rolls. I cut a lot of slits in the top crust and pushed a few of them open about a quarter inch with my knife. Did the fraisage method on my marble "board". Did not fold, I only chilled and then rolled the dough. Made the bottom crust and put it in the pan then chilled it again while cooking the filling. Top crust was chilling all the while. The dough was surprisingly easy to work with using your tip to lift and rotate during the rolling process. The only recipe modification was that I had run out of millet flour--having added all mine to a homemade blend of potato starch/sweet rice/sorghum/millet. I used this blend in place of the millet in your recipe. I had only whole black chia seeds and ground them in the Vita-Mix; they worked just fine. I also froze the whole pie overnight. It tucked neatly into a 2-gallon (jumbo) zip-lock bag. I brushed the frozen pie lightly with egg wash (dipping my brush into 1 egg + 1 Tbs. water). I was worried about cooking times for a frozen pie. I decided on 350° for 30 minutes then raised the oven to 375° for a full hour. Can't remember if I let it go another 10 minutes or so after that. Do remember checking often for over browning. I used a metal pie-crust shield that fits over the rim and put it on for the entire time. Bottom rack. Crust looked, smelled and tasted fantastic! Thank you so much!
Alanna says
I'm so glad you liked the crust - that's fabulous! :)
Daria Wrubel says
Well, Alanna, you've done it again. I made this yesterday to use for tonight's quiche. The directions were great! Very easy to follow. I used vinegar, because I didn't have any buttermilk. I did the fraisage method, and two turns. I have a ceramic pie tin, so I wasn't sure about the cooking times. I tried 20 minutes with the weights, and I think that was too short. But, the crust was great! I even got a "this takes just like regular dough!" So flaky and crisp. Can't wait to try it again!
Alanna says
Yay!!! Thanks so much for trying my recipes Daria and for the great feedback! I'm so glad it was a hit!
Ginger says
Singularly the best pie crust I have ever made. Sadly, after too many attempts to admit, with regular pie crust over the years, with chilling, fraisage, leaf lard, high fat butter... the whole good technique bit, my crusts always fell short of what I felt they should be. (anything from, not the best I've ever eaten, to so awful, lets just scrape off the filling) I almost gave up totally. With it being GF, I guess I may not have been expecting much from this crust. Boy, was I wrong! Wonderful, flaky, buttery greatness. Thank you for the inspiration to try again and the wonderful recipe.
Melynda says
Hi Alanna, thank you for this GF pie crust recipe. Can arrow root be substituted for the cornstarch?
Thank you,
Melynda
Victoria says
Hello!
This recipe looks gorgeous. I have my dough chilling in the fridge at the moment. One direction I just can't get my head around though is the 'roll into a spiral' after the letter fold, and then how to make it flat. After the letter fold, I have quite a small, high square (1 1/2 - 2 inch thick, about 10 inches in length /width) - and I'm not sure how to roll that into a spiral! Is there any way you could describe how to do this part?
Thanks so much!
Alanna says
Hi Victoria! Sorry for the confusion. If your dough is too tall to roll up the other way, I would just flatten it out a bit with the rolling pin first. Then start with a skinny end and roll it up into a spiral, or you can fold it in thirds; whatever works to get some more folds/layers in there. :)
Laura says
Can this dough be filled and baked raw?
Alanna says
Yes! Any pie recipe that calls for that will work with this dough; custard-type pies will do better blind-baked.
Bethany says
As a long-term wheat-free baker who first cut her teeth on wheat flour baking, I have been deeply impressed by your book the Alternative Baker. It's a beautiful book and every recipe I've tried has been lovely. I'm a special fan of the tangerine-vanilla madeleines, chestnut financiers and peach brown-butter creme fraiche tart.
I love the flavor and moisture resistance of your pie dough recipe. It's lovely to work with (especially for a g-f dough) also has great flake (I usually give it the recommended turns.) However, I have been having a problem: it's always slightly tough/chewey once baked, like an overworked wheat dough. I've never had this problem with a gluten free dough before! Have you encountered this issue yourself? Do you have any suggestions? Thank you!
Alanna says
Hi Bethany! Thank you so much for buying my book and for the sweet note - I'm honored that you're enjoying the recipes! However I'm sorry you're having trouble with the pie dough. I used to have this problem with my original version of this dough, but I haven't had it happen since I reformulated it here. My best guess would be that maybe there's a little too much liquid in the dough which is activating the sticky ingredients (chia, sweet rice, tapioca). If the dough got too warm during handling, I could see that potentially creating toughness too. Let me know if you want to chat through this more via email, and let me know what you try! -A
Sharon says
Have you/anyone ever tried using frozen grated butter and eliminating the friasage step? Seems like an easier and more efficient way of incorporating the butter. I saw this as a tip on some cooking show, but I am sure it was not in a gf recipe!
Alanna says
Hi Sharon! I tried this once several years ago, and just didn't like cleaning smeared butter off the grater, but I bet it would work fine! Let me know if you give it a try. :)
Susan says
Not too crazy about using cornstarch:(
What would be a substitute and keep consistency?
Alanna says
Hi Susan,
The cornstarch really helps give this dough a crisp and tender consistency. I'd recommend trying it as written first if possible. I tried the dough with potato starch instead and it made it soggy. I think adding more tapioca might make it gummy. But if you experiment, please come back and let me know!
Jacquie says
Dear Alana,
What I don't understand is how all the folding, rolling and smearing doesn't cause the pastry to be tough!?
It's not that I don't trust you and all the bakers who rave about this gorgeous looking recipe, I just love to learn. :)
Thank you for being such an incredible teacher for us all.
Alanna says
Excellent question, and thanks for the sweet words!
So first off, it's the glutens in wheat flour that become tough when overworked, so we don't have that problem in GF baking - which is a big win! But wheat pie dough actually requires some degree of gluten development. The way you get the flaky layers is from layers of sticky, strong dough being lifted up by the steam coming off the butter beneath the dough layer. When you have that happening in dozens of different layers, that's what makes for flaky pastry.
Working this GF dough creates the same effect, helping the dough hold together so that layers of dough can be lifted by buttery steam. If you try making it with all the steps, you'll see how after the final roll out, it's much smoother and less prone to cracking, almost like magic, and it bakes up crisp and flaky. My hunch is that since the proteins in the GF dough are much weaker than those in wheat dough, there's less of a chance of overworking the dough and making it tough – at least, I've never had it happen. Let me know if that makes sense or if you have more questions! :)
Jacquie says
Your answer was perfectly understandable.....of course it's the glutens!!!
Thank you so very much for taking the time to answer so thoroughly!
C says
What would you suggest as a substitute for the oat flour?
Alanna says
I think a GF all-purpose blend would be a safe substitute. Oat flour is fairly unique in its soft, starchy texture and I've never tried the pie dough without it. I do think chestnut flour could be a good sub if you want a flavorful flour, but it can be tough to find. If you find a sub that works, please come back and let me know!
C says
Well, I was able to use oat flour. I used American butter, flax instead of chia, and only 4 Tb water. I did the fraisage and turning, but the final crust was not flaky at all. Very crumbly and tasted good (but a bit bitter), but not flaky. :(
FYI, in case you're curious, I have made a (semi) flaky gluten free crust before, using America's Test Kitchen's gluten free pie dough recipe with their whole grain flour mix recipe. Have you checked it out?
My dad has made many pies and has perfected his (glutenous) dough recipe. I'm a novice, so he's a tough act to follow, with gluten free flours too!
Emily says
I’m going to try this for thanksgiving, and I’m wondering what you think about swapping arrowroot powder for the tapioca. Also, curious if you’ve ever tried using egg for a binder instead of tapioca.
Alanna says
Hi Emily, I haven't worked with arrowroot much, but I think it should work as a sub? I've never tried egg in the dough, but if you do, please let me know how you like it!
Magdalena says
Thank you Alanna for this very promising recepie. I am so excited since your other recepies turned out wonderful!!,
I don't have a cornstarch or potato starch. Can any of the other flours be increased to substitute ? I understand I may not get the same result but I would like to make the pie today and no time to look for the starches.
Also , I am making a pumpkin pecan pie which requires over 60 min baking time because of the pumpkin layer on the bottom and pecan filling on top.
I an supposed to bake a pumpkin layer first in parbaked crust and add pecan filling and bake again . It seems very complicated and I am afraid I will burn the crust.
Help , please😩
Alanna says
Hi Magdalena, I'm sorry for the delay, I was away from my desk over the holiday. Did you end up trying the crust? I would increase the sweet rice and tapioca flours to replace the cornstarch, but it will probably end up more chewy and less flaky/crispy. That filling sounds delicious! I would bake the pie in the lower third of the oven, and maybe err on underbaking the crust in the first parbaking step? Let me know how it goes!
Shirley says
Hi Alanna! Do you have any tips for making this without dairy? I tried making it for my sister who can't have gluten or lactose with a vegan "buttery spread" instead of butter, but that softened too quickly and made the dough difficult to work with. And thanks as always for your wonderful recipes :)
Alanna says
Aw, thanks Shirley - so glad you're enjoying the recipes! I have a coconut oil version in my book (I believe you just sub cold coconut oil for the butter - you'll want to cut it in more finely than regular butter, and you'll want to work this dough more than the buttery version to help it hold together better). This one's a bit more fragile than the butter/buttermilk version, so it may be harder to form into a pie shell (I use it in hand pies in the book). I've also been loving Miyoko's vegan butter - it's closer in texture to real butter than buttery spreads. I haven't yet tried it in this pie dough but I'm guessing it would be the closest thing to real butter. Let me know if you give any of these a go!
Shirley says
Thanks! When I tried this before I ended up freezing the dough in between turns which made it a bit more manageable, but I'll give coconut oil or Miyoko's vegan butter a try next time!
Shirley says
I found myself wanting to bake another pie before I got my hands on Miyoko's vegan butter, so I used part buttery spread and part coconut oil, and it worked pretty well! It did tear easily so I flattened it with my palms first each turn and had some trouble transferring it to the pie pan, but it's a big improvement :)
Alanna says
Perfect! I'm so glad those substitutions worked out. Let me know if you give it a go with the Miyoko's too. :)
Robin says
Hi Alanna,
I’m a little late to the party here and am wondering about tricky substitutions. I was hoping to make this for a friend (frozen pie crust holiday present) but she can’t eat oats or millet! Is there any hope of trying a pie crust for her? (She cat eat sorghum or buckwheat either so the variations listed didn’t get me much farther.) I know those are pretty big things to switch out - any advice? Should I give up and find another present?
Thank you so much for this - a few people on my list ARE definitely getting these for presents (with no substitutions).
Alanna says
Hi Robin, Never too late! What a sweet holiday gift, that's genius! Which flours can your friend have? Maybe I can make some suggestions. :) Or maybe my tart crust would be a better place to start? https://bojongourmet.com/2017/12/pomegranate-tart-hibiscus-lemon-almond-flour-crust-gluten-free/
Please let me know how you like the substitution-free version! :)
Robin says
Thanks so much for responding so fast! She says rice-based things, corn, potato, and tapioca are all ok. (No buckwheat, sorghum, quinoa, spelt, rye, barley, millet, or oats!)
I know that's slim pickins! Totally ok if you dont have a magic fix/suggestions! I'm so appreciative of your blog, thank you for all the recipes and inspiration! :)
Alanna says
You could try brown or white rice flours (or a combination) in place of the millet and oat! Let me know how it works. :)
Robin says
Awesome!! I will do that! I'll get back to you when everyone has baked their pies!
Barbara says
Just stumbled on this recipe...can't imagine where I have been since I really enjoy your 'work'!. I'm a trained chef/pastry chef whose boundaries have been pushed these past few years in the name of healing.
Question about the corn starch...have you tried arrowroot starch as a replacement for the corn? (can't have corn in this household).
Alanna says
Thanks for the kind words! I'm sorry you're having to make dietary changes in the name of health, but kudos for doing it! I haven't tried arrowroot here, but a few people have asked about it, so if you try it please let me know! It may make the crust more chewy and less crispy/flaky than cornstarch, but I'm guessing it would work well enough. Happy baking!
Amanda says
I super love how you tried using ground chia instead of xanthan--have you used it in other recipes? What's your conversion ratio: 1 t xanthan is replaced by 5 T/1 oz ground chia?
Alanna says
Yes, I use chia in my pizza crust! That conversion sounds about right, though most of the time I wing it. The two do slightly different things so they're not always interchangeable. But please let me know if you experiment!
charles says
I think this is a really amazing recipe and technique BUT I strongly suggest you post something about how to grind chia seeds because I have had a very hard time doing it effectively
Alanna says
Thanks for the great feedback! I grind mine in a coffee grinder - added a note to the recipe! :)
Kim says
Hello! I’m in the chilling portion of making this, and I have an awful feeling that I’ve made it too wet. I tried the version in the food processor, ended up using 8T ice water total because it was so dry, and attempted the frissage (for making your apple galette with tomorrow morning). But when I dumped it out of the food processor it was so sticky! I’m worried about having it be terribly damp when I bake it.
I’d hate to throw it away, but is it even worth trying to turn it into something edible?
PS I am assuming this is user error. Your recipes are always so amazing. :-)
Alanna says
Hi Kim! I'm so sorry that happened - I've definitely added too much liquid before myself. The good news is that there are no glutens to interact with the liquid, so things might work out! Sometimes the butter is also soft, adding to the wetness, so chilling it can help firm it up. I'd say that if after chilling the dough still feels too wet, and you're baking this for a special occasion where you want it to be perfect, it might be worth making a new batch. But don't throw the dough away! Once I overworked the dough in the food processor so much that I thought it was ruined, but I baked a pie with it anyway and it turned out great! It seems to be a pretty forgiving recipe. Please let me know what you end up doing, and thank you for trying my recipe and for the kind words!
Kim says
You’re awesome! Thanks for replying!!!
I decided that I would go for it (after turning it twice more in the morning and baking a tiny tester off). And it looks to be very good! Crust browned up beautifully and it sounds well cooked. I’ll report back on how it’s recieved.
(I made your chocolate pots as a backup dessert last night just in case!)
Thanks!!!!
Alanna says
I'm so glad it worked out, and now you get to enjoy two desserts! Too much dessert said no one ever, hehe.
Kim says
I am laughing, because I clearly enjoyed asking you questions about your recipes. And the apple galette turned out amazing! It’s funny that was last year at this time. :-)
Shannon Clifford says
Absolutely delicious! I used this recipe for two two-crust chicken pot pies, and the group I served them for loved them! One person commented that if this was how gluten-free tasted, then maybe they should go gluten free!
When I made the first pie I followed the directions as written. I found the crust difficult to handle when it came out of the refrigerator, even after I let it sit a few minutes. For the second pie, I rolled out the crust without refrigerating first, and it was great! Almost as easy to handle as my non-gluten free crust.
Alanna says
That's a great tip - I'll try it next time! I'm so glad this recipe was a hit! Thanks a bunch for the rating and the note. :)
Luisa says
What can i use to substitute corn starch with?
Alanna says
You could try arrowroot starch or more tapioca. Potato starch works but the crust becomes soggy more quickly due to the hygroscopic nature of potatoes. Please let me know what you experiment with!
Amra says
I am making this tonight. I have celiac and have to be gluten free and it is so hard to find good gluten free baked goods. I used to bake a lot before going gluten free so now i need to experiment and get my mojo back :) thanks for the recipe and inspiration :)
Alanna says
You bet! Please let me know how you like it. I feel you - learning to bake gluten-free is a constant challenge. But it has some benefits too - you don't have to worry about tough baked goods, and you get to taste so many more delicious flours than just all-purpose! You might also like my book Alternative Baker if you haven't checked it out already. :)
Kim says
Hi Alanna! This recipe is amazing! I generally make it in the Cuisinart at this point, because I am lazy and it is good enough to still make us smile.
I am wondering if I could double it. Or is that an awful idea? I’m leaning towards the latter.
Kim says
I decided to make four separate crusts and just assembly-lined it into three bowls and the Cuisinart. It worked a charm! Now I have 4 delicious pie crusts on hand for last minute baking. :-)
Alanna says
Brilliant! Sorry I didn't respond in time, but I'm so glad you made it work! Now what pies are you making??
Kim says
Well, I made a spinach, ham and feta galette the other day that my partner declared was both delicious and a reinvention of pizza. Ooops. It had not tomato but tasted exactly like pizza! (Come to think of it, I love pizza, so no harm there.) And I made the apple galette you’ve got - but I subbed store-bought marzipan. It wasn’t as amazing as the walnut frangipane for the record.
I’m hoping to make one of your savory galettes soon.
I’d meant to make a second apple galette on Christmas but then someone turned up with an apple pie, so I didn’t. :-)
Thanks again! Often just asking the question reveals the answers in my head. But I do appreciate that you’re available and actually reply! And I love your recipes and send people here all the time. :-)
Alanna says
I totally know what you mean about how asking a question sometimes reveals the answer in our heads. I love getting questions about recipes because it helps me know what I need to clarify, so please keep them coming! That savory galette sounds DIVINE. I've been wanting to make something like that with spanakopita flavors. I'm thrilled that you're enjoying the recipes - it's notes like these that keep me inspired to share them! Happy baking to you. :)
CANDY Scanlon says
On color me stupid, I don't understand the rolling into spiral part of this recipe.
I have made numerous awful gluten free crust. I am excited to try this. I love the idea of no xanthum gum. I can't wait to try.
Alanna says
Hi Candy, I feel you - there are a lot of subpar GF pie crust recipes out there. I'm very proud of this one - please let me know how it goes for you! On rolling into a spiral - you're really just folding the dough, as shown in the photos. This helps the dough become smooth and pliable, less prone to breaking, and it creates lots of flaky butter layers. Please don't hesitate if you have any more questions come up. :)
Ruth Cherry says
Can you leave out chia? Don't have any.
Alanna says
Hi Ruth, you could try ground flax if you have any of that (I grind mine in a clean coffee grinder). Otherwise you can try leaving it out. You'll probably need less liquid since the chia is quite absorbent, and the dough may be a little less pliable. You could also try 1/2 teaspoon xanthan gum if you have any on hand. Let me know how it goes!
Peter Berglund says
This pie crust is amazingly good. Buttery, nutty flavor; nearly as easy to handle as wheat dough; and a lovely fine flakey texture. I also appreciate the whole-grain ingredients, and the use of chia instead of gum. We wrapped a potato-herb galette with it and tbh the crust was more interesting than the potatoes.
My first foray into GF baking was a pizza crust recipe that was more food science than cooking, and tasted like it. This crust has restored my confidence.
Alanna says
Aw, I'm so glad this was a hit! Potato herb galette sounds absolutely divine. If you like this recipe you might enjoy my GF pizza crust too - it has many of the same flours and it's stupid easy to make. I've tried lots of subpar GF recipes over the years too. There's no longer any excuse for bad GF baking!
Kay says
Hi, I was hoping you could elaborate a bit on this part: "Bake the crust for 15-30 minutes (shorter for a metal pan, longer for a glass pan), until the dough will hold its shape when you lift off the parchment."
I had a hard time figuring out when it's ready - how would I tell when it's not holding it's shape? It all turned out alright, though not as flaky as I would've hoped. Hoping to give it another go! Thank you!
Alanna says
That is an excellent question! As long as the crust stayed up and didn't slip and slide down the sides of the pan, you baked it long enough!
The flakiness is definitely something that takes making it a few times and getting a feel for. You want to make sure you have some large-ish butter chunks in there – these will create those nice flaky layers. I've found that making it by hand tends to yield the most flake, but the dough is a bit more brittle. Whereas the food processor method gives you less flake, but the dough it more pliable and tender. Usually I make the food processor method because it's so much quicker and easier though!
Please let me know how attempt #2 goes! I'm working on shooting the grain-free version this week so I've been elbow deep in pie dough too. :D
Puja says
If I was to use bob's 1:1 gf flour, would you suggest not putting in chia seeds, cornstarch or tapioca flour? Thanks! Can't wait to try this recipe!
Alanna Taylor-Tobin says
Sorry I missed your question before, it's a good one! I would use Bob's 1:1 GF flour in place of maybe half of the starches, but I would still use the chia I think. I actually tried making a crust with that flour and no other starches and it didn't hold together as well or become as flaky as my version here. Please let me know if you try it!
Gabrielle says
Hello! This sounds amazing I'm so excited to try it. Has anyone used ground psyllium instead of ground chia? I don't have a spice grinder but do have plenty of ground psyllium powder on hand. Thank you!
Alanna says
I haven't tried that myself but I've been curious to! I think you could use less psyllium, maybe a teaspoon or two? Please let me know if you experiment!
Robin says
You nailed this recipe!! It was perfectly buttery, flaky magic! I can’t get over how amazing it is! This will forever be my go to gf pastry dough!
Alanna says
Awwww this makes me so happy! I'm glad it turned out well and that you love it!