
 At the party, my bars got eclipsed by a (heavenly) pecan pie brought by another talented baker, and Jay and I were stuck (alas and alack!) with a plethora of cheesecake squares. Regardless of how hard we tried get rid of them, we kept finding ourselves in the kitchen with our fingers in the pan and crumbs round the lips. Luckily, these bars work equally well as breakfast, a mid-day snack or a satisfying dessert, as we can now attest.

 For more pumpkin recipes:
 For more pumpkin recipes:
- Gluten Free Pumpkin Cream Pie
- Pumpkin, Rye + Chocolate Babka
- Maple Pumpkin Pudding Chômeur
- Gluten-Free Pumpkin Ricotta Gnocchi with Pancetta and Seared Radicchio
*Bojon appétit! For more Bojon Gourmet in your life, follow along on Instagram, Facebook, or Pinterest, purchase my gluten-free cookbook Alternative Baker, or subscribe to receive new posts via email. And if you make these pumpkin cheesecake squares recipe, I’d love to know. Leave a comment and rating below, and tag your Instagram snaps @The_Bojon_Gourmet and #bojongourmet.*
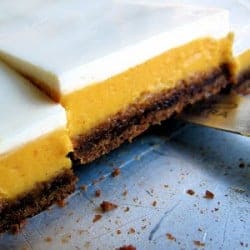
Pumpkin Cheesecake Squares
Print Recipe Pin RecipeIngredients
Gingersnap Crust
- 3 oz. unsalted butter, softened but cool (6 tablespoons or 3/4 stick)
- 1/3 cup sugar (2 1/4 oz.)
- 2 tablespoons molasses (unsulphured blackstrap)
- 1/2 egg (about 2 tablespoons)
- 5 1/2 oz. all purpose flour (1 cup plus 1 tablespoon)
- 1/2 teaspoon baking soda
- 1/2 teaspoon powdered ginger
- 1/4 teaspoon cinnamon
- 1/4 teaspoon salt
- 1/8 teaspoon cloves
- 1/8 teaspoon allspice
Pumpkin Cheesecake Filling
- 12 oz. winter squash puree or canned pumpkin (about 1 1/2 cups)
- 12 oz. cream cheese
- 3/4 cup plus 2 tablespoons sugar (6 1/2 oz.)
- 3/4 teaspoon salt
- 1/2 teaspoon cinnamon
- 1/4 teaspoon freshly grated nutmeg
- 1/8 teaspoon each cloves and allspice
- 3 eggs
- 3 tablespoons heavy cream or sour cream
- 1 teaspoon vanilla
- 1 tablespoon whiskey or brandy
Sour Cream Topping
- 12 oz. sour cream, at room temperature
- 1/4 cup sugar
- 3/4 teaspoon vanilla extract
- pinch salt
Instructions
Gingersnap Crust
- Preheat the oven to 350º. Place a rack in the lowest position.
- Grease a 9x12" (1/4 sheet) pan.Cream together the butter and sugar in a stand mixer fitted with the paddle until light and fluffy. Add the molasses, then the egg, beating to combine after each. Sift together the dries, then add to the butter mixture and beat on low until just combined.Using an offset spatula or moistened fingers, press and spread the dough into the prepared pan, making it as flat and smooth as possible. (Hint: if you scrape the bowl well enough, you can reuse it for the pumpkin filling.) Place in the oven on the lowest rack, and bake for about 20 minutes, until firm. Remove and set aside. Turn the oven down to 325º.
Pumpkin Cheesecake Filling
- Line a large plate with a triple layer of paper towels and spread the squash puree evenly over. Place another triple layer on top (I don't hate trees, I swear!) and top with another large plate. This will press out excess moisture and prevent a watery cheesecake. Get on with the rest of the cheesecake. When you're ready to add the squash, remove the top plate, peel off the top layer of towels, grasp the bottom layer and flip the squash onto the plate. You should have 10 or 11 oz. of puree.
- Beat together the cream cheese and sugar on low in the bowl of a stand mixer fitted with the paddle attachment until very smooth and well combined, scraping down the sides of the bowl and the paddle. Add the salt, spices and squash puree and beat until combined. Add the eggs one at a time, beating until combined and scraping down the sides of the bowl and the paddle between eggs. Beat in the cream, vanilla and booze until combined, scraping the paddle and bowl to incorporate thoroughly.
- Spread the puree onto the baked gingersnap crust. Place in the 325º oven on the lower rack. Bake 25-35 minutes until the sides are just barely starting to puff up a bit. The center should wiggle like jello when you jostle it, but should not seem liquidy. Remove and let cool 10 minutes.
Sour Cream Topping
- Beat all together to combine. You can use a bowl and spoon for this. Gently drop spoonfuls of the mixture onto the outer edge of the cheesecake, then use an offset spatula or the back of a spoon to carefully spread the mixture to evenly coat the cheesecake. Return to the oven for 5 minutes until set. Remove.
- Let the cheesecake cool to room temp, about 1 hour, then chill for at least 2. Using a sharp knife dipped into hot water and dried between each cut, slice in the pan into squares (6 the long way by 4 the short way, or whatever size you like).
Notes
Nutrition
This recipe calls for half an egg. Odd, yes, so if you fancy, make a double batch of the dough and set half of it aside to roll out and cut into gingersnaps. Or just have half an egg lying around to add to a scramble or brush on a set of buns. To measure half an egg, break the egg into a bowl and beat well to combine. Measure out 2 tablespoons.I've written this recipe to be as quick and easy as possible. For an extra-delicious crust, don't spread the cookie dough directly into the pan; instead, wrap it and chill until firm, about 1 hour. Roll out to 1/8" thick, and cut into 2" squares. Place on a parchment-lined sheet pan, spaced 1" apart, and bake for about 20 minutes, until firm and slightly darkened around the edges. Let cool completely, then grind finely in a food processor. Toss the cookie crumbs with two or three tablespoons of melted butter until they clump together, then press them evenly into the pan. Bake the crust for 10 minutes until toasty, let it cool slightly, then proceed with the recipe.
1 teaspoon vanilla


Kim says
Love to see that you're blogging. Everything is so beautiful and sounds soooo yummy. Sadly, I can't eat any of it!
alanna says
: ( That is sad, but hopefully you're the better for it! Thanks for the kudos; your blog is beautiful, too!
Phoebe says
This comment is very late, but I just wanted to say that I made these last year for a Thanksgiving office potluck. Everyone asked for the recipe (so I sent them all here) and I have been instructed to always bring these in the future, so I'll be making them again this weekend. Thanks for the fabulous recipe!!!
Alanna says
Thanks for the fabulous comment! So glad the bars are being enjoyed. : )
YellowBunnies says
Made these last year, making them again this year! I've been substituting gluten-free gingersnap cookies for the crust instead of making it from scratch to make it a little easier for me on Thanksgiving. Thanks for the recipe!
Alanna says
I'm so glad to hear it!
Valerie says
Hi,
How many days ahead can I make this for thanksgiving? Also, I was going to make this DF with DF cream cheese.
Thank you
Valerie
Alanna Taylor-Tobin says
Hi Valerie,
Great question! You can make the bars up to 2 days ahead. The crust will soften a bit but they will still be delicious. Please let me know how it goes with the DF cream cheese – now I want to try them that way!