Follow this top-rated recipe tutorial at home to bake soft, crusty, and chewy fresh focaccia using a combination of leftover discarded sourdough starter and instant yeast. It’s easy and quick to make, as far as baking homemade focaccia goes, no special equipment needed!
This recipe takes about 4 hours to make; baker's schedule included! This is a great recipe for beginning sourdough bakers because it's quick, easy, and foolproof.

Note from Alanna: I first published this easy focaccia recipe in 2009 when TBG was only 1 month old! I was deep in a sourdough bread phase and needed things to do with excess sourdough starter. This recipe quickly became the most-made of all my homemade bread recipes over the years (the second one being my multi-grain sandwich bread). It has over eighty 5-star ratings (plus more positive comments from the days before I had star ratings on TBG.) I hope you love it too!
Here's what one happy baker had to say about this sourdough discard focaccia:
Excellent Recipe
“This focaccia is RIDICULOUSLY good!!! Excellent recipe! Made mine with Maldon sea salt, dried thyme and rosemary. So so good!”
—Violetta
These days, most of the recipes I publish are gluten-free. Try this one from my friend Sarah at Snixy Kitchen if you're looking for a gluten-free focaccia recipe.
PS. Some people say "focaccia bread" but since focaccia *is* a type of bread, this is like saying "bread bread". Please just don't.
My Introduction to Handmade Focaccia
My first baking job, during my freshman year at UC Santa Cruz, lasted about three months. My shift started at 4am and I regularly slept through my alarm and awoke at 9am to a call from my coworkers, already 5 hours late to work.
But despite my frequent tardiness and sleep deprivation, my favorite part of the job was dimpling out the oiled, herb-coated focaccia dough as it slowly rose in multiple hotel pans. There was something so satisfying about pressing the soft, springy dough, coated with fragrant olive oil, onto baking sheets, the scent of yeast mingling with fragrant olive oil.
Easy Sourdough Focaccia
I developed this quick sourdough focaccia recipe one day when I wanted to bake a sourdough focaccia but didn't have the hours and hours needed to wait for a dough leavened only with wild yeast to rise. I tinkered with a recipe for yeasted focaccia, adding sourdough starter and tweaking the rest of the ingredients accordingly.
What I pulled out of the oven that day was the best focaccia I'd ever eaten or made, and it took a quarter of the time that traditional sourdough recipes do. It was one of my more triumphant moments in life to date. You'll feel the same way when you try it!
Why is this sourdough focaccia so fast to make?
Most sourdough focaccia recipes are leavened only by sourdough and they take many hours to rise; most top recipes take about 20-24 hours to make, start to finish.
This recipe uses a touch of rapid rise yeast to speed up the process shortening the rising time significantly. It only takes about 4 hours total. This means you can start your sourdough discard focaccia earlier in the day and enjoy it with dinner! Just like those more time-intensive recipes, it still bakes up with a golden crust, beautiful air holes, a springy texture, and big flavor.
Here's the baker's schedule for this focaccia recipe:
- mix the dough: 20 minutes
- first rise: 1-2 hours
- second rise: 45-60 minutes
- bake: 30-40 minutes
- cool: 1 hour
- total time: 3.5 - 4.5 hours
Sourdough Focaccia made with Discarded Starter
Another bonus of this recipe: since commercial yeast is doing some of the heavy lifting, we don't need to use freshly fed starter. This recipe uses the starter you throw away when refreshing your starter. Sourdough discard starter can be stored in the refrigerator for up to a few days, which means you can make this recipe on the fly instead of first having to feed your starter and wait for it to activate. You can even freeze discard starter and defrost it when you're ready to bake!
This is also a great recipe to make if your starter is just getting going, since it might be a bit weak to raise bread on its own at this point. And it's an easy, foolproof recipe, making it great for beginning sourdough bakers as well as seasoned pros with time constraints.
Ingredients & Substitution Suggestions
This easy sourdough discard focaccia comes together with just a handful of ingredients.
- Sourdough discard starter adds tangy notes and helps the bread rise. The starter should be runny enough to pour, the consistency of runny yogurt or thick heavy cream. It's best to measure by weight since the bubbliness of your starter will impact volume measurements.
- A small amount of rapid rise yeast gives the focaccia dough a boost, shortening the rising time. You can sub fresh yeast or active dry yeast (see recipe notes for the method)
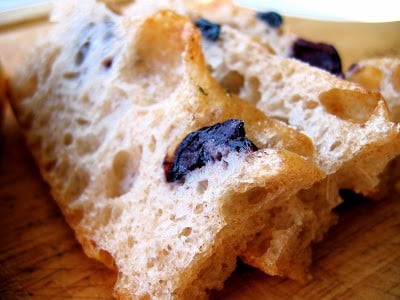
- All-purpose flour or bread flour can be used here. Bread flour will give the focaccia bigger air holes and a chewier crumb, as shown here. All-purpose flour will make a more tender focaccia with a finer crumb.
- Whole wheat flour adds some nice, earthy flavor. You can use other glutenous whole grain flours such as spelt, kamut, rye, or barley if you like. Or you can use all white flour for a more traditional focaccia.
- Warm water moistens the dough. It's best to heat filtered water to avoid contamination from your pipes. Just make sure it's not too hot so as to kill the yeast. It should feel pleasantly warm to the touch but not hot.
- Olive oil adds moisture and savory flavor. Use a flavorful extra-virgin olive oil if you can.
- Fine sea or kosher salt flavors the dough, while flaky salt adds addicting crunch to the top of the focaccia. Avoid using table salt, which can taste harsh.
- Optional toppings and flavors: try adding some minced fresh rosemary or thyme to the dough. Dot the focaccia with some olives, sliced red onion, or cherry tomatoes. Or try poking some roasted cloves of garlic into the top before baking. It's hard to go wrong where focaccia is concerned!

Equipment
No don't need much special equipment to make this easy sourdough focaccia.
- to mix the dough: stand mixer with a hook or paddle attachment (or a bowl and a spoon or spatula for mixing by hand)
- to shape the dough: 9x12-inch baking pan or quarter-sheet pan
- to turn the dough: a plastic bench scraper
- optional: a baking stone will make the bottom crust more crisp if you've got one
- also optional: I like to add some ice cubes to a pan in the oven, which steams the oven, helps the crumb open up, and makes the crust turn golden. But several readers have omitted this step and still had great results!
Method
This recipe is so fun and easy to make. The mixer does the hard work of mixing the sticky dough, and the best part is sticking your fingers in the dough to dimple the dough in the pan!
If you don't have a stand mixer, don't fret: several readers have successfully made this recipe with a bowl and a wooden spoon or spatula!
This makes a 9x12-inch focaccia, about 12 servings.
- Combine the starter, yeast, water, and flours in the bowl of a stand mixer fitted with the paddle or dough hook attachment (both work!).
- Mix on low a couple of minutes until combined, then increase to speed 3 and beat for 8 minutes.
- Sprinkle on the salt, and beat on 3 for another five minutes. At this point, the dough should still be sticky, but should pull away from the sides of the bowl while it's being mixed.
- Leave the dough in the bowl, cover, and let rise 1-2 hours until doubled or tripled in bulk.
- Line a 9x12-inch baking sheet with a sling of parchment paper and coat with some olive oil.
- Turn the dough out onto the center of the oiled parchment and drizzle with more olive oil.
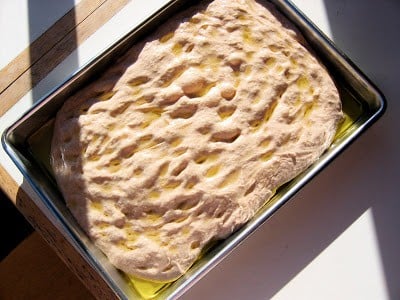
- This is the best part! Use your fingers to dimple the dough outwards towards the sides and corners of the pan.
- Let the dough rise until doubled in bulk, about 1 hour, dimpling out the dough a few more times to fill in the corners.
- Sprinkle a bit of crunchy salt over the top, and any other toppings you like, and give the dough one last dimpling.
- Optionally place a "sacrificial" pan in the oven and add a handful of ice cubes just before adding the focaccia.
- Bake the focaccia at 500ºF until golden and lovely.
- Let cool completely, then devour!
Full of big, "old-dough" flavor, the generous dose of olive oil makes the outsides of this sourdough focaccia addictively crisp and keeps it moist for several days. A sprinkle of flaky salt and fresh herbs add palate pleasing complexity.
What to Serve with Sourdough Focaccia
You may want to just nom this straight from the pan. But if you have some restraint, here are some favorite uses for this focaccia:
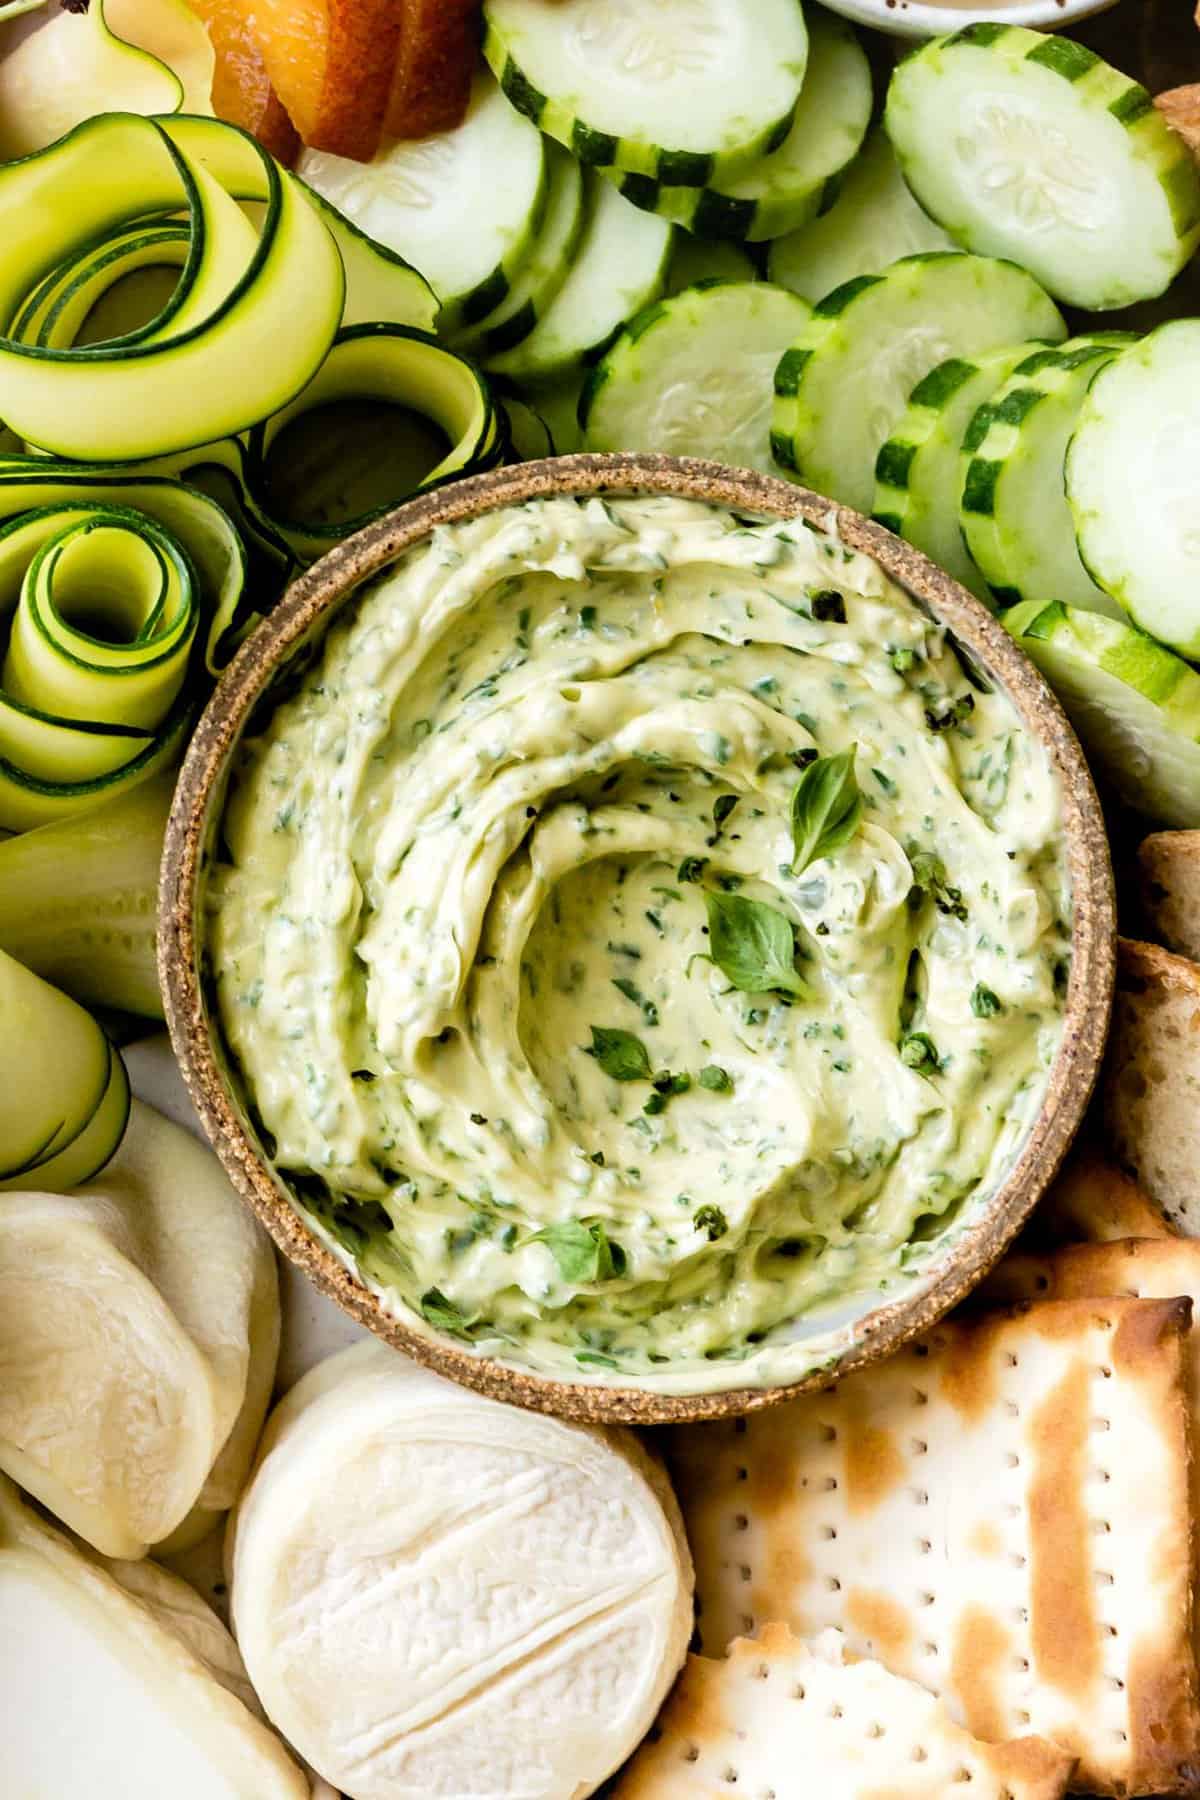
- Slather with homemade basil butter or green herb compound butter
- Cut it into fingers for hors d'oeuvres with dips and spreads such as vegan lentil-walnut pate
- Dip it in soup, such as this creamy vegan roasted tomato soup
- Slice it horizontally for sandwiches such as these green goddess sandwiches, or use it to make this giant grilled tomato sandwich situation.
How do you like to use focaccia? Drop a note in the comments below!
*Bojon appétit! For more Bojon Gourmet in your life, follow along on Instagram, Facebook, or Pinterest, purchase my gluten-free cookbook Alternative Baker, or subscribe to receive new posts via email. And if you make this quick sourdough focaccia recipe, I’d love to know. Leave a comment and rating below, and tag your Instagram snaps @The_Bojon_Gourmet and #bojongourmet.*

Discarded Sourdough Starter Focaccia (Quick & Easy!)
Print Recipe Pin RecipeIngredients
- 6 ounces (170 g) liquid sourdough starter (¾ cup flat, 1 ½ cups or more bubbly)
- 1 teaspoon instant, rapid rise yeast (or 1 tablespoon fresh yeast) (you can omit this if your starter is very active)*
- 1 cup (120 g / 4 ¼ ounces) whole wheat flour (or more AP flour)
- 1 ¾ cups (225 g / 8 ounces) all purpose or bread flour
- 1 ¼ cups (285 ml) water, lukewarm
- 2 teaspoons fine sea or kosher salt
- ¼ cup (55 ml) extra-virgin olive oil
- ¼ teaspoon or so crunchy salt, such as Malden or fleur de sel
- optional toppings: ½ cup halved pitted black olives; chopped thyme, rosemary, or sage; whole roasted garlic cloves; cherry tomatoes; anything else you can think of
Instructions
Mix the dough
- Combine the starter, instant yeast (see note if using active dry yeast), water and flours in the bowl of a stand mixer fitted with the paddle or dough hook attachment (both work!).
- *Note that if you don't have a stand mixer, you can mix the dough by hand in a large bowl with a wooden spoon or flexible spatula for the same amount of time listed for each step.
- Mix on low for a couple of minutes until combined, scrape down the sides of the bowl, then increase to speed 3 and beat for 8 minutes. The dough should be very wet and sticky, almost batter-like, but not liquid. Add more flour or water as you knead if the dough seems overly wet or dry, respectively.
- Sprinkle on the salt, and beat on 3 for another five minutes. The dough should still be sticky, but should pull away from the sides of the bowl while it's mixing.
- Leave the dough in the bowl, cover tightly with a lid or plastic wrap, and let rise 1-2 hours until doubled or tripled in bulk.
Bake the focaccia
- Position a rack in the lower third of the oven and place a baking stone on top, if you have one. Place a sacrificial metal or cast iron pan on the floor of the oven - you will put ice in it to steam the oven, and it will become rusted and nasty. (UPDATE: a reader reported that the recipe works beautifully without this step, so I'm calling it optional!) Preheat the oven to 500ºF.
- Line a 9x12-inch rimmed baking pan (or quarter-sheet pan) with a sling of parchment paper (the paper should lay flat in the bottom with the long ends sticking out.) Drizzle 2 tablespoons of the olive oil all over the bottom and sides of the paper.
- With a plastic scraper, turn the dough over in the bowl a few times, tamping out some of the air bubbles, then blob it onto the center of the oiled parchment. Drizzle the remaining oil on top and use your fingers to dimple the dough outwards towards the sides and corners.
- Let the dough rise until doubled in bulk, about 1 hour, until it mostly fills in the pan, dimpling out the dough a few more times to fill in the corners. The olive oil will pool in the corners, so use a teaspoon to "baste" the top of the focaccia with that oil. Sprinkle a bit of crunchy salt over the top, and any other toppings you like, and give the dough a last dimpling.
- Fill a 1 cup measure with ice cubes. Quickly place the focaccia pan on the baking stone (if using) and toss the ice cube into the sacrificial pan on the floor of the oven if using. Close the door and don't open it again for the next 15 minutes.
- After 15 minutes, rotate the focaccia, then turn the oven down to 450ºF and bake for another 5 - 15 minutes, until golden and lovely on top. Remove to a cooling rack for 10 minutes, then lift out of the pan and cool completely before snarfing.
- Store the focaccia at room temperature in a plastic bag for up to a few days (but I doubt it will last that long!)
Notes
- mix the dough - 20 minutes
- first rise - 1-2 hours
- second rise - 45-60 minutes
- bake - 30-40 minutes
- cool - 1 hour


tracy says
Have you ever done it without the instant yeast and just use the starter?? I want to try it that way, and thinking it would be fine, just longer rise times, right?
Alanna says
I never have! Please let me know how it goes. :)
tracy says
Ok- so I did it and it worked good but not great. Well- the taste is amazing- but it's a bit flat and dense. The first rise was about 6 hours and then I put it in the fridge overnight, took it out in the morning and let it warm up for a few hours- then baked. Also, I added fresh sliced figs and they were so juicy that it made the dough way more liquid than I realized. Dimpling was impossible- so that may have attributed to the rise problem. But it is so delicious and I will keep working on it to perfect. Keep you posted how it goes next time!
Patty K says
Thank you for the recipe and Tracy, thank you for the information on making without commercial yeast. I'm about to try to make it with just my starter, as you did. I'll report back!
Jen says
I have, with a longer first rise, like 12-18 hours. Turned out great!
Ilene Ungerleider says
This turned out wonderful in every way. Thanks for the recipe!
Avital says
Thank-you so much for providing weights of ingredients! Bubbly sourdough starter is not easy to measure by volume.
Alanna says
I completely agree!
Rebecca says
Have you done this with active dry yeast instead of instant? If so, how does that change the rise time? Looking forward to trying this soon!
Alanna says
I haven't tried but please let me know if you experiment. :)
Layla says
Had little faith in the dough since it was very sticky and I down own a stand mixer so was kneading by hand. So I went and made a different leas hydration focaccia. I’m pleased to say this turned out so good that I gave the others away!! I didn’t use ice or stone, just made it in a baking sheet
Alanna says
I'm so glad this was a success in spite of hand mixing that sticky dough. Thanks so much for the rating and comment! :)
Alena says
I made this recipe and it turned out amazing!! Bread lasted only a day so I better make a double batch next time. Personally, the dough was still manageable by hand and was a delight to watch rise.
Glynis says
I don't have a stand mixer or baking stone, and would prefer to not put a pan of ice on the bottom of the oven ( I live in Eastern NC, so the humidity alone should suffice, right? lol) I'll just aim for less hydration and hope for the best!
I went ahead and gave you 5 stars, though I haven't yet made it. I enjoyed your story, and who knows how my bread will turn out! I am an artist, but not a baker...numbers, measurements, following directions...and as you can see, I'll already need to make adjustments! I'm sure the bread will be fantastic...or as close to it as I can manage! HA!
Alanna Taylor-Tobin says
Aw, please let me know how it turns out!
Gwennw says
I did make this with active dry yeast. And didn't give it the rising times suggested. It rose perfectly in the oven though. Instead of rising in the bowl, I put straight into pan and allowed to rise 1.5 hours. When time was limited, this turned out to be a great option.
Rebecca says
I'm trying your recipe. No mixer, no stone. Using rosemary thyme garlic olives and thin slices onion. I'm in my first rise.. right now.. love the story and can't wait this is my first attempt at Focaccia.. fingers crossed.. thanks again.. 5 stars because I love a recipe with a story😁
Alanna Taylor-Tobin says
Those toppings sound amazing. I hope the recipe still earns its stars after it's done baking, hehe! Let me know how it comes out :D
Mary Morrill says
Absolutely fantastic! Cut way back on the total amount of olive oil, added minced garlic and rosemary when the sea salt was added. Can’t wait to use it for a panini, if it lasts that long!
sam says
Baking recipes need weights, grams preferred.
Gwenn says
Hi,
I’m just about ready to try your quick and dirty sourdough focaccia and I noticed you say to use the paddle attachment on the mixer, but in one of your photos it shows a dough hook attachment. Do you switch attachments at some point in the process or is the photo just for looks?
Alanna says
Ah nice catch! It should be the dough hook. Please let me know if the dough hook works if you give it a try, and how it comes out!
Malavika says
The timing for baking seems too much. The bread becomes brown on the top in the first 15 minutes. Or at least mine did😅
Alanna says
Hm thanks for letting me know! Is your oven calibrated and do you have an external thermometer in there? My oven runs about 25 degrees cold so I have to use an external thermometer. Also which rack did you bake the bread on?
Jennifer Greene says
I began reading and realized without reading the full recipe we had attended the same alma mater. I decided to try your recipe and it turned out perfectly on the first try! Thank you so much for sharing!
Alanna says
Aw I love meeting fellow banana slugs! I graduated in 2004 - how about you? I'm so glad you liked the recipe and that it worked well! :)
Ruchi says
Do you add any olive oil to the dough, while mak8ng or when it is resting? Or
Only while baking?
Alanna says
Only to the pan. Let me know if you make it! :)
Suzanne Frisse says
I've been using a starter I've had for about nine years. It's from a small pack I sent away for from Carl Griffith 1847 Oregon Trail (no kidding, it's been in his family that long.) With the pandemic, all my friends started asking for starter and YOUR RECIPE is, hands down, my most favorite focaccia recipe ever. I use the paddle and it works just fine. I bake for 15, turn pans, bake for 4 more minutes and voila! I don't do the sacrificial pan, the crust is always so crunchy and the crumb is delightfully chewy with great, big holes. Someone asked about skipping the yeast. I made a batch with and without and b/c my starter is so darn active, I couldn't tell which was which. Thank you so very much for this amazing recipe!
Suzanne+Frisse says
Quick question...can someone who doesn't have a stand mixer use this recipe or is it too labor intensive?
Alanna says
That's a great question. Since the batter is so wet, it might be hard to mix by hand. I've never tried so I can't say for sure. Let me know if you decide to brave it!
Abbi says
Hi! Sorry this is such a late reply but I just tried this recipe yesterday. I don’t own a stand mixer so I just mixed it with a rubber spatula and it worked great! I might have not mixed it quite as long as you stated 😬 but it still worked great! I also skipped the ice step while baking with no adverse effects. Added minced garlic, rosemary and kalamata olives on top. Sooooo good! Going to try roasted garlic next time. I also used a rapid rise yeast, as that was all I had on hand. Hubs, who is NOT a bread guy even said like 4 times how awesome it was. 🙌🏼👏🏼 Thanks so much for the simple recipe. Might have to give it a go with my active starter next time and cut the yeast to see how that works. Thanks again!!
Alanna says
I'm so glad you and Hubs loved the focaccia! Those toppings sound glorious. Thanks so much for the note!!
Alanna says
This is awesome feedback, thank you! I'm thrilled that you're enjoying the recipe so much. Great to know it can be made without yeast and sacrificial pan, that's brilliant! Happy baking to you. :)
Maria says
Love this recipe! Due to pandemic shortages, I've been making it without instant yeast and just letting it rise longer (2-4 hours,). It is more flat, as another commenter mentioned- maybe it needs even more time.
I also didn't want to sacrifice a metal pan, so I use an ovenproof glass casserole pan to hold the ice cubes - the steam really seems to help!
Diane Lynn says
Best focaccia bread ever!!! Made this to be a side with homemade lasagna... my family has not quit oohing & aawing since! Light & fluffy, topped with fresh rosemary & Himalayan sea salt...no need to have additional oil to dip... My husband claimed "perfection" on Father's Day! Cannot wait to do this again & am thrilled to have a new go-to "quicker" recipe with my sourdough starter.
BTW, I did not use the ice trick, just put the pan in my pre-heated 500* oven for 15 minutes, then rotated pan & baked another 5 minutes at 450*... AMAZING! Thanks for such a great recipe!
Dawn says
I made this yesterday and it was terrific. I was looking for a recipe that could be made with sourdough starter in one day. The addition of instant yeast gave the boost needed to speed things up and it turned out great. We topped it with rosemary, garlic and Kalamata olives, in different combinations. The rosemary and garlic combo was the fan favorite but all were really good. Thanks for the great recipe! I appreciate the inclusion of whole wheat flour.
Ellen says
I just pulled this out of the oven. I did apply a layer of tomato paste to half of it in an effort to see if I can make tomato pie like we have in Philadelphia. My only issue I had was that the dimples would fill in after a minute and I think that means I needed a bit more flour. I had already added about a half a cup at the point in the recipe indicated to do so but maybe I needed a bit more. Will taste in a few minutes after cooling.
Ellen says
Absolutely the best focaccia I’ve tried; and that’s been trying different recipes since I’ve been on furlough since April. The use of the starter discard made all the difference. In addition, I roasted my garlic in olive oil and used that olive oil for the bread. Oh yum, thank you.
Alanna says
Ooh that sounds like heaven! Thanks so much for the sweet note and rating, I really appreciate it!
Sadie says
First time making focaccia and first time using discard. I forgot to bloom the yeast because i didn't see there was only a note about it. I also didn't have a mixer and just "kneaded" by hand with a spoon for equivalent time. Despite these differences the focaccia turned out AMAZING! I'm super happy with it. I added some garlic confit i had left in the fridge and a little bit of thyme and rosemary. Absolutely phenomenal
Alanna Taylor-Tobin says
Hi Sadie,
I'm so glad the recipe worked well without a mixer or blooming the yeast – that's really helpful to know! Those toppings sound absolutely divine too. Thanks so much for trying out the recipe and for the note!
-Alanna
Rebekah says
This was fantastic! I was looking for a sourdough focaccia I could have ready in just a few hours. I didn't have whole wheat flour so did half rye/half AP in place of it. I didn't use the ice cubes, and it was still so crunchy on the outside, and chewy/tangy inside with lots of air bubbles. I will definitely make this again! I added fresh rosemary and cracked pepper before baking.
Craig Faustus Buck says
Sounds delish. One question: if you use a stainless steel bowl or pan for the ice, why would it have to be sacrificed? It should survive just fine.
Alanna says
I'm not sure about that, but you can certainly try!
Pavi says
Hi just use a mini baking pan . I pop in a mini tart pan on the bottom arch while preheating and then fill with boiling water once the bread is in. Works great in getting a good crust and no damage to the pan :)
Crystal says
Have made this twice already. It's so good! And an excellent way to use up sourdough discard :) I cooked minced garlic in olive oil for a few minutes and used that to coat the bottom and drizzle on top.
Alanna says
That garlic oil sounds divine!! I'm so glad you like the recipe. Thanks a bunch for the note!
No Name says
I made this today because well... why not. My first attempt at focaccia using a different recipe was an epic failure after a much, much longer period of waiting. I found this quicker version and gave it a shot. I did not use the ice and instead of a baking pan I used a 12" cast iron skillet. So now I have a round focaccia that smells divine and I cannot wait for dinner time to try it out. It sure looks the part.
Alanna says
Oooh I bet this is beautiful and delicious made in a skillet. Please let me know how you like it!
Linda Campbell says
I don't like the taste of wheat flour bread and my sourdough starter is all bread flour. Can bread or all purpose flour be used instead of wheat flour? Should either the bread flour or all purpose flour be added in the same amount as the wheat flour? I am almost ready to try this recipe but don't want to waste my starter discard by not getting the amounts of flour correct. Thanks!
Alanna says
Hi Linda, You can absolutely use all white or bread flour instead of the whole wheat flour. Just add all the flour together as per the instructions. I bet it turns out extra lofty and chewy that way! Please let me know how you like it. :)
Pavi says
Hi I used 100% whole wheat flour to make this focaccia. It tastes absolutely wonderful , but I had to bake it for longer than 1 hour even though it developed a lovely brown crust midway. Also my crust developed cracks on it and it had a close crumb , though very soft . What could I have done wrong. Thank you for your recipe though, it was so much fun to watch this dough rise and do its magic .
Alanna says
Hi Pavi,
I'm guessing it was the all whole wheat flour which will produce a much denser dough. I'm recommend trying it as written, and then you can start increasing the whole wheat flour and decreasing the white flour until you like the texture. I love whole grains too, so I get it! But all those whole grains inhibit gluten production in bread doughs which can lead to dense doughs that crack and take a long time to bake. Please let me know if you give it another try as written!
Eugene Fodor says
This is a great recipe. It disappeared within an hour of coming out of the oven. Best focaccia I've ever had. I used 100% King Arthur white whole wheat and it came out excellent. I did it without the water and it was no problem at all. Thank you.
Paige F. says
Thank you SO much for a wonderful way to use starter/discard. This was gobbled up by the family and it worked for me to cut out the first rise and simply put it straight into the pan with olive oil for the rise in a warm oven. Topped as suggested with rosemary and sea salt flakes. Rose beautifully and even more so with baking!!! Thank you!
Alanna says
That's great to know that you can skip the first rise - brilliant! Thanks so much for the note and rating. I'm so glad it was a hit!
Jaime says
Came out great- I'm new to sourdough and this was a perfect bread to break in with using my discard. I didn't get much volume increase on the first rise (did use yeast) but once I had it out in the pan, I set it in front of the wood stove and got plenty of good rise in a short amount of time. I also cut down the oil a little to cater to health needs, but it was still delicious! Roasted garlic was a perfect addition. Thanks!
Alanna says
I'm so glad you loved it! Thanks a bunch for the note and review!
Kaitlyn M Hockett says
Tried this focaccia. sadly, mine burnt on top after the first 15 in oven. :( pretty sad about it. hopefully others have better luck.
Cristen Miller says
I made this last night and it was a huge success. Thanks so much for the recipe, I'll be making it again for sure!
Lynda says
Made this today using King Arthur all purpose flour along with their Super 10 Blend. I did feel it wa necessary to add a significant amount of extra water to get the consistency described and pictured. I was a little concerned about how the dough looked after rising because it was really light and airy but it turned out perfect! Topped with fresh rosemary and sea salt and baked just the minimum amount of time. I spoiled my dinner by eating 3 pieces before but it was worth it. Outside was nice and crisp and inside was just the right amount of chewy. Definitely a keeper! Thanks so much for the recipe.
Jeanne Farrar says
My bread is in the oven now, house smells great, have had it in 30 minutes didn't really do a 2nd rise. Cooking a little longer to brown the top I will let you know results.
Jessyca says
Wow~ I made this today as written (added only 1/2 teaspoon of additional yeast), and it's amazing! I loooove the whole wheat flavour in it and I love that it uses sourdough discard!!! It's going to become a go-to!
Tammy says
Just a question, I followed the recipe exactly but without the ice cube part, used active dry yeast instead of instant and baked mine in a 9x9 inch baking tray. It came out really dense, doughy and chewy? How can I tweak it to be less dense and has more air pockets? Thanks!
Alanna says
Hi Tammy, That's a great question! For active dry yeast, you'll want to add it like so:
Place the warm water in the bowl of a stand mixer and sprinkle 2 teaspoons active dry yeast over the water and add 1 teaspoon of sugar or honey (to feed the yeast). Whisk to combine and let sit until the mixture foams, 10-20 minutes. Add the remaining ingredients and proceed with the recipe.
I'll add this note to the recipe!
If it wasn't an issue of the yeast, it sounds like the batter may have been too thick, in which case I'd add less flour at first, or splash in more water if the batter looks thicker than in the photos. Please let me know how it goes if you try it again!
Tracy says
So, the oven has to be on at 500˚F for an hour while the bread is proving? Seems a bit odd.
Alanna says
Some ovens take 45 minutes to stabilize their temperature, but you can of course turn it on closer to when the bread goes in if you prefer!
Natalie says
I just made this recipe and it turned out excellent. I did not do the optional step (pizza tone or water).
I now found a fantastic recipe to use for my discard sourdough!
Thank you!!!!
Alanna says
I'm so glad you liked the recipe and that it worked well without those steps - that's fantastic! Thanks so much for the note. :)
Barb says
Oh my! I’ve not eaten focaccia since the 80s when (at least in Australia) they all started tasting just like regular bread, but with Italian toppings! I used high protein bread flour and spelt. I also used truffle olive oil, rosemary, salt and olives. This was remarkably straight forward, and to be honest…I much prefer it to the sour dough I spend 30 odd hours making! Beautiful big crumb and that tangy chewiness from sourdough starter. Subscribed!! Looking forward to trying other recipes :)
Sarah says
I just made this and it turned out great! I actually made a few mistakes and still got a great result (I put 55ml of oil directly into the dough - whoops!). I went with raisins which may seem a bit weird but it was a nice sweet/salty situation with lots of tasty sea salt complimented further by the olive oil. Great use of discard starter!
Alanna Taylor-Tobin says
Raisins sound delicious! I can imagine making it with dried figs or apricots too - yum! Thanks so much for trying the recipe and for the sweet note. Feel free to leave a star rating too if you're so inclined!
Katrina says
I'm curious, why is the baking stone recommended? Does it affect the heat contact on the bottom? I was just going to use a baking sheet.
Alanna Taylor-Tobin says
Hi Katrina,
Exactly! The baking stone helps the bottom of the focaccia get golden and crisp, but you can absolutely use a baking sheet by itself if you prefer! Please let me know how it goes if you try it.
Nicole says
Hi - thanks for this amazing recipe. It didn't even last one day the first time I made it! I used a Thermomix instead of a stand mixer, following the mixing times on the dough setting. Baked on a cookie sheet (lined with parchment paper and coated with olive oil and a sprinkle of polenta). Didn't bother with the pan in the base of the oven. I'm not sure whether it's just our oven, but I found the bread cooked fully in about 12 minutes. This is my new reason for having a sourdough starter in the house - thank you!
Rebecca says
It would be so awesome if you added the note about having to mix the active dry yeast with warm water and sugar before adding it to the mixture, in the main recipe directions in big bold text! I know I should have read the entire recipe prior to starting (this is my bad not yours) but I caught it in small text as a disclaimer at the very end, I think other scatterbrained amateur bakers like me would appreciate a big bold heads up about this before they mix everything up (like I did hahaha). Thanks for sharing this recipe, hope my focaccia still turns out ok despite my dumb mistake!! :)
Alanna Taylor-Tobin says
Oof, that's totally something I would do. Thanks for calling that out. Updated! How did it turn out??
Rebecca says
DELICIOUS!!! I do not know if my mistake affected the bake too much at all. The crust was crusty, the inside was bubbly and delicious. And, I am happy to say I am back on this recipe page because I was craving focaccia again, so I am looking at the recipe to make it for a second time this week!!! I will let you know how it turns out this time around. I am going to activate the dry yeast now!
Alanna Taylor-Tobin says
Oh good, I'm so glad to hear that! How did it turn out the second time around??
Alberta says
Recipe is a keeper! No stand mixer so I used a Danish dough hook. I know I did not knead as well as a stand mixer, but it came out great! P.S - added a scant 1/4 cup of olive oil to the dough while mixing. Before the time to turn it out into the pan, I mixed in a head of smashed roasted garlic, some cut up pepperoni and salami, some shredded Italian cheese mix and some Italian herbs. Mixed well to incorporate, then dumped into a well oiled 9x13. Did the 2nd rise (probably closer to an hour and 15 minutes), then added the olive oil, Maldon salt, rosemary, grape tomatoes sliced in half and some Parmesan cheese to the top. I did use the ice and baked as directed. Easily 1 and 3/4 inches thick! Only regret...I decided against the parchment...SMDH. Wasn't thinking about the added cheese. Still got it out OK, but it was a chore. Next time, Greek with oregano, feta, pepperoncini peppers and kalamata olives! OH, and parchment paper!
Alanna Taylor-Tobin says
Damn those toppings sound epic! I'm so glad you're a fan of this recipe. LMK how the Greek version turns out – that's such a brilliant idea!
Violetta says
This focaccia is RIDICULOUSLY good!!! Excellent recipe! Made mine with Maldon sea salt, dried thyme and rosemary. So so good!
Alanna Taylor-Tobin says
Woohoo, I'm so glad you loved it! Can't go wrong with those flavors - yum!
Fran says
Delicious and so easy! My sourdough discard looked and smelled good but was pretty old, so I boosted the yeast by 1/2 teaspoon. In a rush to get to the main dish, I forgot to add the ice cubes but the bread came out beautifully golden with the perfect texture. And the flavor…yummm…love the sourdough notes. This was my first time making focaccia, but I’ll definitely use this recipe again. No need to try another.
Alanna Taylor-Tobin says
I'm *so* glad it worked out well! Yes other readers have said that they didn't need to use the ice cubes to get a great focaccia, so if it's not broken, don't fix it! ;)
Meg says
this is my family's favourite recipe, so much that my son asked for his wn loaf for Christmas...and he's 11. :)
I want to make it for a dinner party tomorrow evening but I'm at work all day. Is there anyone who has prepped the dough the night before and done a cold ferment in the fridge with success? I'm thinking of doing the first rise as normal, then popping it in the fridge overnight that way. When I get home from work tomorrow, I can resume with the second rise on the pan while allowing the dough to reach room temp.
Any more experienced bakers have advice on whether this is a good idea?
Alanna Taylor-Tobin says
I'm so glad you all love this recipe so much – especially your son, ha! I would have loved a homemade focaccia loaf for the holidays as a kid too. :)
I think that plan should work; you'll just want to take care to not overproof the dough during the second rise. Please let us all know how it goes!
-Alanna
Sunny says
Hello. I came across this recipe today whilst searching for a fast discard focaccia recipe. I didn’t use a stand mixer. Just mixed it up by hand using a spatula. Did a few coil folds every half hourly during the first proof. Added sliced black olives, tomatoes and dried chives as toppings. And it turned out good! Thank you for the easy approachable recipe.
Alanna Taylor-Tobin says
Hi Sunny,
I'm so glad you like the recipe and that making it by hand worked well – that's so helpful to know! Those toppings sound absolutely delicious too. Thanks a bunch for the note!
-Alanna
Bri says
Way too long of a bake at that high of a temperature. Be very careful how long you leave it in for the second "15 minute” bake at 450°. I had a beautiful focaccia with caramelized onions and roasted garlic and it was burnt to a crisp. What a bummer .
Alanna Taylor-Tobin says
I'm so sorry to hear that the bread overbaked – happens to the best of us! Since the, recipe has worked well for most people, it makes me wonder if your oven might run a bit hot? Have you ever had it calibrated or tested it with an external oven thermometer? I always have 2 in my oven when I bake since my oven runs cold and I have to set it for 25º higher than the temperature I want.
In any case, if you try this again, try setting your oven to a lower temperature (400 or 425) and check it at 5 and 10 minutes to see how it's doing. You can also bake it on a lower rack of the oven. Keep me posted!
Sam says
This recipe has been one of my go to's. I make it every week. I dont have a stand mixer, keep the hydration levels the same and mix /fold onto itself with a spatula for the max suggested times. Also don't use any ice pan. Cook on 500 for 15 then 5ish at 450 .Turns out perfect!
Alanna Taylor-Tobin says
Hi Sam,
That makes me so happy to hear! It's great to know that the focaccia can be made without a stand mixer. I'll add that to the recipe notes. Thanks so much for the note!
-Alanna
Lisa Feldman Silbert says
Just made this recipe and I love it! I am usually into exactness when I bake but this recipe is very forgiving. I am definitely using this recipe again with my discard. Used paddle in my kitchen aid mixer and instant yeast that i keep in freezer so I did do the sugar yeast foaming thing……it is cooling right now, can’t wait to serve it!!
Alanna Taylor-Tobin says
I'm so glad you loved the recipe so far! How did you like the finished focaccia?
Lisa Feldman Silbert says
it was delicious, such a great recipe. Will definitely make again!!
Alanna Taylor-Tobin says
Oh I'm so glad you liked it!
Larissa says
Just wondering, in the ingedient list, it says 1 teaspoon of active dru yeast but in the notes it says 2 teaspoons. Which one is it??
Alanna Taylor-Tobin says
Oh sorry for the confusion! In the ingredients it lists 1 teaspoon rapid-rise yeast. In the notes I've given instructions on how to sub active dry yeast, which needs twice as much and a different method of adding it to the recipe. Please let me know which one you try!
Kate says
Amazing recipe! Honestly a perfect sourdough focaccia - tasty, bouncy, airy, crispy crust. I have a fresh 1 month old starter and used a 3 day old discard that had been sitting in the fridge. I have no fancy baking equipment - only wooden spoons and my partner is the ‘stand mixer’ (I hold the bowl firmly and he mixes). We mixed according to the times above. I fashioned the right size tray by putting a small cake tin into a bigger roasting tray. I halved the salt amt and cooked on a low shelf for 13 min at 260 degrees Celsius (fan forced, pre-heated for 15 min) - I didn’t rotate and it was cooked evenly throughout. I watched it carefully and based cooking time on visual browning/rising. Next time I plan to halve the olive oil amt and use a nice drizzle oil rather than cheaper cooking oil. Happy baking!
Alanna Taylor-Tobin says
Hi Kate,
Awww this note makes me so happy, and I LOLed at the part about the husband mixing bowl – love it!! I'm so glad you love the recipe and that it worked well with those mods and a young-ish starter. Love the idea of finishing the focaccia with some super good olive oil and using less in the baking process. Brilliant! Let me know how it goes :)
-A
Kerry says
I have been using this recipe for a few years and it never failed. This summer I am struggling every time. The dough is super wet and is not getting to the texture it usually would. Does high humidity affect the bread or could my flour be the problem. I’m stumped. The finished loaf tasted good still but it is less than half the size of what it usually is.
Alanna Taylor-Tobin says
Hi Kerry,
I'm so glad you reached out about this! That's really interesting. If the dough feels too wet, I would suggest adding a few more tablespoons of flour to see if that helps.
Are you measuring the starter and other ingredients by weight? Did you recently start using a different brand or type of flour?
Those are the variables that could be most likely to affect the moisture of the dough aside from humidity. I could see humidity causing the dough to be more wet, though I'm surprised it would make that much of a difference.
If it's still not rising enough when you add more flour, you could try using bread flour if you're not already; the extra glutens might help it rise higher.
Let me know what you try; fingers crossed we can get it back to where it was before!
-Alanna