I never feel more like a "real" baker than when I'm shaping bread dough. And there's no better time to bake bread than a chilly winter day spent at home.
Indeed, bread baking is a quintessentially bojon activity as it requires a bit of time and patience doing nothing while you silently curse the dough for not rising faster take a deep breath and enjoy living in the present moment. You're on the bread's schedule, and if it's cold and slow-moving, you can't do much to hurry it up, save for sticking it in an oven armed with a pilot light, and reading food porn while you sip a hot toddy in your jammies.
Last year I got it into my head to make a triple barley bread, which would contain barley flour, barley flakes, and fermented barley juice (a.k.a. beer!). I tinkered with different ratios, but the bread kept turning out on the dense/crumbly side. One day I found myself out of both barley flakes and flour, so I made "single barley bread," with oats and whole wheat bread flour in their place. This loaf turned out springy and light, heads and tails above the others, due, presumably, to more gluten in the whole wheat flour, and softer oats which cut at the glutens less than the sturdier barley flakes. I haven't looked back.
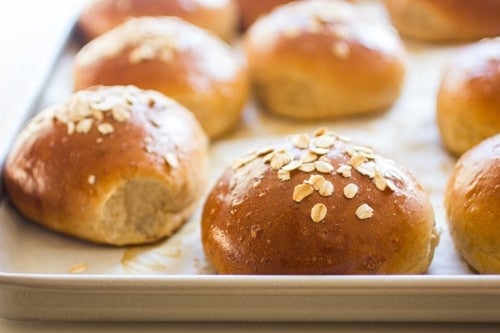
I wanted a good whole-grain bun on which to put burgers or dip into soups, so I added an egg and a touch more honey to my standard recipe, and turned them into these buns.
I made small ones first, 2 ounces of dough each – dinner roll size. After diving into a warm bun slathered in butter Jay said, "The only problem with your buns is that they're too small."
Well, there's a first time for everything.
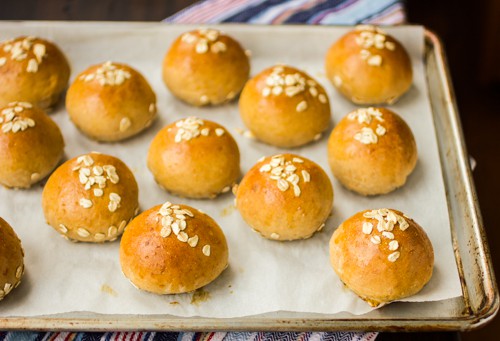
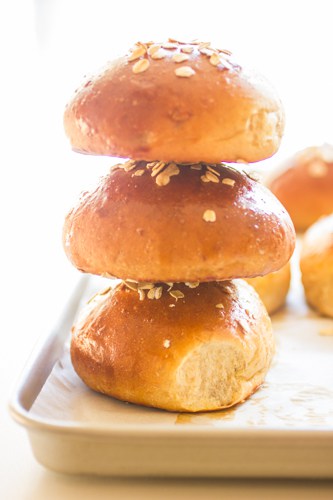
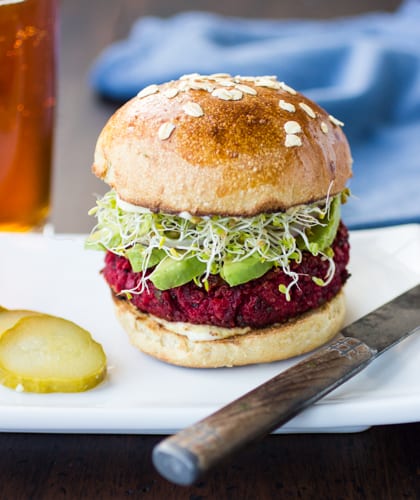
To keep him happy, I made some bigger buns which I flattened slightly so that they'd make good sandwiches. We've been slicing them in half and enjoying them slathered with cream cheese and lox for breakfast, topped with melted cheese and smoked turkey for lunch, and surrounding Chickpea, Beet and Quinoa Burgers for dinner.
The buns are slightly sweet, with a deep, malty flavor from the beer. Oats and whole wheat flour give them a bit of heft and chew, while butter and egg keep them soft and a little bit rich.
If you have yet to brave yeasted bread, this would be a forgiving recipe to start with. I knead it by hand every time, though you can throw it in a stand mixer armed with the dough hook if you want to keep your hands free.
So slip on your jammies, mix up a hot toddy, and get to work. Bojon, my friends.
More Baking Recipes With Beer:
More Bread Recipes:
*Bojon appétit! For more Bojon Gourmet in your life, follow along on Instagram, Facebook, or Pinterest, purchase my gluten-free cookbook Alternative Baker, or subscribe to receive new posts via email. And if you make this honey oat beer buns recipe, I’d love to know. Leave a comment and rating below, and tag your Instagram snaps @The_Bojon_Gourmet and #bojongourmet.*
Honey Oat Beer Buns
Print Recipe Pin RecipeIngredients
The dough:
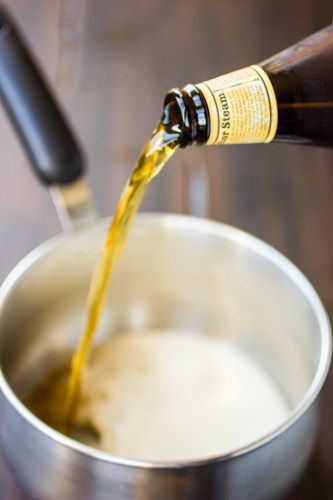
- 12 ounces beer (I prefer a lager or wheat beer, such as Anchor Steam or Anchor Summer Ale)
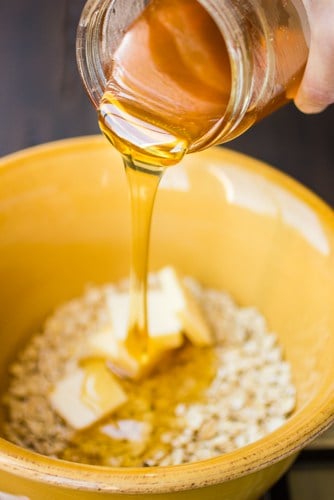
- 3/4 cup old-fashioned rolled oats (2 1/2 ounces)
- 1/4 cup mild honey (3 ounces)
- 2 tablespoons butter (1 ounces)
- 1 large egg
- 3/4 cup whole wheat bread flour (3 3/4 ounces)
- 1 package rapid-rise yeast (1/4 ounces)
- 1 1/2 teaspoons fine sea salt (or 1 3/4 teaspoons kosher salt)
- about 2 cups white bread flour, plus more for kneading
For finishing:
- 1 large egg
- 1/2 cup oats
Instructions
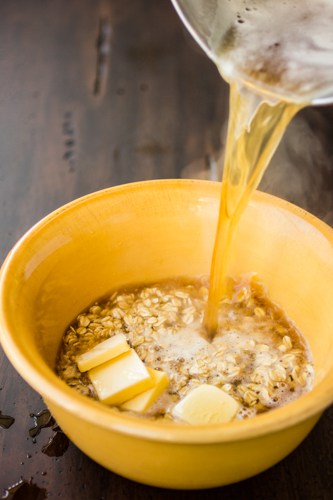
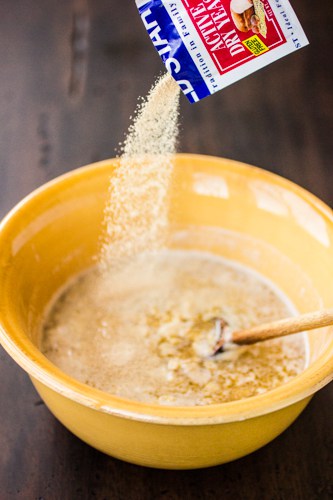
- In a medium saucepan, heat the beer to a simmer. Watch it closely, as it will foam up and overflow the pot if it gets too hot. Meanwhile, place the oats, honey and butter in a large, heat-proof bowl (or the bowl of a stand mixer). Pour the hot beer over the oat mixture and let it sit until just warm to the touch (100-100ºF), about 30 minutes, stirring the mixture occasionally.
- If using a stand mixer: fit it with the dough hook and use that to incorporate the ingredients and knead the dough as follows. If kneading by hand: proceed with a wooden spoon, and then your hands for kneading.
- Beat in the egg, then the whole wheat flour, yeast and salt, stirring until smooth. Begin adding the white flour, 1/2 cup at a time, stirring until smooth after each addition, until the mixture is too thick to stir with a spoon.
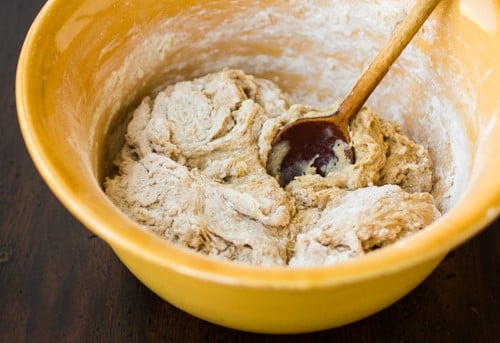
- Scrape the dough out onto a lightly floured surface, sprinkle a bit more flour over the top, and invert the bowl over the dough. Let the dough sit and autolyse for 20 minutes. This lets the dough absorb some moisture and makes it easier to knead.
- Uncover the dough, and knead it vigorously (or in the mixer on medium-low speefor 10-12 minutes, using as little flour as possible on your hands and the work surface to prevent the dough from sticking. When you've finished, the dough will feel springy and look smoother than when you began. (It will not be completely smooth or withstand a windowpane test due to the whole grains).
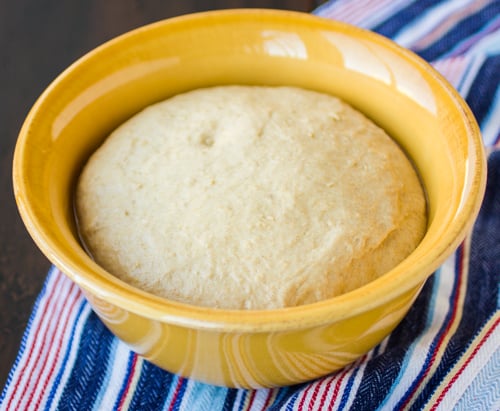
- Place the dough in a lightly oiled bowl or container that is at least 3 times the volume of the dough. Turn the dough to coat it with oil, then cover the container snugly and let the dough rise in a warm place until doubled or tripled in bulk, 1-2 hours.
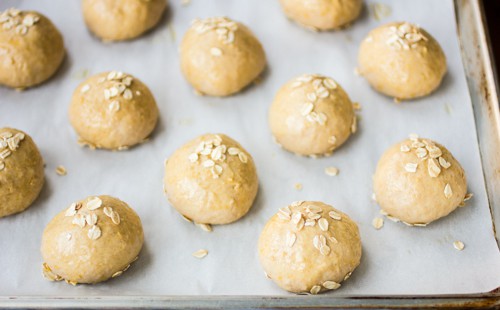
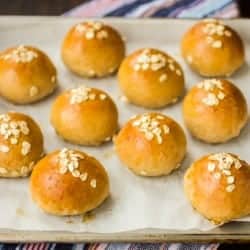
- Line a baking sheet with parchment paper and set aside. Place the 1/2 cup oats in a shallow bowl.
- When the dough has risen, turn it out onto a lightly floured surface. Divide the dough into 10 or 20 equal pieces. I like to use a scale to weigh the buns into 4 or 2 ounce balls, respectively; 4 ounce balls will make burger-sized buns, whereas 2 ounce balls will make slider or dinner roll sized buns.
- Tuck the edges of a dough ball under itself, then place it seam side-down on an un-floured part of the counter and roll it counter-clockwise to seal the seam and pull the outer layer of dough taut (see video link in headnote). You may need to use two hands to turn the dough for larger balls. When you've rolled a bun, dip its bottom in the oats, then place it on the lined baking sheet. If making sandwich buns, use a lightly floured palm to flatten the bun slightly.
- Repeat with the remaining dough, placing the balls 2-3 inches apart on the baking sheet. You may need a second baking sheet, though it's ok if the buns touch a bit when they expand. Slide the whole sheet pan into a large, clean garbage bag, inflate the bag a bit, and twist it closed, securing it with a clip or twist tie. Let the buns rise in a warm place until nearly doubled in size, 1-2 hours.
- Meanwhile, position a rack in the lower third of the oven and preheat to 375ºF.
- When the buns have risen, remove them from the bag. Beat the remaining egg in a medium bowl with 1 tablespoon of water until foamy. Brush the top of each bun with the egg wash, and sprinkle to tops with more oats.
- Bake the buns until they are deeply bronzed on top, about 15 minutes for small buns and 20 minutes for larger buns, rotating the pan halfway through for even baking. An instant-read thermometer inserted in the center of a bun should register 200-210ºF when they are cooked through.
- Let the buns cool until warm. Eat warm, or let cool completely.
- The buns will keep at room temperature in an airtight container for a few days, or double-bagged in the freezer for a month or two. Defrost and toast the buns before serving.
Notes
Nutrition
Honey Oat Beer Buns
If you lack rapid-rise (also called "instant") yeast, substitute active dry, stirring it into the warm beer/oat mixture and letting it sit for about 15 minutes before proceeding with the recipe. All ounce measurements here are by weight. I use Anchor Steam (lager) or Summer Ale (wheat beer) when I make these. Use a darker stout or porter for deeper color and flavor if you like, but stay away from anything hoppy, such as IPA. Turn larger buns into sandwiches, or top with Quinoa, Beet and Chickpea Burgers. Smaller buns make great sliders or dinner rolls.
Rolling buns takes a bit of practice, but it's fun once you get the hang of it; here is a good video to get you started.
Makes 10 large (burger-sized) or 20 small (slider/dinner roll-sized) buns
The dough:
12 ounces beer (I prefer a lager or wheat beer, such as Anchor Steam or Anchor Summer Ale)
3/4 cup (2 1/2 ounces) old-fashioned rolled oats
1/4 cup (3 ounces) mild honey
2 tablespoons (1 ounce) butter
1 large egg
3/4 cup (3 3/4 ounces) whole wheat bread flour
1 package (1/4 ounce) rapid-rise yeast
1 1/2 teaspoons fine sea salt (or 1 3/4 teaspoons kosher salt)
about 2 cups white bread flour, plus more for kneading
For finishing:
1 large egg
1/2 cup oats
In a medium saucepan, heat the beer to a simmer. Watch it closely, as it will foam up and overflow the pot if it gets too hot. Meanwhile, place the oats, honey and butter in a large, heat-proof bowl (or the bowl of a stand mixer). Pour the hot beer over the oat mixture and let it sit until just warm to the touch (100-100ºF), about 30 minutes, stirring the mixture occasionally.
If using a stand mixer: fit it with the dough hook and use that to incorporate the ingredients and knead the dough as follows. If kneading by hand: proceed with a wooden spoon, and then your hands for kneading.
Beat in the egg, then the whole wheat flour, yeast and salt, stirring until smooth. Begin adding the white flour, 1/2 cup at a time, stirring until smooth after each addition, until the mixture is too thick to stir with a spoon.
Scrape the dough out onto a lightly floured surface, sprinkle a bit more flour over the top, and invert the bowl over the dough. Let the dough sit and autolyse for 20 minutes. This lets the dough absorb some moisture and makes it easier to knead.
Uncover the dough, and knead it vigorously (or in the mixer on medium-low speed) for 10-12 minutes, using as little flour as possible on your hands and the work surface to prevent the dough from sticking. When you've finished, the dough will feel springy and look smoother than when you began. (It will not be completely smooth or withstand a windowpane test due to the whole grains).
Place the dough in a lightly oiled bowl or container that is at least 3 times the volume of the dough. Turn the dough to coat it with oil, then cover the container snugly and let the dough rise in a warm place until doubled or tripled in bulk, 1-2 hours.
Line a baking sheet with parchment paper and set aside. Place the 1/2 cup oats in a shallow bowl.
When the dough has risen, turn it out onto a lightly floured surface. Divide the dough into 10 or 20 equal pieces. I like to use a scale to weigh the buns into 4 or 2 ounce balls, respectively; 4 ounce balls will make burger-sized buns, whereas 2 ounce balls will make slider or dinner roll sized buns.
Tuck the edges of a dough ball under itself, then place it seam side-down on an un-floured part of the counter and roll it counter-clockwise to seal the seam and pull the outer layer of dough taut (see video link in headnote). You may need to use two hands to turn the dough for larger balls. When you've rolled a bun, dip its bottom in the oats, then place it on the lined baking sheet. If making sandwich buns, use a lightly floured palm to flatten the bun slightly.
Repeat with the remaining dough, placing the balls 2-3 inches apart on the baking sheet. You may need a second baking sheet, though it's ok if the buns touch a bit when they expand. Slide the whole sheet pan into a large, clean garbage bag, inflate the bag a bit, and twist it closed, securing it with a clip or twist tie. Let the buns rise in a warm place until nearly doubled in size, 1-2 hours.
Meanwhile, position a rack in the lower third of the oven and preheat to 375ºF.
When the buns have risen, remove them from the bag. Beat the remaining egg in a medium bowl with 1 tablespoon of water until foamy. Brush the top of each bun with the egg wash, and sprinkle to tops with more oats.
Bake the buns until they are deeply bronzed on top, about 15 minutes for small buns and 20 minutes for larger buns, rotating the pan halfway through for even baking. An instant-read thermometer inserted in the center of a bun should register 200-210ºF when they are cooked through.
Let the buns cool until warm. Eat warm, or let cool completely.
The buns will keep at room temperature in an airtight container for a few days, or double-bagged in the freezer for a month or two. Defrost and toast the buns before serving.


jenny says
I can hardly wait to try these! I made your yummy pumpkin cinnamon rolls yesterday, and my boys and I ate every last one before the end of the day. It reminded me how much I love making yeasted doughs, so I have bread rising on the counter now (my two-year-old son helped by standing on a chair next to me while I kneaded the dough, and carefully sprinkling flour onto the kitchen floor).
Thank you for another great looking recipe!
Alanna says
Jenny, thank you for the sweet note! I'm so glad you're enjoying baking bread, and psyched that you and your family enjoyed the pumpkin cinnamon rolls!
Katzenoma says
I've made these buns a few times now and they were always a winner!!!! They come together easily, they smell great, they taste wonderful and they freeze fine too... Thanks a lot for the great recipe!
Alanna says
I'm so glad to hear that, Katzenoma! Thanks a lot for the sweet note! My day is made. :)
raygan says
I have spent grains from making beer... Think I could use them instead of oats?
Alanna says
What a great idea! I bet they'd work well; you may need to add a little more flour if the grains are wet, but that oughtn't be a problem. Please come back and let me know how it goes... and save some beer for me. :)
Bonnie Gallegos says
Tried this recipe twice with no luck. I’ve baked many successful loaves of bread and rolls, I have no idea what I’m doing wrong. Approximately how much more flour do you add when kneading? My dough was Very sticky even after adding quite a bit of flour, and it never did rise both times. HELP!
Alanna says
I'm so sorry you're having trouble with this recipe! Another reader made them a few times with success so I think it should work! For the flour, it sounds like you need to add more if the dough is still sticky. The lack of rising could be the yeast. Is your yeast fresh? Did you make sure the liquid was the correct temperature? Too hot and it can kill the yeast. Hope that helps!