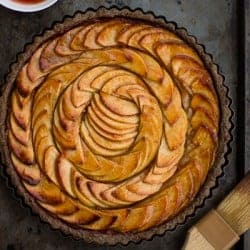
Apple Quince Tart with a Gluten-Free Buckwheat Crust
So many great flavors in this fall tart: toasty buckwheat, floral quince, and tart apples. An extra-special GF dessert for when you want to fuss a little! See my post on gluten-free pie crust for detailed photos and my updated formula for buckwheat pie crust.
Servings: 8 servings (makes one 9-10" tart).
Ingredients
For the Roasted Quince:
- 3 cups water
- 1 1/4 cups organic sugar
- 1/4 cup honey
- 1 vanilla bean, split lengthwise and scraped
- 6 cardamom pods, cracked
- 6 large quince (about 4 cups peeled and sliced)
- 1/4 cup late-harvest Riesling, Muscat, or other white dessert wine
For the Gluten-Free Buckwheat Pie Dough:
- about 6 tablespoons ice water
- 1/2 cup sweet rice flour (2 3/4 ounces)
- 1/2 cup buckwheat flour (2 1/4 ounces)
- 1/4 cup cornstarch (1 ounce)
- 1 teaspoon sugar
- 1/2 teaspoon xanthan gum
- 1/4 teaspoon fine sea salt
- 6 tablespoons cold, unsalted butter, sliced thinly (3 ounces)
For the tart:
- 1 1/4 cups roasted quince (from above), drained, syrup reserved
- 1 tablespoon (meyer)lemon juice
- 1 tablespoon honey
- 3/4 cup syrup from the quince, more as needed
- 3 large baking apples (such as Belle De Boskoop, Granny Smith, or Pink Lady)
- 2 tablespoons melted butter
- 1-2 tablespoons sugar
- lightly sweetened whipped cream or vanilla ice cream, for serving
Instructions
Roast the quinces:
- Position a rack in the center of the oven and preheat to 375ºF.
- In a large saucepan, combine the water, sugar, honey, vanilla pod and scrapings, and cardamom. Bring the mixture to a boil, stirring occasionally, then simmer over low heat while you prepare the quince.
- Peel the quince (I like to use a T-shaped vegetable peeler), and cut them off the core (or halve and core for cleaner slices). Cut the quince into 3/4" thick slices. Lay the quince slices in a gratin dish or other shallow baking dish with a 2-quart capacity.
- Pour the boiling syrup and spices over the quince.
- Bake the quince, uncovered, for about 2 hours, turning the slices over in their juices every 30 minutes (and more frequently during the end of the cooking time). When done, the quince should be tender and rosy, and somewhat translucent.
- Remove the quince from the oven and pour the wine over them. Cool the quince in the their juices, pack into a quart-sized mason jar, cover with the liquid, and refrigerate for up to 2 months (or store in the freezer for longer).
Make the gluten-free buckwheat dough:
- Make your ice water by filling a small cup with ice and topping it with cool water. Set aside while you get on with the recipe.
- In a large bowl, combine the flours, cornstarch, sugar, xanthan gum, and salt, and stir to combine. Scatter the butter slices over the top, and work with a pastry blender until the butter is in almond-sized chunks. Tablespoon by tablespoon, dribble in the ice water, tossing with a rubber spatula and/or your hands after each spoonful, until the dough is just damp enough to hold together when you give it a squeeze. Add drops of water directly to the floury bits if needed; you may need more water, or less, depending on how warm and worked-in your butter is. When finished, the dough should look like a pile of fat crumbles. We'll bring it together in the next step.
- Dump the dough out onto the counter, and quickly fraisage it by scraping an eighth of the dough at a time across the counter beneath your palm. Scrape it up with a metal bench scraper, and gather it into a ball. Place on a piece of plastic wrap, flatten into a 6" diameter disc, wrap, and chill for at least 30 minutes or up to 2 days.
- When you're ready to use the dough, let it soften at room temperature for 5-10 minutes. The dough is a touch more delicate than regular pie dough, so it benefits from slightly softer butter. Gently roll it out into an 11-12" round on a surface dusted lightly with buckwheat flour. Dust the pin, your hands, the dough, and the work surface with just enough flour to keep the dough from sticking. If the dough tears, pinch it back together, or use a scrap of dough to patch it up.Gently lift the dough into a 9 or 10" tart pan with a removable bottom; the dough may crack and tear, and that's ok, just press it into place with your fingers. Trim the edges to 1" and fold them over to make a double-thick crust, trimming the top of the crust flush with the pan. Freeze the crust until firm, 15-20 minutes (or wrap and freeze for up to a month).
Assemble the tart:
- Position a rack in the lower third of the oven and preheat to 425ºF.
- In the bowl of a food processor, combine 1 1/4 cups of the roasted, cooled quinces with the lemon juice and honey. Puree to a smooth paste, adding a tablespoon of quince syrup if needed to help the mixture turn over. Spread the paste evenly in the bottom of the frozen, unbaked tart shell and set aside.
- Place 3/4 cup of the quince syrup in a small saucepan. Simmer over medium heat, swirling occasionally, until reduced to 1/4 cup, about 10 minutes. Set aside.
- Peel the apples, cut them off the core, and slice them about 1/8" thick, keeping the slices together for easy fanning. (If the apples start to oxidize or turn brown, drop them into a bowl of cool water and the juice of 1 lemon as you work – some apples oxidize more than others.) Fan the apple slices out the long way with your fingers and place them in concentric circles in the pan with the round edges facing out. It works well to use the fatter slices in the outermost rings. You may or may not need all the apple slices, but you can pack them in pretty tightly; they'll lose a lot of volume as they bake.
- Brush the apples with the melted butter and sprinkle with 1-2 tablespoons of sugar (depending on the tartness of the apples).
- Bake the tart at 425º for 20 minutes. Remove the tart from the oven and brush with a layer of the quince glaze, reserving the rest. Reduce the heat to 375º and bake until the apples are tender when pierced with a knife and golden around the edges, about 40 minutes longer.
- Let the tart cool slightly, then brush the apples and the top of the crust with the remaining quince glaze (re-warm until fluid, adding a few drops of water if necessary to loosen it up). Remove the sides of the pan by placing the tart on a large can or ramekin and easing off the sides. Slide the tart onto a cutting board and use a large, sharp chef's knife to cut it into wedges.
- Serve the tart warm or at room temperature with lightly sweetened whipped cream or ice cream. Leftovers keep well, refrigerated and airtight, for up to 4 days.
Notes
This recipe has a few different steps: roasting the quince, pureeing them to a paste and reducing their syrup, making the dough, and assembling the tart. However, the quince can be made up to a month ahead and stored in the refrigerator in their syrup; the pie dough can be made one or two days ahead; and the finished tart keeps well for at least a day or two.
This will make enough quince for 3 tarts; they are also delicious eaten on their own with cheese and crackers, or chopped and baked into muffins or pancakes.
As for the crust, be sure to use sweet white rice flour (such as Mochiko brand), which is naturally stickier than regular rice flour. I like using the fraisage method (in which portions of crumbly dough are scraped across the counter under your palm) to bring the dough together, but if that freaks you out, you can just give the dough a quick knead in the bowl until it sticks together in a ball. This dough is a bit more delicate to roll out than a wheat-based pie dough, so be gentle with it, use plenty of flour, and keep a metal bench scraper or spatula nearby to help you turn and flip the dough as you roll it out. I like to get it started by using a pressing motion with the rolling pin. If it cracks or tears, smush it back together with your hands, or use dough scraps to repair tears in the final dough. See my original post on gluten-free pie dough for photos of the fraisage process.
All ounce measurements here are by weight.
The roasted quince is adapted from Seasonal Fruit Desserts.
Nutritional values are based on one of eight servings.
Nutrition
Calories: 492kcalCarbohydrates: 98gProtein: 3gFat: 12gSaturated Fat: 7gCholesterol: 30mgSodium: 120mgPotassium: 485mgFiber: 6gSugar: 51gVitamin A: 455IUVitamin C: 29.6mgCalcium: 37mgIron: 1.9mg
Making this? I'd love to see!Tag your snaps @The_Bojon_Gourmet and #bojongourmet!