Flaky Paleo Pie Crust with Cassava Flour
A paleo pie crust recipe that actually rivals a wheat crust! Almond, cassava, and tapioca flours build a smooth, pliant dough that you can roll, fold, flute, and weave. Gluten-free, grain-free, dairy-free, egg-free, plus vegan and nut-free options.
Servings: 8 -10 servings (one single 9-inch pie crust)
Ingredients
- 5-6 tablespoons (80 ml) ice water (from 1 cup ice cubes filled with cool water)
- 2 teaspoons strained fresh lemon juice (or 1 teaspoon apple cider vinegar)
- ½ cup (75 g) cassava flour
- ½ cup (60) blanched almond flour (or more cassava flour or tiger nut flour for nut-free)
- ¼ cup (28 g) tapioca flour (or arrowroot flour; double this amount for an easy-roll crust - see note below)
- 2 ½ tablespoons (15 g) finely ground chia seed or flax seed (I grind mine in a coffee grinder)
- 1/2 teaspoon fine sea salt (decrease if your butter is salted)
- 8 tablespoons (115 g) cold, unsalted butter or plant butter sliced ¼-inch thick (or chilled ghee, lard, or palm oil)
Instructions
Make the dough:
- In a 1-cup measuring pitcher, stir together 5 tablespoons of the ice water and the lemon juice.
- In the bowl of a food processor, combine the cassava, almond, and tapioca flours with the ground chia seed and salt.
- Scatter the butter pieces over the top but don't run the mixer just yet! Open the feed tube and gradually pour in the ice water/lemon mixture as you pulse the mixer until all the liquid is incorporated. Open the lid and give the dough a squeeze; it should hold together easily, with lots of butter chunks the size of large peas. If the dough is dry, replace the lid and drizzle in more ice water by the teaspoon while pulsing the mixture until the dough is evenly moist but not sticky. Take care not to overmix the dough. Note that this dough prefers more moisture than a wheat flour pie dough.
- (If making by hand, combine the dry ingredients in a lage bowl and use a pastry blender or your fingers to work the butter into the size of peas. Drizzle in the water by the tablespoon as you toss the mixture with a silicone spatula to bring the dough together as described above.)
- Remove the food processor blade and gather the dough into a ball, flatten into a disc, and wrap in plastic wrap, a plastic bag, or (my favorite!) beeswax wrap. Chill until firm, 30 minutes or up to several days.
Turn the dough:
- This technique, traditionally used when making puff pastry and croissants, makes the dough more pliable and flaky. If you'd like to skip this step, see the easy-roll variation below using more tapioca flour and water!
- Roll the dough on a piece of floured parchment into a large 1/4-inch thick rectangle. The dough will crack and tear at first and that's ok! Periodically dust the dough with cassava flour, sweeping excess flour away with a dry pastry brush. To flip the dough over, place a second piece of parchment on top of the dough, grasp everything with your hands, and bravely flip the whole thing over. Flour will fly everywhere so have your work surface clear!
- Fold the dough in thirds like folding a letter, then fold in thirds the other way. Flatten the folded dough slightly, re-wrap, and chill until firm, 30 minutes.
- Repeat the rolling and folding process one more time. The dough will become more smooth and pliable the second time around.
Shape the crust:
- Remove the dough from the fridge, unwrap, and place on a lightly floured piece of parchment. Roll out the dough into a 12" circle, dusting the dough lightly with cassava flour as needed, rotating and flipping it to prevent it from sticking.
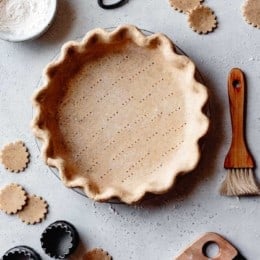
- Ease the dough into a 9" glass pie plate, fit it into the corners, and trim it to a 1" overhang. (Save the scraps to patch any tears in the dough post-parbaking.) Fold the overhang of the crust under, and flute the crust by pressing it between the thumb of one hand and the index finger and thumb of the other hand. Prick the bottom of the crust all over with the tines of a fork.
- Chill the crust until firm, at least 30 minutes. Once the crust it cold, you can wrap it and refrigerate it for up to a day, or freeze it for up to a month or two. (If using a glass pie plate, let the frozen crust stand at room temperature for 30 minutes before placing in a hot oven, otherwise the glass can shatter.)
Bake the crust:
- Position a rack in the lower third of the oven and preheat to 400º. If you have a baking stone, put it on the rack as this will help the bottom of the crust stay crisp. Place the cold crust on a rimmed baking sheet. Fill and bake as directed in your pie recipe, or...
- To blind bake the crust, line it with a piece of parchment paper, and fill to the top with pie weights, dry beans, raw rice, or clean pennies, pressing the weights into the sides and corners of the crust. Bake the crust for 15-30 minutes (shorter for a metal pan, longer for a glass pan), until the dough will hold its shape when you lift off the parchment. Carefully remove the weights and parchment and bake until the bottom is dry and lightly golden, about 5-8 minutes longer (for a parbaked crust) or until deeply golden, 8-12 minutes (for a fully baked crust). Use the saved scraps of dough to patch any holes, cracks, or tears in the dough, baking for a few more minutes post-patching. A par-baked crust can be made a day ahead, wrapped tightly, and stored at room temperature for up to a day or two, refrigerated for up to 1 week, or frozen for up to a few months.
Video
Notes
Easy-roll pie crust:
If you're pressed for time and want to skip the extra folding steps, you can double the tapioca flour in the recipe (1/2 cup or 56 g) and increase the ice water as needed (7-9 tablespoons). The pie crust will be easy to roll out without doing the turns. The only downside is that the crust will be slightly less buttery and tender, but it will still be the best paleo pie crust out there.
Turning the dough:
If turning the dough (rolling it out and folding if up) intimidates you, you can skip this step (or see above for an easy-roll variation). The dough will be more fragile to work with and more brittle when baked, but it will still be tastier than many of the paleo pie crusts out there! You can also do just one turn if you're pressed for time. Or if you work really fast and keep your dough cold, you can do both turns in one go.
Timing this recipe:
Give yourself three or four hours to complete a parbaked crust; most of this time is inactive. The ideal timeframe for making this crust is as follows:
- 10 minutes to mix the dough
- 30 minutes to chill
- 10 minutes to roll and turn the dough
- 30 minutes to chill
- 10 minutes to roll and turn the dough a second time
- 30 minutes to chill
- 10 minutes to roll out the dough, get it in the pan, shape it, and dock it
- 30 minutes to chill
- 30-40 minutes to par-bake the crust
- Well-wrapped dough will keep refrigerated for up to 3 days and frozen for up to 2 months.
- A well-wrapped unbaked crust will keep refrigerated for up to 2 days and frozen for up to 2 months.
- A well-wrapped parbaked crust will keep at room temperature for up to 1 day, refrigerated for up to 3 days and frozen for up to 2 months.
- Once you've gotten a feel for making this dough, I recommend making a double batch at a time. Keep the extra dough in the freezer for the next time you're ready to bake.
Nutrition
Calories: 169kcalCarbohydrates: 10gProtein: 2gFat: 14gSaturated Fat: 7gCholesterol: 27mgSodium: 219mgPotassium: 16mgFiber: 1gSugar: 1gVitamin A: 311IUVitamin C: 1mgCalcium: 31mgIron: 1mg
Making this? I'd love to see!Tag your snaps @The_Bojon_Gourmet and #bojongourmet!