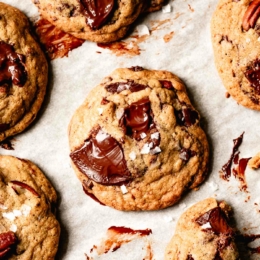
Thick & Chewy Gluten-Free Chocolate Chip Cookies
With crisp edges and tender middles, these easy gluten-free chocolate chip cookies get a flavor boost from a blend of oat flour, sweet white rice flour, and tapioca flour, plus brown butter, loads of bittersweet chocolate, and flaky salt. Ridiculously delicious and no one will believe they're gluten-free!
Servings: 12 -15 cookies
Ingredients
Wet Ingredients
- 8 tablespoons butter (115 g) unsalted butter*
- ½ vanilla bean, split lengthwise and scraped (or ½ teaspoon vanilla extract or paste, added with the egg)
- ½ cup (100 g) packed organic dark brown sugar**
- ¼ cup (50 g) organic granulated sugar***
- 1 large egg (2 ounces by weight out of shell)
Dry Ingredients
- ½ cup (78 g) sweet white rice flour (such as Koda Farms Mochiko)****
- ½ cup (50 g) gluten-free oat flour (such as Bob's Red Mill)*****
- 2 tablespoons (15 g) tapioca flour******
- ¼ teaspoon baking soda
- ¼ teaspoon fine sea salt
- 7 ounces (200 g) bittersweet chocolate (around 70% cacao mass), coarsely chopped (1 ½ cups)
- ½ cup (60 g) toasted pecans, cooled completely and coarsely chopped (optional)
- flaky salt such as Maldon, for sprinkling (optional)
Instructions
Brown the Butter
- Melt the butter and vanilla bean and scrapings (if using) together in a small, heavy-bottomed saucepan over medium heat. (If using vanilla extract or paste, just brown the butter by itself and add the vanilla along with the egg.)
- Continue to cook, swirling occasionally, until the butter turns golden and smells absolutely amazing, 3-5 minutes. There should be dark brown bits (not black) on the bottom of the pan. When the butter starts to foam up, watch it very closely as it can go from brown to burnt in moments.
Wet Ingredients
- Place the sugars in a large bowl and when the butter has browned, scrape it and the browned bits into the sugar immediately to stop the cooking. Let cool, stirring occasionally, for 10-20 minutes. Remove the vanilla bean if using (you can rinse and dry it and use it to make vanilla extract or to flavor a small jar of sugar or liqueur).
- Whisk the egg (and vanilla extract, if using) into the cooled sugar-butter mixture until well-combined and emulsified.
Dry Ingredients
- Meanwhile, sift together the flours, baking soda, and salt into a medium bowl.
- Use a sturdy wooden spoon to stir the flour mixture into the sugar mixture, stir until well combined, then continue to stir vigorously for 45 seconds; the mixture will firm up slightly. This increases the stickiness of the flours, helping the cookies hold together and be more chewy.
- Stir in the nuts and chocolate until evenly distributed.
- Cover the dough and let it sit at room temperature for at least 30 minutes and up to 2 hours to allow the butter to firm and the starches to absorb moisture, leading to thicker, chewier cookies.
Bake the cookies
- Position racks in the upper and lower thirds of the oven and preheat to 375ºF. Line two rimless cookie sheets with parchment paper.
- At this point, I recommend baking off a single test cookie on a small baking sheet. This way you can adjust the rest of the dough and/or oven temperature before baking off the whole batch. See Troubleshooting & Tips in the recipe notes.
- Scoop the dough into 1 ½ inch diameter balls (about 2.5 tablespoons each; a size 24 cookie scoop works wonderfully) and place on the prepared cookie sheets, spaced 2-3 inches apart. Top each cookie with a pinch of flaky salt.
- Bake the cookies about 7-10 minutes, rotating back to front and top to bottom after 5 minutes. When the cookies are ready, they will seem underbaked. The edges should be just starting to color, and the tops should be puffed all over with soft centers that collapse when gently touched with a fingertip. The centers will look wet under a thin surface of dry, cracked-looking dough.
- Remove the cookies from the oven and pull them, parchment and all, onto cooling racks to stop them from baking further. Let cool for at least 10 minutes before devouring. Or cool completely and store in an airtight container at room temperature; the butterscotch flavor comes through better when the cookies are cool.
- The cookies will keep for up to 3 days, airtight at room temperature.
Notes
Ingredient Subs:
*Can sub vegan butter by weight (such as Miyoko's cultured butter) and take care when browning the butter that it doesn't burn
**Can sub by weight coconut sugar or maple sugar
***Can sub by weight coconut sugar or maple sugar
****Can sub by weight any GF AP blend, such as Bob's Red Mill 1 to 1, or try cassava flour
*****Can sub by weight sorghum, buckwheat, teff, or chestnut flour
******Can sub by weight arrowroot flour
Make-ahead:
Make the dough as directed, then let sit until firm enough to scoop (or chill for a few minutes). Scoop into balls, place the dough balls on a small baking sheet lined with parchment, and chill until firm, about 1 hour. Transfer the cold dough balls into a container and chill for up to a week or so. When you’re ready to bake, just plop the dough balls on a cookie sheet as directed, top with flaky salt, and bake. They may need a bit longer in the oven. You can also freeze dough balls for up to several months.
Dairy-Free Cookies:
Use a good plant-based butter such as Miyoko's in place of the butter. Watch closely during the browning process – it may need more or less time than specified – or skip the browning process altogether.
Refined sugar-free cookies:
Omit the white and brown sugars and use 150 g (1 cup + 2 tablespoons) coconut sugar. Use chocolate sweetened with coconut sugar (such as Hu) or maple (such as Raaka).
Troubleshooting & Tips for better cookies:
Since cookies are sensitive to slight changes in moisture and temperature, here are some ways to get foolproof cookies:
- measure by weight, not volume
- if measuring by volume, use the dip and sweep (aka scoop and swoop) method
- make sure your oven is the correct temperature by using an external oven thermometer
- bake off a single test cookie to make sure your cookies spread the right amount
- if your cookies spread too much, add more flour or increase the oven temperature
- if they don't spread enough, flatten the dough balls or decrease the oven temperature
Nutrition
Calories: 238kcalCarbohydrates: 26gProtein: 2gFat: 14gSaturated Fat: 7gCholesterol: 28mgSodium: 120mgPotassium: 121mgFiber: 2gSugar: 15gVitamin A: 209IUCalcium: 22mgIron: 1mg
Making this? I'd love to see!Tag your snaps @The_Bojon_Gourmet and #bojongourmet!