
I pretty much went to pastry school for the sole purpose of learning to make croissants. (That and because my mom was kind enough to spring for the tuition – thanks, Mom!) Previous attempts at the flaky French classic included a version made in a hundred-degree kitchen on a San Fernando Valley Summer's day, and one "healthy" version made with spelt flour and yogurt. Both resulted in flat, malformed breads with few flakes. It was time to seek professional help.

Not only did my teacher Claire deliver with a perfectly flaky dough technique, I also got to intern with her at Cafe Cacao, where I had the privilege of learning even more of her croissant-making secrets.
I was relating all of this to Craig Lee, food photographer for the San Francisco Chronicle, when he let me sit in on a shoot with him, and he asked if I would give him a croissant tutorial. He and Vijay Nathan of NoshOn.It watched the process and kindly took some shots in my kitchen the other day while I kneaded, folded and rolled.

My favorite croissant dough recipe comes from Baking Illustrated; it has a good ratio of salt, sugar, and butter to dough, and they streamline a few of the steps along the way, which means less hands-on time. At their essence, croissants are comprised of a yeasted dough enriched with a bit of milk and butter (called the detrempe) rolled up with a large block of butter. A series of rolls and folds, called lamination, creates dozens of thin sheets of butter between layers of dough. When the dough hits the heat of the oven, steam from the butter pushes up the layer of dough above it, causing the pastry to rise into a series of buttery flakes. This process is the same one that gives puff pastry and danish dough (and my ultra-flaky pie dough, and these biscuits) their many
layers.
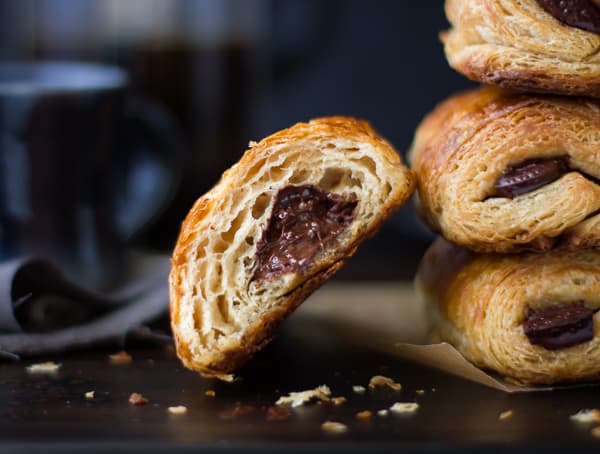
Inspired by David Lebovitz's post on whole wheat croissants, I decided to try these with rye and bread flours. They turned out just as puffy and flaky as regular croissants, but with deeper flavor and pretty flecks of grain and germ from the rye. Lacking rye flour, you can make these with all all-purpose flour, or with whole wheat bread flour in place of the rye. I like making pains au chocolat best – they're easier to shape than
plain croissants, and, hey, they're filled with chocolate, too. Plus, I like chocolate and rye together.

Croissant dough isn't at all difficult to make once you understand the basic principles. Here are the steps, with photos, to making light, flaky pains au chocolat, with some extra tips and tricks I've picked up along the way. (The full recipe's down below.)
1) Make the detrempe
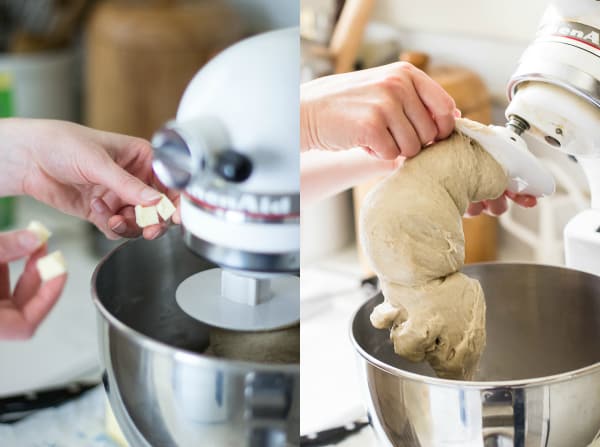
Heat some whole milk over a low flame until it is just warm to the touch, and pour it in the bowl of a stand mixer fitted with a dough
hook. Sprinkle some yeast over the milk and let stand 10 minutes to soften. Add rye flour, bread flour, sugar and salt to
the bowl. Mix the dough on medium-low speed for seven minutes, adding
more bread flour by the tablespoon until the dough comes away from the
sides of the bowl but still feels slightly sticky to the touch. Add some softened butter a little at a time and mix until completely
incorporated.
 |
| Photo Credit: Vijay Nathan | NoshOn.It |
Note: If you don't have a mixer, you can easily make the dough by hand in a
bowl with a wooden spoon. Stir in the flour slowly, then the butter. Turn the dough out
onto a lightly floured surface and knead by hand for about 10 minutes.
Either way, place the dough in a medium bowl, cover tightly, and chill
for at least 1 hour and up to 1 day. Note: Longer chilling means more flavorful pastries. My teacher Claire would make the detrempe one day, laminate it the next, shape the croissants on the third day, and bake them off on the fourth day. They were the best I've ever had.
2) Make the butter block
by beating cold butter on medium-high speed in a stand mixer fitted with the paddle attachment until the butter is smooth and chunk-free. Form it into a thin square on a piece of plastic wrap, cover, and chill for 30 minutes. The butter should be cool, but pliable. Note: You can also make the butter block by beating the three sticks of butter with a rolling pin on a piece of parchment paper. This is loud, but it gets out your aggression and can be rather therapeutic. Note #2: I'm down with anything that has the word "butter block" in it.
3) Laminate the dough
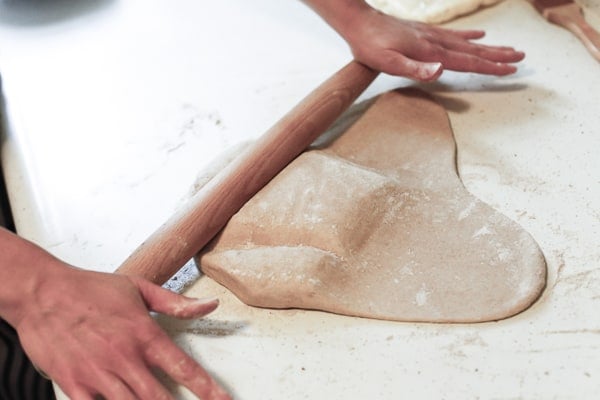
I've seen many ways to get the butter into the dough; this is the method that I learned in pastry school, and the one that I use. Pat the dough into a square on a surface dusted lightly with rye flour. Use a lightly floured rolling pin to roll out each corner of dough into a thin flap, leaving a thick diamond shape in the center of the dough.
 |
| Photo credit: Craig Lee | CraigLeePhoto.com |
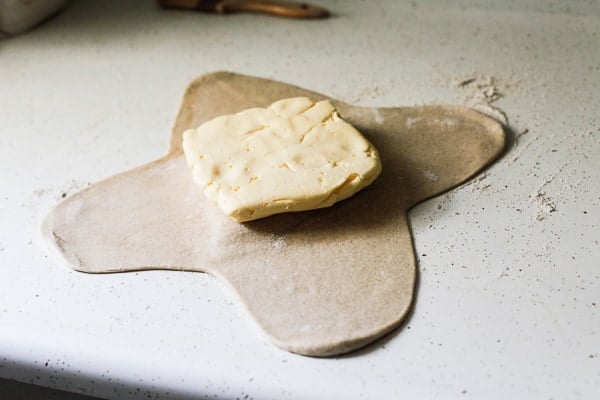
Pat down the diamond to flatten it to the same dimensions as the butter block. Unwrap the butter block and place it over the diamond.
 |
| Photo credit: Craig Lee | CraigLeePhoto.com |
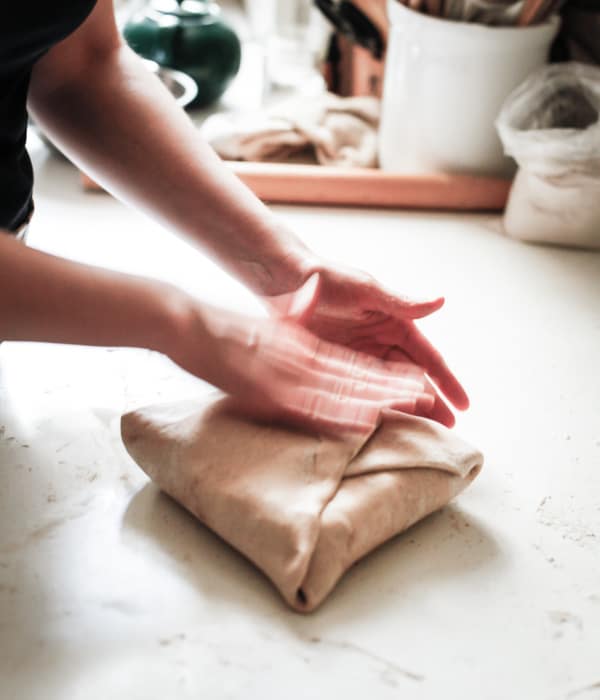
Fold the flaps up over the butter, enclosing the butter within the dough. (My friend Shelley pointed out that this is rather like putting a diaper on a baby.)
 |
| Photo credit: Craig Lee | CraigLeePhoto.com |
A note on butter: If there is one secret to making good croissants, it is having the butter at the proper temperature. It should be soft enough to be malleable when rolling out the dough, yet firm and cold enough to hold its shape and stay separate from the dough. If the dough begins to feel wet or sticky because the butter has become too warm, slide it onto a sheet pan and chill for 10 minutes or so to firm up the butter. Conversely, if the butter cracks as you roll out the dough because the butter is too cold, let it stand at room temperature for 10 minutes and try again. I always use organic Strauss European-Style butter, which has a higher fat content than other butters (around 85% rather than 70%).
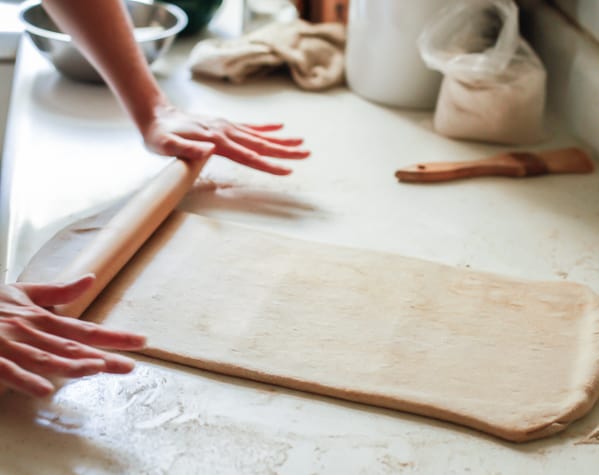
4) Make the first (two) turns
Use a lightly floured rolling pin to begin tapping, pressing, and rolling the dough out into a large rectangle. As you work, flour the dough, pin, and surface with just enough rye flour to keep it from sticking. Tip: I like to have a pastry brush handy to brush away excess flour, too much of which will make the croissants bready and tough.
 |
| Photo credit: Craig Lee | CraigLeePhoto.com |
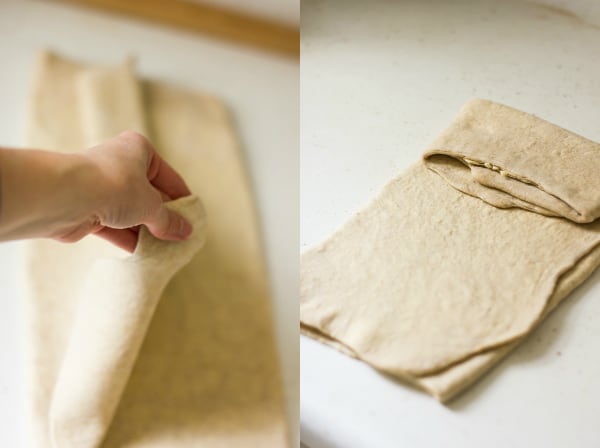
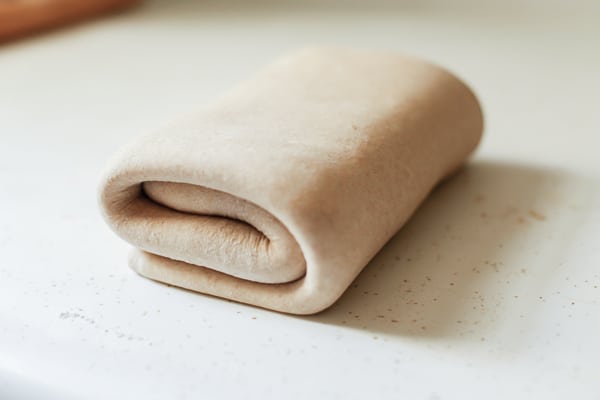
Roll the dough out into a large rectangle that is about 3/8" thick; the dimensions don't matter. Fold the short ends of the dough into thirds, like folding a letter. Beginning with a short end, roll the dough up into a loose spiral. Wrap and chill 1 hour.
 |
| Photo credit: Craig Lee | CraigLeePhoto.com |
Note: traditional croissants call for a single turn (folding the dough in thirds), three to four times, with an hour-long rest in between each turn. I prefer the method here, from Baking Illustrated, which gets two turns done in one go. Additionally, the spiral of dough is smaller and easier to wrap and store in the fridge than a long, skinny rectangle.
5) Repeat step 4 once more
Chill the dough for 1 hour or up to 1 - 2 days. Note: Longer chilling means tastier croissants with a better texture. The chill allows the dough to ferment slowly, giving the croissants that old-world bread flavor (think sourdough or pain au levain). The rest gives the glutens time to relax which makes the dough easier to roll out and results in more tender pastry.
6) Shape the pains au chocolat
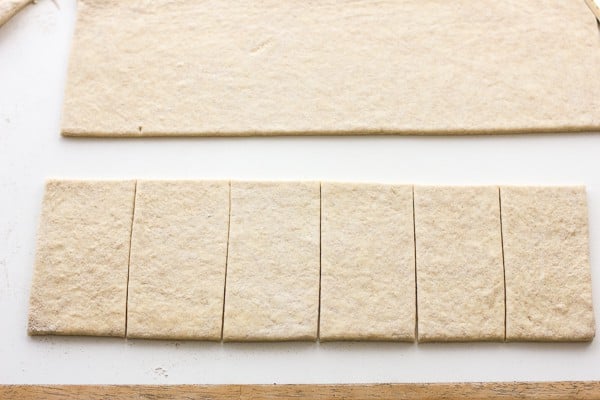
Roll the dough out into a 12 by 18" rectangle, dusting the surface with rye flour as needed and sweeping away the excess with a pastry brush. Trim away the outer inch or so of dough to make an even rectangle. (Save the scraps – I'll show you what you can do with them in a mo.)
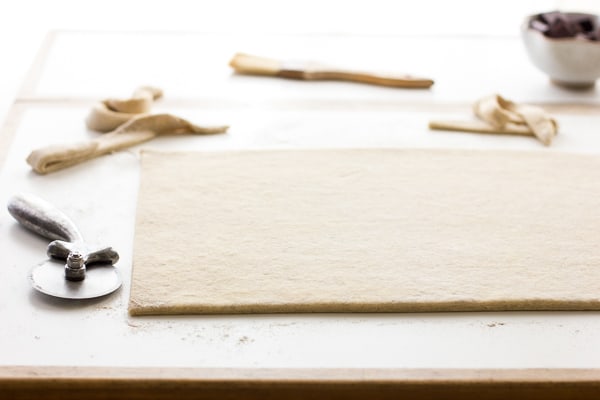
Use a pizza wheel or sharp chef's knife to cut the dough in half the long way, then cut each half into six smaller rectangles.
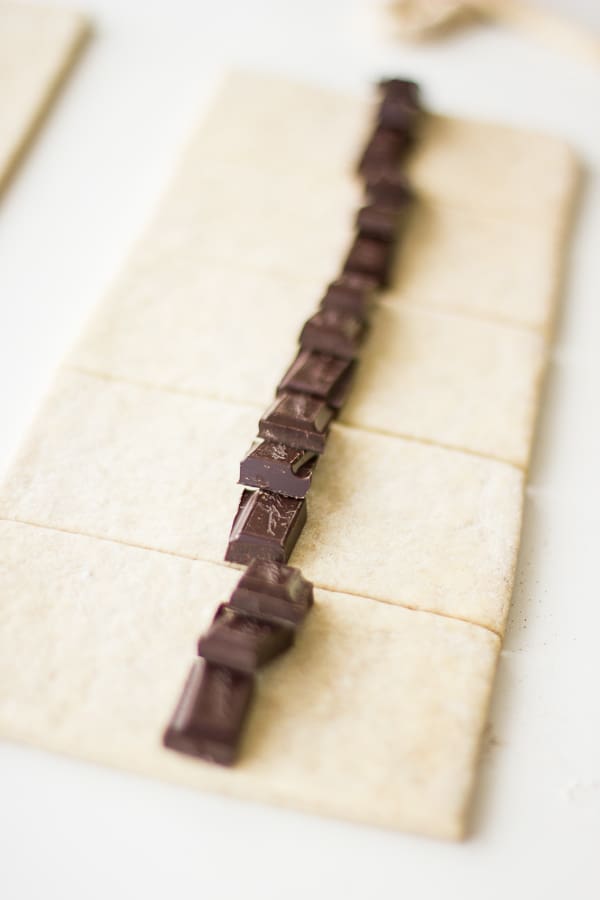
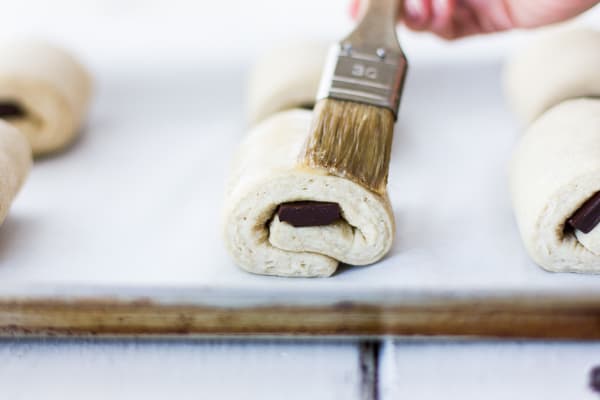
Place some good, dark chocolate down the center of each rectangle, the short way.
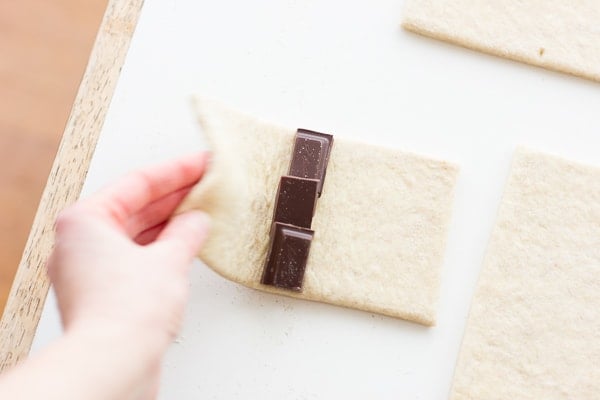
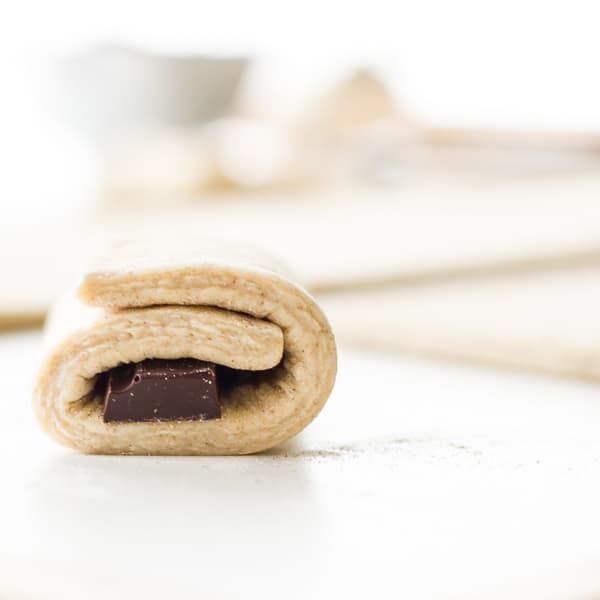
Fold up each end so that the edges overlap loosely. Place the pastry seam side-down on a rimmed baking sheet lined with parchment paper (for easy clean-up).
I filled a few with sliced apples and sharp cheddar – highly recommended!


Here are a few more filling ideas:
-Cheese (sharp cheddar, aged gruyère or goat cheese, asiago, pecorino, parmesan, or something smokey – go wild!)
-slices of apple, ripe but firm pear, or poached quince
-smoked turkey, ham, prosciutto, or cooked bacon
-fresh soft herbs (basil, oregano, chives, thyme)
-caramelized onion, roasted garlic, or green onion
-pesto
-frangipane or almond paste
-peaches, cherries, apricots, or berries
-cinnamon or cardamom sugar
You can also use croissant dough as a pie or quiche crust. Just roll it to 1/4" thick and line a pie pan in the usual way.
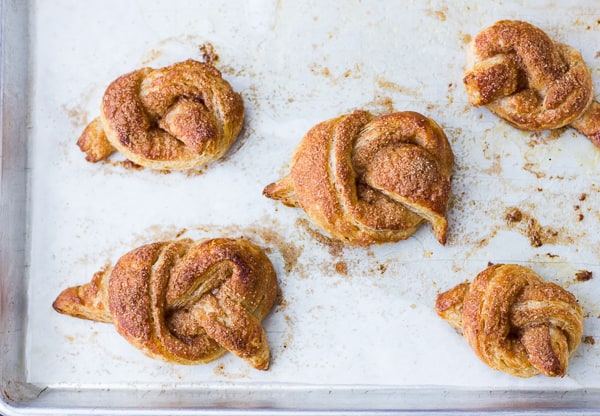
I like to tie the edge scraps into loose knots and sprinkle them with cinnamon sugar. Mmm...
Note: If you don't wish to bake all the pastries at once, they can be frozen on a baking sheet, then transferred to a freezer bag. You'll need to let them defrost at room temperature or overnight in the refrigerator before proofing and baking.
7) Proof those puppies:
Now you need to let your little masterpieces rise, or "proof." My favorite way to do this is to slip the whole baking sheet in a large, clean, plastic trash bag, inflate the bag so that it isn't touching the croissants, and secure it shut with a clothespin. Alternately, you can cover the croissants with plastic wrap sprayed with non-stick spray. They need the moisture kept in, otherwise the outer edges will dry and form a crust which will prevent them from rising properly. Let the pastries rise in a warm-ish spot until they're puffy; they won't double in bulk. If you poke one gently, it's ready to bake if the depression left by your finger doesn't bounce back.
8) Bake!
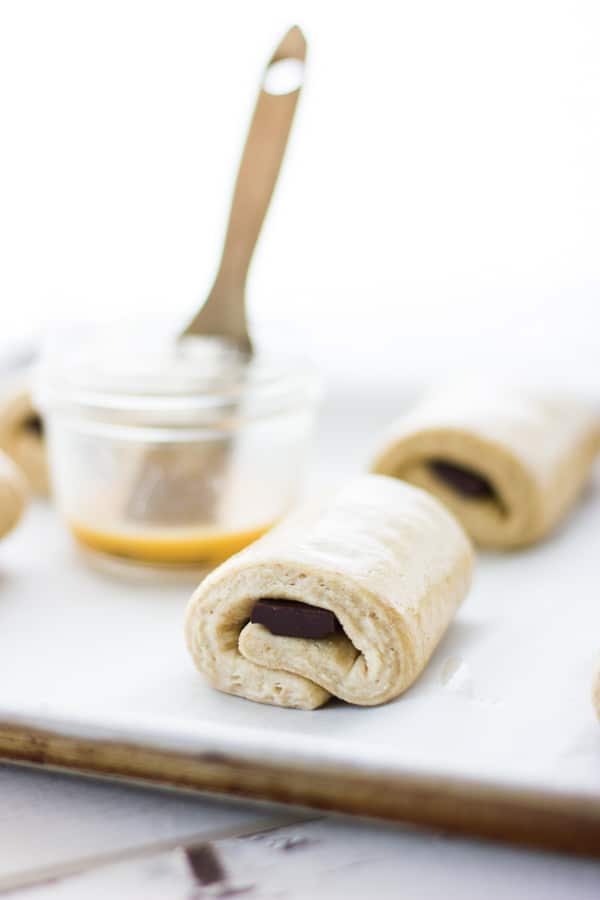
Unwrap the pastries and brush them with an egg that you've beaten very smooth. This gives the baked pastries a beautiful burnished sheen.
Pop the pan in a hot oven, and bake until the croissants are a deep golden brown. A hot oven is essential for giving the layers a quick burst of upward motion, and a thorough bake ensures flaky crispness.

9) Eat!
This is (clearly) the most important step of the croissant making process. There are few things more divine in this world than a warm-from-the-oven croissant; ones made with rye flour and oozing with dark chocolate are even better, though I say it myself. Craig and I sat down with some friends and a pot of tea to enjoy our creations, proving that weekly croissant parties should really be a thing.

More Chocolate Recipes:
- Chocolate Crusted Chèvre Cheesecake
- Triple Chocolate Layer Pie with a Hazelnut-Cocoa Crust {gluten-free}
- No-Bake Chocolate Cream Tart {vegan, gluten-free, grain-free, refined sugar-free}
- Chocolate Things
*Bojon appétit! For more Bojon Gourmet in your life, follow along on Instagram, Facebook, or Pinterest, purchase my gluten-free cookbook Alternative Baker, or subscribe to receive new posts via email. And if you make this pains au chocolat recipe, I’d love to know. Leave a comment and rating below, and tag your Instagram snaps @The_Bojon_Gourmet and #bojongourmet.*

Rye Flour Pains au Chocolat
Print Recipe Pin RecipeIngredients
For the rye flour croissant dough:
- 1 1/4 cups whole milk (10 ounces / 285 grams)
- 1 1/2 tablespoons active dry yeast (from 1 1/2 packets) (1/3 ounce / 11 grams)
- 3/4 cup rye flour, plus more for rolling the dough (3.5 ounces / 100 grams)
- 2 cups bread flour, more as needed (10 ounces / 285 grams)
- 1/4 cup organic cane sugar (2 ounces / 55 grams)
- 1 1/4 teaspoons fine sea salt
- 2 tablespoons unsalted butter, cut into small chunks and softened slightly (1 ounce / 30 grams)
- 3 sticks unsalted butter, cut into cubes and kept cold (1.5 cups / 340 grams)
For the pains au chocolat:
- 8 ounces bittersweet chocolate (60-70% cacao mass), broken into chunks or chopped coarsely (225 grams)
- 1 egg, beaten until foamy
Instructions
Prepare the detrempe:
- Heat the milk over a low flame until it is just warm to the touch (110 - 120ºF), and place in the bowl of a stand mixer fitted with the dough hook. Sprinkle the yeast over the milk and let stand 10 minutes. Add the 3/4 cup rye flour, 2 cups of the bread flour, and the sugar and salt to the bowl. Mix the dough on medium-low speed for 7 minutes, adding more bread flour by the tablespoon within the first 2 minutes until the dough comes away from the sides of the bowl but still feels slightly sticky to the touch. Add the softened butter a little at a time and mix until completely incorporated. Scrape the dough into a medium-sized bowl, cover tightly, and chill for 1 hour. This dough is called the detrempe. (No need to wash the mixer just yet.)
Prepare the butter block:
- Meanwhile, place the 3 sticks of cold butter cubes in the bowl of the stand mixer and beat with the paddle attachment on medium-high speed until the butter is smooth, but still cool. Scrape the butter onto a piece of plastic wrap and shape it into a fairly thin 6" square. Chill the butter block 30 minutes.
Laminate the dough:
- Scrape the chilled detrempe onto a surface dusted lightly with rye flour and shape it into a square. Use the blades of your hands to press a diamond shape into the center of the detrempe leaving 4 triangular wings. Roll out the wings into flaps and flatten the center diamond slightly. Place the butter square atop the diamond, and fold the flaps up over the butter to enclose it.
- Gently begin rolling the dough into a large rectangle, dusting the rolling pin and surface with just enough rye flour to keep the dough from sticking, and brushing off the excess flour with a pastry brush. When the dough is thin enough that you can see the butter through the dough (but not so thin that it breaks and exposes the butter), fold the rectangle in thirds, like folding a letter. Starting with a short end, roll the dough into a loose spiral. Wrap the dough and chill 1 hour to relax the dough and firm up the butter. Repeat the rolling and folding process once more. Wrap the dough and chill at least 1 hour and up to 1 day.
Shape the pastries:
- Roll the dough out into a 12x18" rectangle, dusting the surface with rye flour as needed and sweeping away the excess with a pastry brush. Trim away the outer inch or so of dough to form an even rectangle. (The scraps can be tied into loose knots, brushed with egg wash, dusted with cinnamon sugar and baked.) Use a pizza wheel or sharp chef's knife to cut the dough in half the long way, then cut each half crosswise into six smaller rectangles. Place about 3/4 ounce of chocolate down the center of each rectangle, the short way, and fold up each end so that the edges overlap loosely. Repeat with the remaining rectangles. Place the pastries seam side-down on two rimmed baking sheets lined with parchment paper (for easy clean-up).
- Slip the whole baking sheet into a large, clean, plastic trash bag, inflate the bag so that it isn't touching the croissants, and secure it shut with a clothespin. (Alternately, you can cover the croissants loosely with plastic wrap sprayed with non-stick spray.) Let the pastries rise in a warm-ish spot until they're puffy, 1 - 1 1/2 hours; they won't double in bulk. If you poke one gently, it's ready to bake if the depression left by your finger doesn't bounce back.
- Meanwhile, position racks in the upper and lower thirds of the oven and preheat to 400ºF.
Bake the pains au chocolat:
- Unwrap the pastries and brush them with the beaten egg. Bake the pastries until deep golden brown, 18-22 minutes, rotating the pans once toward the end of the baking time. Let the pastries cool for at least 10 minutes. Pains au chocolat are best when warm, when the chocolate is still soft, but extras will keep at room temperature for up to a few days. Rewarm in an oven or toaster oven for yummiest results. Baked pastries can also be frozen and "refreshed" in a hot oven when ready to eat.
Notes
-Give yourself at least 8 hours and up to 3 days to complete this project to allow for the chilling, rising, and baking. The vast majority of this is inactive.
-Croissant dough likes to stay cool, so if it is particularly warm in
your kitchen, be prepared to chill the dough frequently as you work withit in order to keep the butter cold and ensure a flaky finished
product.
-Use European-style butter which has a higher fat content and will make for more flaky, buttery croissants.
-You can substitute all-purpose flour for the bread flour in a pinch, but the finished pastries may be less flaky. You can also use whole wheat flour instead of rye, or all-purpose flour in place of both flours.
-Don't feel the need to stop at chocolate – see the post above for more sweet and savory filling ideas (thinly sliced apples and sharp cheddar are a favorite). All ounce measurements here are by weight. Nutritional values are based on one of twelve pains au chocolat.
Nutrition
Rye Flour Pains au Chocolat
Adapted from Baking Illustrated
The instructions below are abbreviated; have a read through the post
above for more details, tips, and notes, particularly if this is your
first time making croissants. A few key points:
-Give yourself at least 8 hours and up to 3 days to complete this project to allow for the chilling, rising, and baking. The vast majority of this is inactive.
-Croissant dough likes to stay cool, so if it is particularly warm in
your kitchen, be prepared to chill the dough frequently as you work with
it in order to keep the butter cold and ensure a flaky finished
product.
-Use European-style butter which has a higher fat content and will make for more flaky, buttery croissants
-You can substitute all-purpose flour for the bread flour in a pinch, but the finished pastries may be less flaky. You can also use whole wheat flour instead of rye, or all-purpose flour in place of both flours.
-Don't feel the need to stop at chocolate – see the post above for more sweet and savory filling ideas (thinly sliced apples and sharp cheddar are a favorite)
-All ounce measurements here are by weight
Makes 12 medium-sized pains au chocolat
For the rye flour croissant dough:
1 1/4 cups (10 ounces / 285 grams) whole milk
1 1/2 tablespoons (1/3 ounce / 11 grams) active dry yeast (from 1 1/2 packets)
3/4 cup (3.5 ounces / 100 grams) rye flour, plus more for rolling the dough
2 cups (10 ounces / 285 grams) bread flour, more as needed
1/4 cup (2 ounces / 55 grams) organic cane sugar
1 1/4 teaspoons fine sea salt
2 tablespoons (1 ounce / 30 grams) unsalted butter, cut into small chunks and softened slightly
3 sticks (1.5 cups / 340 grams) unsalted butter, cut into cubes and kept cold
For the pains au chocolat:
8 ounces (225 grams) bittersweet chocolate (60-70% cacao mass), broken into chunks or chopped coarsely
1 egg, beaten until foamy
Prepare the detrempe:
Heat the milk over a low flame until it is just warm to the touch (110 - 120ºF), and place in the bowl of a stand mixer fitted with the dough hook. Sprinkle the yeast over the milk and let stand 10 minutes. Add the 3/4 cup rye flour, 2 cups of the bread flour, and the sugar and salt to the bowl. Mix the dough on medium-low speed for 7 minutes, adding more bread flour by the tablespoon within the first 2 minutes until the dough comes away from the sides of the bowl but still feels slightly sticky to the touch. Add the softened butter a little at a time and mix until completely incorporated. Scrape the dough into a medium-sized bowl, cover tightly, and chill for 1 hour. This dough is called the detrempe. (No need to wash the mixer just yet.)
Prepare the butter block:
Meanwhile, place the 3 sticks of cold butter cubes in the bowl of the stand mixer and beat with the paddle attachment on medium-high speed until the butter is smooth, but still cool. Scrape the butter onto a piece of plastic wrap and shape it into a fairly thin 6" square. Chill the butter block 30 minutes.
Laminate the dough:
Scrape the chilled detrempe onto a surface dusted lightly with rye flour and shape it into a square. Use the blades of your hands to press a diamond shape into the center of the detrempe leaving 4 triangular wings. Roll out the wings into flaps and flatten the center diamond slightly. Place the butter square atop the diamond, and fold the flaps up over the butter to enclose it.
Gently begin rolling the dough into a large rectangle, dusting the rolling pin and surface with just enough rye flour to keep the dough from sticking, and brushing off the excess flour with a pastry brush. When the dough is thin enough that you can see the butter through the dough (but not so thin that it breaks and exposes the butter), fold the rectangle in thirds, like folding a letter. Starting with a short end, roll the dough into a loose spiral. Wrap the dough and chill 1 hour to relax the dough and firm up the butter. Repeat the rolling and folding process once more. Wrap the dough and chill at least 1 hour and up to 1 day.
Shape the pastries:
Roll the dough out into a 12x18" rectangle, dusting the surface with rye flour as needed and sweeping away the excess with a pastry brush. Trim away the outer inch or so of dough to form an even rectangle. (The scraps can be tied into loose knots, brushed with egg wash, dusted with cinnamon sugar and baked.) Use a pizza wheel or sharp chef's knife to cut the dough in half the long way, then cut each half crosswise into six smaller rectangles. Place about 3/4 ounce of chocolate down the center of each rectangle, the short way, and fold up each end so that the edges overlap loosely. Repeat with the remaining rectangles. Place the pastries seam side-down on two rimmed baking sheets lined with parchment paper (for easy clean-up).
Slip the whole baking sheet into a large, clean, plastic trash bag, inflate the bag so that it isn't touching the croissants, and secure it shut with a clothespin. (Alternately, you can cover the croissants loosely with plastic wrap sprayed with non-stick spray.) Let the pastries rise in a warm-ish spot until they're puffy, 1 - 1 1/2 hours; they won't double in bulk. If you poke one gently, it's ready to bake if the depression left by your finger doesn't bounce back.
Meanwhile, position racks in the upper and lower thirds of the oven and preheat to 400ºF.
Bake the pains au chocolat:
Unwrap the pastries and brush them with the beaten egg. Bake the pastries until deep golden brown, 18-22 minutes, rotating the pans once toward the end of the baking time. Let the pastries cool for at least 10 minutes. Pains au chocolat are best when warm, when the chocolate is still soft, but extras will keep at room temperature for up to a few days. Rewarm in an oven or toaster oven for yummiest results. Baked pastries can also be frozen and "refreshed" in a hot oven when ready to eat.


tea-in-tangiers says
would love to try a rye flour pain au chocolat but not sure I am ready to attempt to bake it myself!
Alanna says
You can do it!!! :)
Kezia says
A love croissants and pains au chocolat but I've never made them before! These look totally worth the effort though. I've actually just baked with rye for the first time so I have a bag of rye flour in the cupboard - it must be fate;)
Alanna says
Oh, how perfect! They are such fun to make, I highly recommend it! What did you make with the rye flour? (Ps. Your grapefruit olive oil cake looks SO GOOD!)
Kezia says
I only just saw your reply, sorry! I'm glad you like the look of my cake:) I made a pear, rye and spice cake, which was super delicious!
Alanna says
Ooooohhhhh I want that cake, too! :)
Katie | Healthy Seasonal Recipes says
How I wish I could have been there with you three. That sounds like the perfect way to spend the afternoon. I love this post Alanna. It is full of awesome tips, and the photos are spectacular.
Alanna says
I wish you had been there, too, Katie! The fresh croissants, tea, and company were pretty sublime. Thanks for reading, and for the sweet note. :)
Katrina @ Warm Vanilla Sugar says
You straight up nailed this recipe!! These croissants look perfect!
Alanna says
Aw, thanks, Katrina! :)
Katherine says
Pain au chocolat. What isn't to love about dessert for breakfast with coffee?
I am glad you mentioned freezing them. What do you think the time frame would be from frozen to defrosted and proofed? Could I pull them out the night before and bake for breakfast - say 8 hours?
And thanks for all the other filling options. Definitely will try almond. Herbs would be great - what a wonderful side to a nice breakfast egg dish - an alternative to biscuits.
Alanna says
YES dessert for breakfast! I think that time frame sounds about right. Bakeries I worked in used to defrost frozen pastries in the fridge overnight, then pull them out and proof them in the morning, but it might be ok to leave them out overnight to proof, especially if your kitchen is cool at night. I just wouldn't want them to overproof after all that hard work. Please let me know if you experiment with this! And herbed croissants with eggs? I'll be right over!
Vicki says
Beautiful. They look scrumptious.
Alanna says
Thank you, Vicki. :)
dana says
Heavens to betsy there are gorgeous! I'm so impressed with your skills! I want to come be beside you in your kitchen, please please pleaseeeeseee!?
Alanna says
Aw, and YES PLEASE!!! :D Thanks for the sweet words, Dana!
Elisa says
WHOA!!! Amazing. Top of to do list!
Alanna says
Yay! Thanks, Elisa. Loving your blog!
london bakes says
Such a useful tutorial! Definitely bookmarking this for when I finally get up enough courage to try croissants...love the idea of adding a little rye flour to the dough as well for that bit more flavour and texture.
Alanna says
Thanks, Kathryn! They are such a fun project - I hope you give 'em a go. :)
Q Miceli says
How synchronistic! I was thinking on Friday how much I would like to make and eat some pain au chocolat.
Alanna says
Do it! :)
Erika says
Wow..just wow.. this is amazing.. makes me want to gather up the nerve to partake on my own croissant baking journey. :)
Alanna says
Aw, thanks, Erika. I highly recommend it! :)
Sarah | The Sugar Hit says
These look so perfect. I love rye and chocolate together. Of course rye bread = health food, too. So I guess I'll take a hundred? Thanks.
Alanna says
Ha! Totally. I'll take a hundred, too. Thanks for the sweet note, Sarah. :)
caity. says
Must make these immediately. Thanks as well for checking out amourfoud.blogspot.com and your sweet note about my rye scones! It seems rye is the new whole-wheat and I am happy about that.
Not sure if you've made the chocolate rye cookies from the Tartine cookbook but they are superb! (I may have already made them..Twice.)
Alanna says
Thanks for the sweet note, Caity! I'm loving your site. Those chocolate rye cookies do look amazing - I'll have to try them asap. :)
Cheri Savory Spoon says
Wow! These look amazing. They sure look like a lot of work. But well worth it from the looks of these beauties. Yum!
Alanna says
Thanks, Cheri! They're definitely a project, but most of the time is inactive, and I agree that they're worth the effort. :)
Abbie says
Oh my gosh these look INCREDIBLE. I love the step-by-step photos! So helpful for making pastry.
Pinning this!
Alanna says
Thanks, Abbie! :D
Hovkonditorn says
Beautiful!
Alanna says
Thanks!
Cate @ Chez CateyLou says
Wow - you are a croissant master! These are gorgeous! I love pain au chocolat so much, but I am afraid to try to make it! Maybe someday...
Alanna says
Aw, shucks! Thanks for the sweet note, Cate. I hope you give them a go someday - they're totally doable. :)
Ileana says
These look perfect! I love the addition of rye flour.
Alanna says
Thanks, Ileana. :)
Monet says
Can I please pay you to come to Colorado to teach me how to make such beautiful croissants? The use of rye flour is brilliant. I've recently been enjoying a cranberry walnut bread. It's surprising how well rye flour goes with sweeter flavors. Thank you for sharing. Pinning again and again!
Alanna says
Shoot, I'll come make croissants with you in CO anytime, Monet! I love the idea of rye in cranberry walnut bread! Will you be posting the recipe? Crossing my fingers. Thanks for all the sweet words, dear friend.
Danguole says
Oh my, this is all kinds of inspirational. I adore rye, and chocolate, and croissants... And your photography is guh-guh-gooorgeous.
Alanna says
What a sweet note - thanks, Danguole!! I want to make every single recipe on your site. Back atcha about the gorgeous food photography. :)
Nick Dobson says
Thank you very much for this thorough walk-through. I made the detrempe 2 days ago, laminated yesterday, & baked the pains-au-chocolat this morning. They're delicious, naturally, but not as good as they could be. I had 2 problems: 1) the butter kept piercing the surface of the dough as I rolled it out, & B) I couldn't get the dough as thin as you do on the last roll out. I felt like the dough needed to be relatively warm in order to relax, but the butter needed to be cooler. Do you have any tips for a beginner to get the dough thinner?
Thanks again!
Nick D.
Alanna says
Hi Nick! Thank you for giving this recipe a go - that's awesome! I'm sorry the dough was fighting with you. My best guess is that perhaps the detrempe got too much flour worked in. This could make the dough stiff and difficult to work with. You might try leaving it a bit stickier next time? That should make is more malleable. I would guess that the butter piercing through the dough meant that the dough and butter were too cold. (And also points to the dough being too stiff.) This is easily remedied by letting the dough sit at room temperature for 5-15 minutes to allow the butter to soften up. Also, if the dough is springing back as you're trying to roll it out, it usually means that the glutens are getting overworked. Letting the dough rest for 5-15 minutes should help that, too (in the fridge if the butter in the dough is getting too soft). I hope that helps! Please keep me posted if you make it again, and feel free to post photos on my Facebook page if you're so inclined! That might help me problem solve more accurately. :) Ps. Your kitty is adorable.
Nick Dobson says
Thanks, Alanna! I'll try again.
There was sooooo much melted butter in the pans at the end that it made me wonder what would happen if I cut the amount of butter by, say, 1/3. Would that just reduce the number of pockets & make the pains less airy?
Alanna says
You're welcome, Nick! So the first time I made this recipe, my detrempe was nice and smooth, and there was little to no butter leakage. For the second batch, which I photographed here, the dough wasn't quite as smooth (I think because I kneaded it for only 5 minutes rather than the full 7) and there was a bit more butter leakage when I baked the pains. Also, I was impatient and rolled out the dough the final time despite some butter cracking below the surface of the dough. So I believe that when all is well with the detrempe and butter temperature, this should be a good amount of butter. I'm not sure scientifically what's going on, but I think gluten formation may have something to do with it. I've been doing a bit of research, and some other sources say that underproofing the croissants can lead to butter leakage, as can a hot kitchen. Here's a Q&A on The Fresh Loaf that discusses butter leakage: http://www.thefreshloaf.com/node/23376/three-croissant-questions, and a thread on Food52: http://food52.com/hotline/21706-croissants-leaking-butter. All that being said, if you do want to take down the butter, I would start with 2 1/2 sticks. You could also try beating 2 T bread flour into the butter block (as per the original recipe). Whew! Ok, let me know how it goes. :)
Nick Dobson says
I'm eating 1 of my pains as I type, so clearly it didn't go too horribly wrong. I don't think that my kitchen was too hot--it was still slightly polar vortex-ish here last week--so I probably under-proofed. Thanks for the link. Til I try again,
Nick D.
Alanna says
Glad to hear it wasn't a total wash. Stay warm. :)
cynthia | two red bowls says
These are CRAZY beautiful, Alanna. I love that they're made with rye flour! And obsessed with these process photos. I just want to live in the serenity of these pictures. Thanks for sharing this :)
Alanna says
Aw!!! Thanks, Cynthia - that happens to be *exactly* how I feel about your phtotos! Thanks for the super sweet note - it has made my day.
Grandbabycakes says
OMG these are blowing my mind!!!!! They are absolutely perfect! I so want to learn how to make these!
Alanna says
Aw! Thanks, girl! They are so much fun. Do it! (But not until you're well again!)
Erika K says
Omg!!!! So I was just casually browsing through all of your buttery dough recipes (you've got me SO intrigued with your gluten-free pie dough) when I came across this post...and Craig Lee is my uncle!!!!! What a crazy coincidence! I actually just posted an interview with him about his latest cookbook on my blog! This sounds like so much fun and those croissants look AMAZING. Someday I will go to culinary school to learn how to make the perfect pastry...except probably not because I would gain about 89374598 pounds. (How did you survive??) In any case, this was such a fun, beautiful post! You make making croissants look so tantalizingly doable :)
Alanna says
No way!!! That is so cool! Craig is such a lovely person as well as an extremely talented and knowledgeable photographer. I found the interview on your beautiful site (loving it!!!) and am looking forward to reading it! I know him through my photojournalist friend Shelley Eades who used to work with him at the Chronicle.
I see you're in Houston, but please let's meet up if and when you come back to the Bay Area!
Thanks for the really sweet note - it has made my day!
Ps. I totally did gain 89374598 pounds in pastry school :P
Erika K says
Oh how funny. I love it!! And I would love to meet up someday!! I come back periodically since my family is still in the Bay Area and I might possibly be there late July/early August for our annual camping trip! Anyhoo, I'll definitely let you know because that would be so much fun! :)
Alanna says
Hooray for summer camping trips! I may be on one at the same time, but hopefully we can find a time to grab a flaky croissant somewhere in SF. :)!!
Erika K says
YES!! :)
flower says
I see that you added cheddar on top as well.... Something I applaud! I cook my grilled cheezes twice adding cheese to both sides so that I can enjoy crispy cheese... basically I live for crispy cheese! Just got my organic rye flour in the mail time to make these yay!! Thank you. These may just end up on our food truck :) Seriously though crispy cheese is life!
Alanna says
Oh, that would be so cool! If they do, please snap a shot and send it to me, or tag me on instagram (the_bojon_gourmet). And please come back and let me know how they turn out. I completely agree - crispy cheese is life. :)
Chris says
It's day 2 just laminated the dough 1st pass. No I am not a chef or even a cook lol and I am a man so I have that working against me also......but I love France and everything that goes with it so this is my first ever attempt at any kind of baking ....guess I will leave my wd-40 in the garage no use for it here. I hope the next time I reply I can sing the praises of this recipe it looks perfect and I hope to do it justice.
Chris says
Just pulled them out of the oven......snapped a few pictures got a thumbs up from my wife .....thanks for the recipe!!
Alanna says
Yay! I'm so glad they turned out. And I want to see pics. Bon appetit!
Jen Pita says
hi Alana, thanks for this..I am wondering do you still call hem Pain Au Chocolat even if the fillings are chocolate? like if you fill them with savories! thanks a lot..lookin forward for your reply.
Alanna says
Hmmm, that's a good question!
Simon Hoffmann says
Hey Alanna! I'm making these Friday evening for Sunday brunch, what are the best parts to rest the dough for a long time? The detrempe? After I've wrapped the block? After I've made the individual croissants? Ie I can't give each stage a day like your teacher did, what is the best stage to focus on? Thanks!
Alanna says
Aw, so fun! I would say after the dough has been laminated would be the best time to rest the dough, but really anything you do is fine! I've made them all in one day before and they still turn out delicious. Please come back and let me know how it goes!
Simon Hoffmann says
Complete! Very similar results to nicks comments above, lots of butter leakage which drenched and crisped the bottom a bit oddly. They got good feedback though and the rye fermented taste was great. When you talk about butter cracking beneath the dough do you mean cracking the pastry or just unevenly distributed butter portions? My dough didn't seem to crack but could see some of the butter under the dough surface which wasn't quite evenly distributed, perhaps should have let the butter soften a bit more??? Also my oven wasn't quite hot enough I think which made some of them a bit more bread like than pastry like depending on where in the oven they were... bottom line not unhappy for a first attempt!
Sharon says
Hi All, I know this is an old post, but I just found it! DYING for gf croissants!!! What gf flour should I use in addition to the rye flour? Every gf flour is different. Has anyone made these gf?
Alanna says
Hi Sharon! Oh man, I wish I knew - I have yet to brave GF croissants. Here's one made with Pamela's bread mix that looks good.
Sharon says
I got so excited when this recipe came up under gluten-free only to realize rye flour is NOT gf and Lea's recipe does not come up when you click on the link. VERY MISLEADING!
Alanna says
Hi Sharon,
In what way did this "come up" under gluten-free? I certainly didn't label it as such. And I'm also sad that my friend Lea stopped maintaining her blog. Best of luck finding a good GF croissant recipe though!
Mika says
Hey Alanna! I noticed that you said to repeat step four once. I want to make the best croissants possible so will allow time for the longest chilling. Since there are two turns to laminate the pastry, do you chill the dough twice (once for an hour (the first time and another for two days, the second time) for a total of two days plus one hour or do you chill the dough twice for two days for a total of four days? I’m a little confusing sorry 😐 Anyway I hope you can answer my question, thanks in advance!
Alanna says
Hi Mika! Sorry for the confusion. So first, you roll out the dough, fold it in thirds, roll it into a spiral, and chill for one hour. Then you roll out the dough again, fold in thirds, roll into a spiral. At that point, chill it for at least an hour and up to 1 day. :) Let me know how it goes!
Mika says
Okay, thanks again! Confusion has been cleared up and I'm definitely going to try these ASAP! I forgot to ask this earlier: Do you think this would work with almond milk? Dairy allergy here :( Once again, thanks in advance!
Rai says
Hi! I want to try this recipe but do you think it would work if I used all rye flour? Or substitute bread flour for spelt or kamut flour?
Alanna says
Hi Rai, it's quite tricky to make croissants with 100% whole grain flour because they often turn out dense, heavy, and greasy. I'd recommend trying it once as written, then swapping in more whole grain flour as you continue to test out the recipe until you get a result that you like!
Chun says
Wow they look lovely! And so different from what supermarkets sell in bulk, hoping to try this recipe when I go back to school~ It always makes me so happy when I find out new and interesting ways to cook & bake!
Alanna says
Aw thank you! Let me know if you give them a try. :)
Julie Smith says
I know this is an older recipe, but I'd still love to try it! By "position racks in the upper and lower thirds of the oven," what do you mean? Thank you so much!
Alanna says
Thanks for the question! You'll need to bake on two racks in the oven - one above center and one below center. Please let me know how they turn out!
Antonia Sattler says
Can I make this paleo? Also leave the sugar out?
Alanna says
Hm, paleo croissants would be pretty challenging to develop! You might be better off starting with a recipe that someone else has already worked on. Let me know if you find anything promising!